• There were many reasons for the change of the site software, the biggest was security. The age of the old software also meant no server updates for certain programs. There are many benefits to the new software, one of the biggest is the mobile functionality. Ill fix up some stuff in the coming days, we'll also try to get some of the old addons back or the data imported back into the site like the garage. To create a thread or to reply with a post is basically the same as it was in the prior software. The default style of the site is light colored, but i temporarily added a darker colored style, to change you can find a link at the bottom of the site.

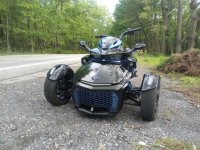
What did you do to your Spyder today?

The nice thing about this set of lights is that it has other colors you can use. You can set it to pink, purple, white, green, yellow, or any of the other colors it can show.

I'm quite sure if I went around flashing police colors even here in Texas, they might find that a bit ticketable. Lol

Although it does look nice on my bike, I think I'll save those particular colors for parking lot displays.
 
Last edited by a moderator:
After picking up my 2024 Spyder RTL on May 8, I've been doing things bit by bit.
- Started with a 5 foot wire to power my Warm 'n Safe heated liner. Ran it to just above the gas cap. Could probably use it as it, but I attach an extension when using it to give me plenty of length to move around in the seat.

From Slingmods...
- 12V Cell Phone/GPS Docking Station with Dual USB Charge Ports for the Can-Am Spyder RT (2020+) - I got the A model with the upper tab on which I mounted a Zumo 396 LMT. I'll add a RAM ball for the lower tab which will be used for other things as the need arises.
- The Plug N' Play 12V Accessory Power Harness for the Can-Am Spyder RT (2020+) - daisy chained to the adapter for the docking station, made it easy to wire the Zumo using the Wago connectors.
- EvolutionR Series Plug N' Play LED Auxiliary Running Light Bar for the Can-Am Spyder RT (2020+) - this is the one for the space in the lower front. Purchased primarily to help oncoming drivers see me.
- Plug N' Play Brake Light Flasher/Modulator Kit for the Can-Am Spyder F3T / F3L (All Years) & RT Models (2020+) - yes, it is plug n' play once you get to where it goes, but that's a bunch of screws and parts to remove to get to there. Have to mention, Slingmods videos are very helpful! Though there are some differences on the 2024. Everything is Torx now and there are a couple more to remove from the side cases that apparently aren't there on earlier models. Also, there is one screw on the removable panel on top of the side cases that has a washer. Since you're not expecting that (none of the others have a washer), it is easy to drop.
- Show Chrome Plastic Key Cover with Key Ring Hole for the Can-Am Spyder Double Black 41-182BK. I agree with Chris the Spyder Minimalist, the included wire loop is too long if you want to put other keys on it. They will hang down on the console and could cause some scratching. But the covers themselves are a great addition to the key so I can use a ring with it.
- Full set of luggage. I'm not sure I'm going to be able to use it all. I think I want the trunk for my helmet, though I might experiment with putting it in the frunk. It (Shoei Neotec 2) doesn't fit in the right-hand side case.
- Push Pin Removal Tool for the Polaris Slingshot, Can-Am Spyder, & Ryker - I like this better than the push pin pliers I bought from Harbor Freight.

From Lamonster
- KOTT Grilles - not sure I got the upper inside block in the correct place. But they are in solidly and look good. As well as being practical.
--- Needed a buy a right-angle drill bit attachment to get the KOTTs installed. Having the right tool sure makes a difference. Grabbed the one by Jamiikury from Amazon.
- Missing Belt Guard - OK, haven't done this one yet. Maybe sometime next week.

From Can-Am
- Adjustable wind deflectors - not yet sure if these really make a difference. I'll know better after I get out on a 90 degree day. I was wishing for more airflow on my first ride in those temps. Hoping these will provide that.
--- Had to get one of these to get those installed. Maybe there was a way to do it with a regular driver, but I couldn't see it. Plus, I'm sure I'll find lots of things to use this for: Amazon - MULWARK 20pc 1/4 Ultra Low-Profile Mini Ratchet Wrench Close Quarters Screwdriver Set with High Torque - Right Angle EDC Tool with 90 Degree Mini Offset Reversible Drive Handle & Multi Hex Bits Set. Fortunately I had a T30 bit from a different set, else you'd need to get one of those too.

- Silver mirror covers - I wasn't willing to cough up the extra $1500 for the Platine version, but really wanted mirror covers that matched the silver on the rest of the bike so go them separately. I think that A. they look much better and B. they will provide a little bit more visibility. Note that I also needed to buy 4 of the body panel clips since the ones on the existing covers appear to be stuck on with glue.

IMG_0428.jpg
 
Last edited by a moderator:
Went out for a short ride after switching to summer mode, removed the windshield and put the gauge spoiler on.

The crawler is also sporting a new nose piercing. I was reading that you should never ride faster than your guardian angel and it should be low to the ground.

I did the piercing and the wife did the honors of hanging the guardian angel bell as she is the one that gave it to me.

IMG_20240516_171604842.jpg IMG_20240516_171504231.jpg
 
Had a headlight out and had a replacement in the garage waiting for the next (this one) to fail. I thought that LEDs were supposed to last much longer than incandescent bulbs? Had a bit of difficulty with one of the headlight mounting bolts (the bottom one that is buried). All better now...........
 
Last edited by a moderator:
Had a headlight out and had a replacement in the garage waiting for the next (this one) to fail. I thought that LEDs were supposed to last much longer than incandescent bulbs? Had a bit of difficulty with one of the headlight mounting bolts (the bottom one that is buried). All better now...........

Interesting, yes, quality LED headlights should last a long time.
Some of the concerns though are heat, generated from the LED chip to generate actual light.

Old school halogen bulbs do run hot. However as everyone knows, that heat from the halogen is on account of passing electrical current thru a fine wire, until it glows to produce actual light.

LED though is more susceptible to decreasing output as the diodes operate, getting hot without proper cooling.

Early, and possibly still today, LED headlights used a stacked pile of braided fine wire electrical braid. The intention being, the braids would extract the heat, and keep the actual LED cool enough to remain efficient, bright, all while having longevity.

These days, it is more common to see a finned heatsink. The heat sink is expected to have a free flow of cool air moving across the cooling fins. Placing a finned type LED inside a closed cover headlight assembly can result with the LED running hot, decreasing output, and shortening life.

Many high output LED headlights utilize a small brushless fan with one moving part, spinning on ball bearings. Essentially the same, but smaller size, as we have all used in our computers and laptops. Those fans, in computer survive a dusty life, running for tens of thousands, if not more hours without complaining or failing.

The fan cooled LED headlights, force cooling air over critical LED components, keeping them cool, efficient, and long lasting. To clarify further, inside the headlight housing, the air circulates, and is able to utilize the headlights cool plastic shell to dissipate heat. Folks often state they do not want fan cooled LEDs believing the fan is the weakest link. Honestly overheated LED electronics from lack of good cooling is the weak link.

Yes, for many, many years, our Spyder has run high quality, fan cooled LED headlights and driving lights without issues.

So Lew, just curious, what type cooling method is utilized by the LED that failed?
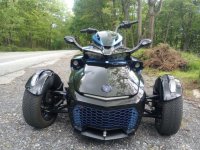
 
3 hour ride and lunch in the E.TN mountains on an absolutely beautiful day.
Changed out the Route 129 windscreen to the gauge spoiler prior to the ride. The wind felt good.
 
It stopped raining today after about two weeks. Me and the misses took a nice two hour ride thru the country side in Harford County, Maryland. Very nice day on the Sea to Sky. Then washed the bike when we got back.
 
Last edited:
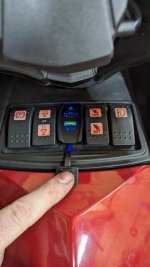
My previous owner ran a USB cable from the trunk all the way to the handlebars. I thought it was resourceful but ugly, and when I plugged in a USB adapter in the trunk I randomly got RFI out of the speakers when the USB cord was plugged into my phone. Probably a cheap USB adapter in the 12vdc plug, but hey a good excuse to delete the cable and add a "Rocker Style" USB port.

PXL_20240518_221458159.jpg
 
Added the Baja Ron Ultra sway bar. Gained a minimum of 5 mph in sharp turns. Would, without a doubt, allow a bit more speed in corners, if I wanted it.
 
Last edited by a moderator:
We had decided that we were going to use our phones for navigation, but found that the GPS antennas are failing in the phones. Rather than buy new phones sooner than we'd intended and then put them to use in this manner, we chose to get the Garmin.

I purchased the Zumo XT2 kit, along with a Motopumps GPS lock and the plug & play wiring harness from Lamonster last week. Did the installation today. I was counting on daisy chaining the harness with the front light kit harness that was installed a few months ago but it didn't work out, so I spliced into the previously installed harness and soldered the power & ground wires there. Everything powers up (and down) appropriately. Also used the Ram Mount Key Knob in place of the standard nut that comes with the Ram Mount.

Unpaired the helmet connections from the Spyder, which then freed up the GPS channels on the Cardo units and allowed them to pair with the Garmin.

While the body panels were off, I re-routed the brake repeater light through to the front and then up the cowling. The light bulb protrudes just enough to be seen from the seat. I'd made a much less professional looking install earlier, thinking that it would be removed relatively soon, but I like that I can keep an eye on the brake module performance and tune as needed.
 
Last edited:
Well about years ago My OEM antenna broke, so I decided to prevent that from happening again. I bought a manual retractable auto antenna, and last year that broke also (my fault, it was fully extended and hit the overhead garage door). So I bought a replacement made by Metra, and I am re-installing it into the right rear speaker pod. Yep, a bit of disassembly, but it is worth it. I live in rural Vermont and FM reception is spotty except for one station. With this antenna, I get about 12 stations .... Mike :thumbup:
 
Last edited by a moderator:
Well about years ago My OEM antenna broke, so I decided to prevent that from happening again. I bought a manual retractable auto antenna, and last year that broke also (my fault, it was fully extended and hit the overhead garage door). So I bought a replacement made by Metra, and I am re-installing it into the right rear speaker pod. Yep, a bit of disassembly, but it is worth it. I live in rural Vermont and FM reception is spotty except for one station. With this antenna, I get about 12 stations .... Mike :thumbup:

Which antenna from Metra did you buy? I replaced my OEM with a short version and the reception is horrible, and I live in an area where reception is not a problem.
 
Last edited by a moderator:
Which antenna from Metra did you buy? I replaced my OEM with a short version and the reception is horrible, and I live in an area where reception is not a problem.

It's model # 44 UL09 was $20.95 @ Amazon with free shipping. Crutchfield has it for less but no free shipping. The Metra is relatively short, so you only need about 8 inches of space below the mounting point, and the speaker box allows that. You would have to remove the OEM parts and get an OEM antenna plug from BRP (it's the same as the plug for the left side antenna hole). In order to do, this the metal antenna must go thru the rear edge of the ARM-REST which is on top of the speaker box. At least it does that on my 14 RT, I don't know what your Spyder is, so all this might not matter. Mike :thumbup: :thumbup:

Ps: I just brought the speaker pod with antenna out and tested it by plugging it into the radio connection. Well, I now get 12 FM stations instead of just one! :clap: For your issue, if you haven't already done so, clean off ALL the LokTite from the antenna and make sure the ground strap is connected properly and makes good contact. Many folks have found this makes a big difference in reception. ....Mike :thumbup:
 
Last edited by a moderator:
I took a beautiful ride from Piney Flats TN to Watuga, Elizabethton, to Hwy 107, Fairview, to hwy 173 Limestone, Unicoi, interstate 26, Johnson City, and back home. 77°F & Partly Cloudy.
Most of the ride is narrow 2 lane (typical E.TN) lots of curves, and wooded mountain scenery.
 
Last edited:
Back
Top