• There were many reasons for the change of the site software, the biggest was security. The age of the old software also meant no server updates for certain programs. There are many benefits to the new software, one of the biggest is the mobile functionality. Ill fix up some stuff in the coming days, we'll also try to get some of the old addons back or the data imported back into the site like the garage. To create a thread or to reply with a post is basically the same as it was in the prior software. The default style of the site is light colored, but i temporarily added a darker colored style, to change you can find a link at the bottom of the site.

What did you do to your Spyder today?

I rode up Hwy 421 today. Might be the last ride for a few days due to weather.
Got home and rested up. My knees, even though replaced with the VA's best, get sore and cranky after 3 hours of the twisties. I'm wondering now why I even bought saddlebags, lol.
Once home, I decided to take the front grill off, clean out the radiators, wipe down the fan motors and blade's, and clean the radiator compartment.
It'll pass inspection.
It's Beer 30 ;)
 
Took my Celtic Spyder out for a spin.
A little over 30 minutes at about 35 mph (~56 kph).
Enough to get the engine up to temp and to smell some good and bad things (I was riding with my helmet visor partially open).

I learned that someone ran over a skunk recently, so I got to smell that.
And two places where someone was burning some wood.

It was a good day.
 
Had to get a new battery. The old battery was over 3 years. Had the date it was changed written inside the frunk liner. One I took out was a NAPA AGM. Nobody local had one, so I went to Lake City and checked with a battery wholesaler over there. They did not have one on the shelf. I stopped by a battery retail store in the mall on the way back out of Lake City and they had an AGM from a different manufacturer... or more likely the same manufacturer with a different name printed on the battery.

The old battery was still starting the Spyder, but on mornings when it was 40 degrees or less, the starter was dragging noticeably. It wasn't gonna last much longer, so rather than get left some place and have to get a jump or call somebody to bring me a horse trailer, I went ahead and bought a new battery.

While I had the battery out, and the frunk lid took loose from the hinges, I added another red cable from the Plus terminal of the battery to a flat spot above the left A-frame arm. Added another black cable from an unused hole on the metal frame for the front suspension support to a place close to where the plus cable I had just added terminated above the left side A-frame support. That will allow jump starts or hooking up a battery maintainer without ever opening the frunk lid.

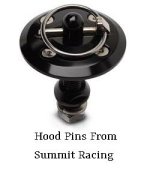
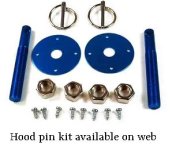
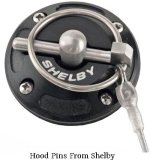
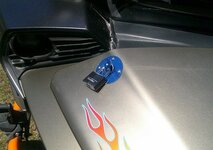
Also disconnected the cable from the frunk latch to the key that opens the frunk, and wired the latch back into the always unlatched position. Then I drilled the metal shelf area on either side at the rear corners of the frunk and added a set of the old hot rod type hood pins made for securing lift off hoods or flip up fiberglass front ends on vintage drag racing cars. Instead of using the hood latch pins that came with the hood pin kit, I bought a couple of identical keyed water-proof outdoor padlocks and put them in for hood hold down pins. The frunk is now easily lockable and unlockable. There is no excess strain on the ignition key and no cable to break, locking me out of my own frunk. A little graphite sprayed in the padlocks a couple times a year will keep them in good working condition for decades. The hood pin kit came with an anodized round plate to go on the top frunk surface and help protect it from scratches and scrapes. The padlocks I got also had rubberized coverings over the large metal tumbler cover, so it all looks good to me, and it doesn't matter to me what it might look like to some young engineer designing frunk releases that break after a couple dozen uses. If one or both the locks ever refuse to open, even after rinsing with diesel and re-lubing, there is a set of 18 inch bolt cutters hanging in my shop that are guaranteed to open the frunk and I won't need to take half of the front end apart to put it all back like it is now.

Examples of a few of the various hood pin kits available.

summit-pins.jpggeneric pin kit.jpgShelby Pins.jpgSPY0007.JPG
 
Last edited:
Picked up a 2019 Time Out XL1800 trailer today for great price. Local seller via FB Marketplace. It has several of the MFR upgrades & looks great. I towed it home with my truck and confirmed all the lights are working. It has the full size 8 pin wiring connector, but the seller included a small one as well. Gonna need to shop around a little to see what my options are for wiring the Spyder up to accommodate. I have intended to purchase the harness that's sold on Lamonster's site.
 
I'm definitely interested in seeing how it looks when you're done. Thank you.
I just installed an electronic isolation fuse block. It has keyed and unkeyed circuits, tail, turn, and brake light ports for accessory lights or your trailer.
This way, you do not have to cut into the bikes wiring, which could effect the canbus system on the bike. I would not cut into anything on the bike.
My GPS is hooked into the fuse block at present and later, accessory lights will be added.
I appreciate your recommendation, thank you. Can you share the mfr information for the fuse block you mentioned?
Over on Lamonsters shop they sell a plug & play harness that looks very appealing for straight forward simplicity, and I'm leaning heavily towards getting that. I'll need to determine which type of lighting is on the trailer in order to have an idea of the additional load on the circuit. I've already added quite a few LED kits, and quite frankly I haven't paid a bit of attention the overall load to this point.
 
Poppie65

I looked at the Lamonster harness you pointed out. It does tap into the Spyder's 12 Volt line for trailer harnesses and has an isolator so it would not add any load to your lighting circuits. It is a little easier and cheaper than what I did with the Bushtec isolator and my own harness taps (about $180 including a connector kit). But it is only a 4 pin output. I know you were interested in what I did. I will publish it this week in the DIY area.
 
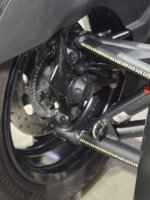
It's real nasty outside so I played shop rat and installed the Eyelets in the lower A-arms so I'll have a good place to hook straps on while trailering.
The only roadblock I encountered was the shock bolt head. They're real shallow and I had a bit of a time trying to tighten down while also keeping the eye in a vertical position. The socket had a tendency to slip off.
It's a nice addition.
20250212_164817.jpg
 
Last edited:
Poppie65

I looked at the Lamonster harness you pointed out. It does tap into the Spyder's 12 Volt line for trailer harnesses and has an isolator so it would not add any load to your lighting circuits. It is a little easier and cheaper than what I did with the Bushtec isolator and my own harness taps (about $180 including a connector kit). But it is only a 4 pin output. I know you were interested in what I did. I will publish it this week in the DIY area.
Thank you checking and for sharing this info, I feel a lot better about everything!
The Lamonster harness is also a 4 pin output, but I'll attach it to a 4 X 8 adapter that I'll secure to something on the rear. I haven't looked very closely at that step just yet.
 
Nothing, since it is still on a battery tender until April.

In the meantime, I am taking rides on my snowmobile; we sure have plenty of snow for riding the snowmobile. I also don't have much down time between the snowmobile season and the Spyder season here in Vermont.

Deanna
 
Installed footboard lights over the weekend. Got everything finished in time to tuck the Spyder back into the corner and get my truck back in the garage before the snowfall. Very pleased with the results.
Before I got finished with the lights, I made a misstep and rolled the hell out of my ankle. No broken bones but it's sprained pretty bad. Can't drive for a while and that's OK for now, and I'm glad it's not riding season while I'm on crutches and walking boot.

I'd love to share a picture of the lights, but I don't have the option to insert thumbnails, so I guess you'll need have to use your imagination.

Edit... I was able to resize the picture to make it small enough to meet the size limit for the forum, then it allowed me to insert it as a thumbnail.

View attachment 211465
Are those floorboard lights from BRP, or aftermarket? They look great!
 
Went for 2 short rides today. One to buy Flowers for the Misses, and the 2nd was my normal short (keep the battery charged and liquids circulating) ride. It was 46° F, windy & pcldy.
I'm getting to where I can ride a bit in cool wx.
 
I appreciate your recommendation, thank you. Can you share the mfr information for the fuse block you mentioned?
Over on Lamonsters shop they sell a plug & play harness that looks very appealing for straight forward simplicity, and I'm leaning heavily towards getting that. I'll need to determine which type of lighting is on the trailer in order to have an idea of the additional load on the circuit. I've already added quite a few LED kits, and quite frankly I haven't paid a bit of attention the overall load to this point.
I bought the Custom Chrome isolator fuse block, nice unit, good instructions, plug and play on my '22 RTL, no splicing into any wires.
Make sure you buy the unit for the year of your bike as the wiring and connectors have changed between the years from what I have read, at least the '24 and newer Spyders are different from the '20 to '23's
I can absolutely see the benefits of going your route. I look forward to reading your posts when you've wrapped your project up.
 
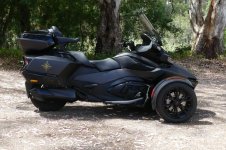
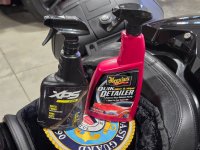
Today I "polished" my RTL. The hassle is that the only colour I could get was black, and mostly matte black at that! So I could not use my usual polish and had to find something to use on glossy and matte plastic, there is not even any chrome to polish.
I ended up with a combination of Mother's Naturally Black and Armorall. Now it is clean and mostly slick.
Does anyone have any suggestions?
24 1.jpg
 
I use the BRP stuff for the matte black, and I've been using the Meguiar's for 30 years. In the time I've had my Spyder, I've only used soap and water to wash it once.
20250214_083403.jpg
 
Thank you checking and for sharing this info, I feel a lot better about everything!
The Lamonster harness is also a 4 pin output, but I'll attach it to a 4 X 8 adapter that I'll secure to something on the rear. I haven't looked very closely at that step just yet.
It looks like I won't be able to use the adapter after all. The trailer has separate, dedicated lights for the turn signals, so unless I'm misreading the way the 4 pin plug is wired, I'm going to need to use a fuse block. Am I missing something?

20250214_133932.jpg
 
Back
Top