• There were many reasons for the change of the site software, the biggest was security. The age of the old software also meant no server updates for certain programs. There are many benefits to the new software, one of the biggest is the mobile functionality. Ill fix up some stuff in the coming days, we'll also try to get some of the old addons back or the data imported back into the site like the garage. To create a thread or to reply with a post is basically the same as it was in the prior software. The default style of the site is light colored, but i temporarily added a darker colored style, to change you can find a link at the bottom of the site.

Electronic cruise control install

Rickb, very clean set up. Did you use the ground and 12volts at the switch point? Is the cruise on all the time And the two buttons are start/ resume and coast? I really like that. So how does it work for you. Glad you did it. And glad I and my man could do it to show others.
 
Yes, I used the aux power connection for power and ground. I tapped into it and left the original connector in place. As this circuit is already protected by a 5A fuse, I did not use the fuse holder supplied by rostra.

aux power tap.jpg

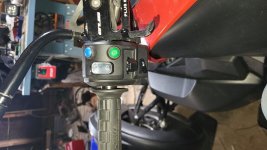
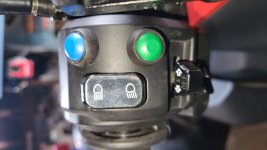
The button on top of the switch cluster is push - on, push - off for cruise on/off. The bottom two are momentary Resume/Accel above Set/Decel. I'm learning to find the buttons by feel with gloved hands. The first switches that I got were flush and could not be located by touch very well. These have a high head and are easier to locate.
 
Some additional information on my installation:

Throttle

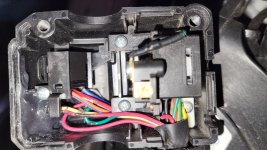
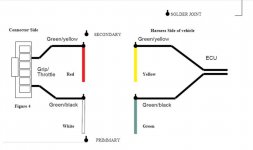
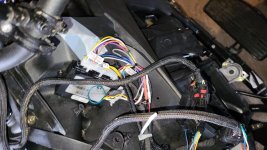
Under the left headlight cover are three black factory connectors: a 4-pin, 6-pin, and 12-pin (they may be in a different order, as I removed and replaced them from their mounts and I may not have replaced in the same order as original). The top connectors go to the handlebar controls, and the bottom halves to the wiring harness. The 6-pin connector is the throttle connection. The green with black stripe is the Throttle Sensor 1 and the green with yellow Throttle Sensor 2. Cut and connect these two at the wiring harness connector per the Rostra instructions. (if you get these wrong, the bike will enter Limp Home Mode as soon as you try engaging cruise.)
The gray connector is my added cruise control buttons - more on that next.
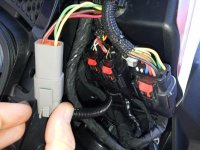
factory connectors.jpg

Cruise Control Switches

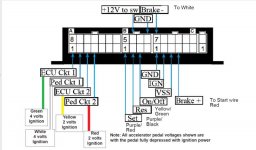
I ran 4 wires to the cruise control switches using the factory wire loom for the left switch pod. As stated, the On/Off switch is a push - on, push - off switch; the others momentary. Make the 4 wire connections to the cruise module per the Rostra wiring diagram. As explained, I added a connector so that the switch pod can be readily removed if necessary. As this added connector has no mounting point, I wrapped it in foam to keep it secure.
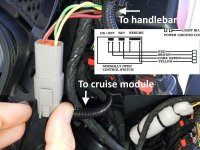
cruise buttons.jpg

Brake

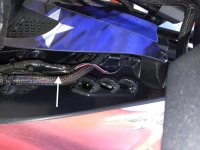
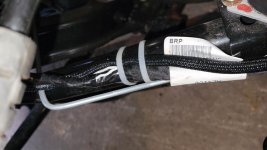
The brake connection can be made here, at this wire bundle that runs along the bottom of the frame to the rear of the bike. The Brake wire is white. There are two white wires; use either.
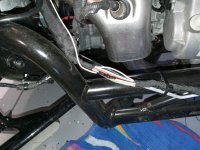
brake.jpg

I solder then use Liquid Tape on these splice connections, then rewrap the bundle with black electrical tape. I ran this connection, along with the speed sensor wires, to the cruise module using wire loom (which I strongly recommend).
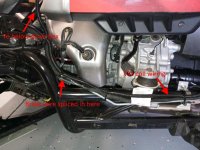
wire loom.jpg

The Brake + connection on the cruise module can be simply wired to switched 12V power (aux power). It is a required connection for the module to function.

Speed pickup

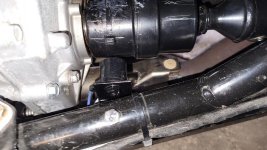
Rostra supplies a mounting bracket for the speed pickup coil, but I used a piece if 1/8" sheet aluminum with a slot cut in it and a cable clamp.
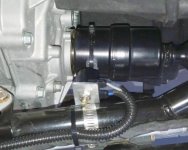
cruise4.jpg
 
I've put 3 of these on my Spyder. The 1st one was a vacuum unit. The next 2 were the electronic version. The vacuum unit was OK. But the electronic units were much improved. They lasted between 2 and 3 years each. Water got to every one of them. I am now looking at doing this a 4th time. they used to be about $100.00. They've gone up just a bit over the years.

Cruise is invaluable on long trips.
 
I've put 3 of these on my Spyder. The 1st one was a vacuum unit. The next 2 were the electronic version. The vacuum unit was OK. But the electronic units were much improved. They lasted between 2 and 3 years each. Water got to every one of them. I am now looking at doing this a 4th time. they used to be about $100.00. They've gone up just a bit over the years.

Let us know which unit keeps puking on ya so we know which one not to buy ... ;-}

Rykerrally, thanks for trailblazing this. I followed your lead, but did not use a supplied control. I used pushbutton switches on the switch pod for convenience and a factory look. The wires were snaked through the existing conduit, and a connector added to make assembly and any necessary disassembly easier.

Excellent job! Parts numbers and sources please! And make this a sticky !!
 
I've put 3 of these on my Spyder. The 1st one was a vacuum unit. The next 2 were the electronic version. The vacuum unit was OK. But the electronic units were much improved. They lasted between 2 and 3 years each. Water got to every one of them. I am now looking at doing this a 4th time. they used to be about $100.00. They've gone up just a bit over the years.

Cruise is invaluable on long trips.
The case on this drive-by-wire unit is not waterproof; it is intended to be mounted under a car dashboard. I did seal the connectors on the case with silicone sealer and sealed the openings at the back of the case, and wrapped it in plastic. I have been looking for a waterproof case, but finding one small enough to fit the space is proving difficult. One could use the glovebox I suppose.
 
Dickb, nice clean job. Good to see you completed it. I am guessing it is working well? So happy to see other people are profiting from my install.
 
Bajaron, I can understand the control gets wet. I really like what dickb did for his switches. Nice and clean and water proof.
 
Thanks. It is working well. We don't have huge hills here in central Florida, but it holds speed very well, maybe varying 1 mph for a few seconds up or down hill. The RPMs drop for a moment when activating cruise and relaxing the handgrip, but not enough to affect speed. I still have not used it a great deal, but it is definitely much better than a throttle lock.
 
The case on this drive-by-wire unit is not waterproof.

Couple coats of this will seal anything.

61wKgW7gC8L._AC_SS450_.jpg


It's an insulator, and peelable if necessary. Also holds up to heat. A bit of black tape first to seal any holes that might be hard to peel is probably a good idea.
 
Hi everyone, I have finished installing and test driving my Ryker Rally with the Rostra Electronic (drive by wire) cruise control. It is absolutely flawless. One push of the button increase or decrease it does it 1 mile an hour. Brake cancels it out just like in an automobile. I used the Rostra 250-1882, with the magnetic sensor and the control # 250-3472. This unit is used on specially built hot rods that have an open or visible drive shaft. No fooling with the vss wire on the bike. I bought my unit from The control store on line. they are awesome, and has a technician that really knows the unit, just don't say it is going on a bike, act like it is a hot rod. His name is Michael. So I have posted some photos of the install thanks to my man doing all the electrical. If you have any questions please don't hesitate to contact me. Good luck. So much better than the throttle lock.

View attachment 191304View attachment 191305View attachment 191305View attachment 191306View attachment 191307View attachment 191308

Which pedal interface did you choose during checkout of the universal kit?
 
There is no pedal interface for a motorcycle, as of course there is no accelerator pedal. You cut the two throttle sensor wires and wire directly per the Rostra instructions.
 
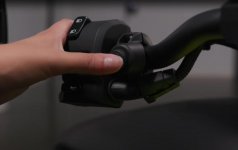
Can-Am should have put the cruise control switch where I did. My location is better ergonomically, as you do not need to reposition your hand to reach the switches, and there's one less thing to clutter up the handlebars. (With hand guards, is the switch even farther away?) Ironic that Can-Am issues this warning in cruise control instructions: "Always keep both hands on the handlebar while riding. Otherwise, this could cause a vehicle loss of control."

Also, the factory cruise control is a single button. You use it to turn cruise on and off, and to set the speed. There is no accel/decel capability, like every car that I have ever driven has. To increase speed with factory cruise, you use the throttle to set your new speed, then press the cruise button for at least 1 second. To decrease speed, you must first press the cruise button to deactivate cruise (or tap the brake), set your new lower speed, then reactivate with another 1-second button press. (This from the 2022 Ryker Operator's Guide.) Perhaps not a big deal, but I do use accel/decel switches often myself. Press and hold to accel/decel to the desired speed, or press x times to change x mph.

An advantage is the factory cruise will disable if VSS is activated.
 

Attachments

  • CanAm cruise switch.jpg
    CanAm cruise switch.jpg
    16.5 KB · Views: 66
I followed your lead and installed the 250-1882 Universal Cruise for Drive by Wire kit on my 2019 Ryker. I wired the kit up and it works perfectly. I used a couple of variations. I didn’t install an on/off switch. I wired it to be always on and installed two momentary switches for the set and resume. I didn’t have enough room for the nut on the resume switch so I epoxy glued the switch.
20220403_132511.jpg20220403_132458.jpg20220402_124636.jpg
 
Last edited:
Screenshot 2022-04-02 111948.jpgScreenshot 2022-04-02 112058.jpg20220402_124923.jpg

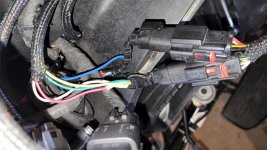
this is how i wired the throttle sensors. The blue wire is for the hot side of the brake switch. It is soldered to the red wire in the 4 wire connector. The red wire goes to the start button which is on the same circuit as the hot side of the brake switch.

20220402_124719.jpg20220402_124728.jpg20220402_124654.jpg
 
Last edited:
Back
Top