• There were many reasons for the change of the site software, the biggest was security. The age of the old software also meant no server updates for certain programs. There are many benefits to the new software, one of the biggest is the mobile functionality. Ill fix up some stuff in the coming days, we'll also try to get some of the old addons back or the data imported back into the site like the garage. To create a thread or to reply with a post is basically the same as it was in the prior software. The default style of the site is light colored, but i temporarily added a darker colored style, to change you can find a link at the bottom of the site.

DIY GPS mount and hookup with 12V outlet - video

No metal on the right either. When you remove the face plate all you see is another plastic panel holding the cluster. On each side is a plastic cup shape the guages sit in. The wire harnesses come through the back of those cups. If there is metal behind those it is way back and I don't see how it would hinder a RAM mount if you put it where the guages would be.

Bob

Man, you're gonna make me go out and pull my Ram mount off yet, aren't you! :bowdown: Just to prove to myself I'm not imaging things! :banghead: I'd swear it's metal, but I know one thing for sure, something is back there about 1/4" or less behind the bezel at the top of the hole and about 1/2" at the bottom, and it sure seemed like it was metal! The '11 and '13 parts diagrams look almost identical in that area.

Bezel looks like it comes out pretty easy with only 4 screws holding it, right? The Ram mount suction cup looks like a great way to go. I had no idea it was made like that.
OK, here are some pics of what I was referring to. It is plastic, not metal. My mistake. At the upper left part of the gage hole the plastic behind is right up next to the dash plastic. Hover your mouse over the pic for the identifications.

Gage hole interference 2.jpg Gage hole lower left.jpg Gage hole upper left.jpg Gage hole upper right.jpg
 
RAM Mount Question

As many that read here a lot might recall, there was a lot of GPS talk over the last month.
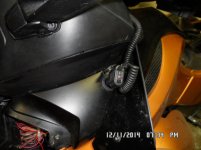
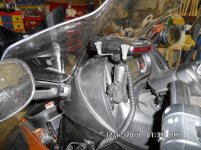
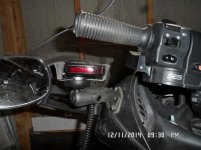
I also wanted a GPS but did not want to spend a fortune on it considering the limit amount I use a GPS. The BRP setup is just too expensive in my opinion considering the alternatives out there. I also dont want anything on my handle bars so I did it another way.
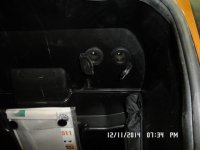
I bought a cheap used Garmin 775T ($80 on ebay) and finally got around to installing it and getting it all working.

I have to say this 775T GPS is awesome! Does more than a Zumo and will do anything a Zumo can do as far as a motorcycle GPS. It's just not water proof! But I am very happy with this setup.

Thanks to Waswinger for some tips.
Another thanks to Stevedfive for the idea :)

Anyway, here is another one of my videos showing how I did it.
ENJOY!

Bob

Bob,

Thanks for the great video and awesome idea. I believe I want to give this a try. I have a question... which specific RAM Mount did you use?

Ed
 
Last edited:
I was asked to post the pin out diagram for the GPS connector on the right side of the Spyder next to the right saddle bag.

Bob

attachment.php


GPS connector.jpg
 
Not to hijack Bob's thread but I installed 3 power plugs on my 2011 RS and thought I would add a few things that people might need to know. First the plug behind the frunk was there but apparently wired wrong because fuse 6 or 7 did nothing. I attempted to trace it out and finally gave up and "wired" it to suit my needs. I placed 2 of the plugs in the frunk, and my thinking is that whatever I have plugged in will be locked in the frunk when I park and leave the bike. I did place on plug on the "outside" of the bike. Being an idiot, I placed it in front of my deflector, which I had off at the time. So I guess it might get wet in the rain, but being an old fart, I don't plan on riding in the rain.:)

BTW, I bought this first Ram mount buying it at Car Toys, $50, then I find the same thing at Walmart for $35, free shipping to a store near you. As you can see by the pixs, my first item is a radar detector, as I haven't mastered staying within the speed limit yet. I guess the other will be the phone or GPS.

Check the first pix on the mount and do you see the immediate issue? Can't turn the steering wheel all the way to the right. So moved it.
 

Attachments

  • SAM_0638.jpg
    SAM_0638.jpg
    91 KB · Views: 221
  • SAM_0639.jpg
    SAM_0639.jpg
    48.3 KB · Views: 230
  • SAM_0640.jpg
    SAM_0640.jpg
    81 KB · Views: 227
  • SAM_0646.jpg
    SAM_0646.jpg
    58.2 KB · Views: 221
Finless, I know you said in the video that you didn't know the part number for those connectors but I am having a difficult time locating some, where did you source them from?
Thanks for the video, it helped me install my gps tonight.
 
Bob thank you for getting back to my thread. You were right about your video. For some reason I thought of Lamont as the one that come up with the install video. Sorry about that. Have a question for you. I have the Garmin 665 and have the BRP install on the handle bar center. Can I use the wiring harness that is from Garmin when I move the GPS to the gage port like you did. I plan on using the Gas gage port on the right. Seems to me that the wires would have a shorter distance to be rerouted. May be you can give me some insight on this. Bob
 
Since I do not have the stock spyder GPS cable I just do not know if it will reach. Can you pull the cable to that location?

Bob
 
I simply bought a new Garmin cable and left the original where it was. I zip tied the new one to the old one when rerouting. I found the only way to get the cabling off to was to cutting it as the parts don't fit thru the hole in the steering base. Way easier to just the a replacement form garmin or I believe GPScity was the cheapest.
 
Back
Top