• There were many reasons for the change of the site software, the biggest was security. The age of the old software also meant no server updates for certain programs. There are many benefits to the new software, one of the biggest is the mobile functionality. Ill fix up some stuff in the coming days, we'll also try to get some of the old addons back or the data imported back into the site like the garage. To create a thread or to reply with a post is basically the same as it was in the prior software. The default style of the site is light colored, but i temporarily added a darker colored style, to change you can find a link at the bottom of the site.

DIY GPS mount and hookup with 12V outlet - video

finless

New member
As many that read here a lot might recall, there was a lot of GPS talk over the last month.
I also wanted a GPS but did not want to spend a fortune on it considering the limit amount I use a GPS. The BRP setup is just too expensive in my opinion considering the alternatives out there. I also dont want anything on my handle bars so I did it another way.
I bought a cheap used Garmin 775T ($80 on ebay) and finally got around to installing it and getting it all working.

I have to say this 775T GPS is awesome! Does more than a Zumo and will do anything a Zumo can do as far as a motorcycle GPS. It's just not water proof! But I am very happy with this setup.

Thanks to Waswinger for some tips.
Another thanks to Stevedfive for the idea :)

Anyway, here is another one of my videos showing how I did it.
ENJOY!


Bob
 
Last edited:
That's a good move. I have had a handful of nuvis over the years on a number of bikes. Several have gotten wet and I've never once had one fail from water. And when you pick them up cheap you don't worry about them as much in the rain either....

Sent from my SCH-I545 using Tapatalk
 
As many that read here a lot might recall, there was a lot of GPS talk over the last month.
I also wanted a GPS but did not want to spend a fortune on it considering the limit amount I use a GPS. The BRP setup is just too expensive in my opinion considering the alternatives out there. I also dont want anything on my handle bars so I did it another way.
I bought a cheap used Garmin 775T ($80 on ebay) and finally got around to installing it and getting it all working.

I have to say this 775T GPS is awesome! Does more than a Zumo and will do anything a Zumo can do as far as a motorcycle GPS. It's just not water proof! But I am very happy with this setup.

Thanks to Wasswinger for some tips.
Another thanks to Stevedfive for the idea :)

Anyway, here is another one of my videos showing how I did it.
ENJOY!


Bob


Finless, his handle is "waswinger" not "wasswinger", sorry but i thought that was very funny. (maybe he was a swinger, maybe he is still a swinger, i don't know but he only admitted to being a winger in the past.) :lecturef_smilie::lecturef_smilie::lecturef_smilie: :roflblack::roflblack::roflblack:

One wrong letter and you are in a world of trouble. :roflblack::roflblack::roflblack:

Cruzr Joe

That's some funny stuff Joe.

Oooh wiiing.er.......where are you? :roflblack:
 
Sorry Waswinger for the extra S.....
I edited it but because Joe quoted me it now permanent :roflblack:


Bob
 
Bob, did you run into any interference with the metal behind the dash plastic? When I was looking at how to fasten my ram ball I had to work around the metal behind there.
 
Bob, did you run into any interference with the metal behind the dash plastic? When I was looking at how to fasten my ram ball I had to work around the metal behind there.

Metal? There is no metal where the analog gauge was. Just a hole and the wire harness. At least on my 2011.
In the video I think there are a few scenes showing what it looks like with the console fave plate removed.

Bob
 
Metal? There is no metal where the analog gauge was. Just a hole and the wire harness. At least on my 2011.
In the video I think there are a few scenes showing what it looks like with the console fave plate removed.

Bob
Best I can tell by looking at the parts diagram I think it might be the windshield motor support assembly. The right side is different from the left side looks like. Now that I think about it I don't recall seeing the same metal piece on the left side when I had the dash plug out.
 
Best I can tell by looking at the parts diagram I think it might be the windshield motor support assembly. The right side is different from the left side looks like. Now that I think about it I don't recall seeing the same metal piece on the left side when I had the dash plug out.

No metal on the right either. When you remove the face plate all you see is another plastic panel holding the cluster. On each side is a plastic cup shape the guages sit in. The wire harnesses come through the back of those cups. If there is metal behind those it is way back and I don't see how it would hinder a RAM mount if you put it where the guages would be.

Bob
Man, you're gonna make me go out and pull my Ram mount off yet, aren't you! :bowdown: Just to prove to myself I'm not imaging things! :banghead: I'd swear it's metal, but I know one thing for sure, something is back there about 1/4" or less behind the bezel at the top of the hole and about 1/2" at the bottom, and it sure seemed like it was metal! The '11 and '13 parts diagrams look almost identical in that area.

Bezel looks like it comes out pretty easy with only 4 screws holding it, right? The Ram mount suction cup looks like a great way to go. I had no idea it was made like that.

Yes 4 screws and out it comes.
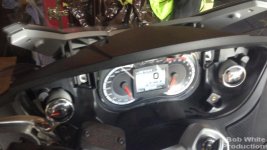
Now if your trying to put the RAM mount above where the gauges were, you will hit the second plastic panel as it is only maybe 1/4 inch behind the front panel in some areas e.g. you can see the plastic "bump" at the left gauges 11:00 position and the right gauges 1:00 position. Maybe you hit those?

Here is a frame from another video I shot a while back showing what it looks like with the panel removed. As you can see no metal.

attachment.php


dash.jpg


Bob
 
Last edited:
Hi Bob,

Many won't be honest with you but here goes. You need to find a teacher before you make another video. You start explaining where you put your mount showing a part that I had no idea what the heck the part was. There are many more improvements that can me made.

HOWEVER.... your idea is excellent and I now have decided to mount as you have. Thanks so much for the idea.


Joe

Not sure I understand? Part? Are you talking about the dash frame?

I do these for the fun of it. I don't have time to make some pro scripted production. They are what they are. But I will take any feedback you have to give please.

Bob
 
2014 wiring harness is different

What a great video. I'm new to Spyder world (got it almost 2 weeks ago) and Spyderlovers. I can't believe how much fabulous information is here.

i was a bit intimidated by all the plastic and lack of access but, after removing all of the right side in about an hour, the first time, I can now do it in 10 minutes. I was trying to install a GPS and used your video for a guide. I used a different mount, same idea, and hooked a female cig lighter dongle to fuel gage wiring, to accommodate Traffic. All wiring, including female cig lighter dongle, resides behind the analog gage hole. I did not install a 12v outlet on the speaker grill. I ran into problems when trying to locate the harness to hook up the audio wires. No matter how big a flashlight I used, no GPS harness from the radio. There was a dead ended audio wire tie wrapped to the side of the fuel tank (right side of spyder). Turns out this is the audio input for the GPS on a 2014 RT. It is covered in a weatherproof sheath so it may not be recognized, at first.

This little tid bit of info added to this great video should help the next person adding a GPS to a 2014 model RT.


Rick
 
Last edited:
Great info for the 2014 RT Rick! Having the first half of the GPS cable there already (you have to add this part on 2010-12) I am sure will help people and be easier!

Thanks for adding to the post.

Bob
 
2014 RT GPS Audio Connection

I guess I should have been clear that the audio connector secured to the right side of the gas tank is already terminated as a 3.5mm stereo male jack. A six foot male (GPS end) to female 3.5mm extender cable will do the trick.
 
Back
Top