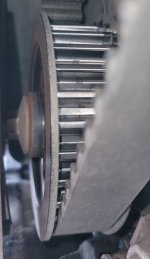
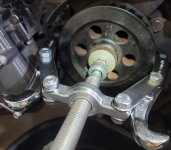
Out for a ride yesterday and SpyderDeb notice something not right on her 2018 F3-L. I rode it and noticed the “noise” at low speeds. Definitely on the drive side and close to the engine. Tried to view the drive sprocket and took a couple of photos, looking for the “red dust”. A little could be found but not bad; Photo 1.
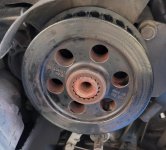
Put the bike in my shop and pulled the cover off from over the drive sprocket. Not a lot of dust but some. Removed the flange-head bolt and found the smoking gun; Photo 2. Loosened the drive belt and pulled from the rear sprocket, then the front. With the bolt removed and the belt off, the full movement of the sprocket on the spline shaft could be felt.
Tried to get the sprocket splines aligned with the drive shaft, put a gear puller on it, and it wouldn’t budge. As the puller was a Harbor Freight special, I was reluctant to put too much force on the bolt. But yet it rattled on the drive shaft.
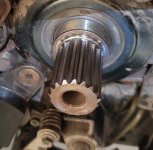
I recalled seeing a photo of the drive shaft end: there was a circumferential groove where the splines ran out into the shoulder, and the sprocket registers against the shoulder. Any wear on the splines would likely leave a ridge of unworn splines on that side of the sprocket. Simply pulling with any gear puller would need to shear the unworn ends of the splines if the splines were not aligned. I needed something to be able to force registration of the spline sets.
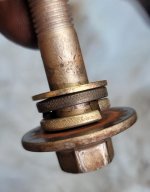
Added washers, a flat washer and two spring-type lock washers, to the bolt and screwed back into its hole; Photo 3. Note: the washer OD needs to be smaller than the minor diameter of the sprocket splines. Snugged the bolt up with a wrench to collapse the spring washers: now the bolt could be used as the base for gear puller. Played with and studied the sprocket movement on the shaft, noting the gaps visible at times between the spline sets; see Photo 4. Rationalized the wear would be the mating spline faces, so forcing the drive sprocket CCW on the shaft by holding the bolt head and moving the sprocket by hand, rotating slightly and pulling outward, until I could feel it “seat” and visually the gaps in the spline surfaces were gone. The washers, as spacers, would allow the sprocket to be pulled outward about ¼”; Photo 5, noting the center punch mark to register the point of the gear puller.
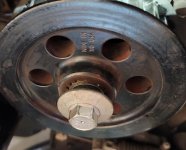
Attached the gear puller, centering the point on the screw on the head of the bolt; Photo 6. This time, after an initial, more modest resistance, the sprocket pulled easily until it reached the bolt head. Removed puller, removed bolt, reinstalled puller and finish removing from the shaft.
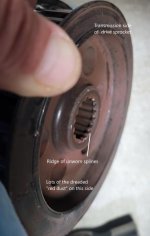
As suspected, the center part of the splines in the gear bore were worn with rings of untouched splines at both the inner and outer edges; Photo 7. In my case, the sprocket was not slipping on the shaft. Whether substantially worn or spinning on the drive shaft, one should take care to align the spline remnants to be able to pull the sprocket without shearing metal. Once removed from the drive shaft, one could see substantial red dust and metal particles on the transmission side of the sprocket; Photo 7.
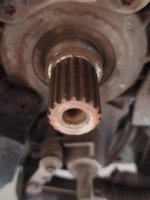
Cleaned up the shaft spline and shoulder using brake cleaner and a wire brush; Photo 8 – before, and Photo 9 - after. Ready for the new sprocket…which is on back order from BRP.
Put the bike in my shop and pulled the cover off from over the drive sprocket. Not a lot of dust but some. Removed the flange-head bolt and found the smoking gun; Photo 2. Loosened the drive belt and pulled from the rear sprocket, then the front. With the bolt removed and the belt off, the full movement of the sprocket on the spline shaft could be felt.
Tried to get the sprocket splines aligned with the drive shaft, put a gear puller on it, and it wouldn’t budge. As the puller was a Harbor Freight special, I was reluctant to put too much force on the bolt. But yet it rattled on the drive shaft.
I recalled seeing a photo of the drive shaft end: there was a circumferential groove where the splines ran out into the shoulder, and the sprocket registers against the shoulder. Any wear on the splines would likely leave a ridge of unworn splines on that side of the sprocket. Simply pulling with any gear puller would need to shear the unworn ends of the splines if the splines were not aligned. I needed something to be able to force registration of the spline sets.
Added washers, a flat washer and two spring-type lock washers, to the bolt and screwed back into its hole; Photo 3. Note: the washer OD needs to be smaller than the minor diameter of the sprocket splines. Snugged the bolt up with a wrench to collapse the spring washers: now the bolt could be used as the base for gear puller. Played with and studied the sprocket movement on the shaft, noting the gaps visible at times between the spline sets; see Photo 4. Rationalized the wear would be the mating spline faces, so forcing the drive sprocket CCW on the shaft by holding the bolt head and moving the sprocket by hand, rotating slightly and pulling outward, until I could feel it “seat” and visually the gaps in the spline surfaces were gone. The washers, as spacers, would allow the sprocket to be pulled outward about ¼”; Photo 5, noting the center punch mark to register the point of the gear puller.
Attached the gear puller, centering the point on the screw on the head of the bolt; Photo 6. This time, after an initial, more modest resistance, the sprocket pulled easily until it reached the bolt head. Removed puller, removed bolt, reinstalled puller and finish removing from the shaft.
As suspected, the center part of the splines in the gear bore were worn with rings of untouched splines at both the inner and outer edges; Photo 7. In my case, the sprocket was not slipping on the shaft. Whether substantially worn or spinning on the drive shaft, one should take care to align the spline remnants to be able to pull the sprocket without shearing metal. Once removed from the drive shaft, one could see substantial red dust and metal particles on the transmission side of the sprocket; Photo 7.
Cleaned up the shaft spline and shoulder using brake cleaner and a wire brush; Photo 8 – before, and Photo 9 - after. Ready for the new sprocket…which is on back order from BRP.
Attachments

Last edited: