-
There were many reasons for the change of the site software, the biggest was security. The age of the old software also meant no server updates for certain programs. There are many benefits to the new software, one of the biggest is the mobile functionality. Ill fix up some stuff in the coming days, we'll also try to get some of the old addons back or the data imported back into the site like the garage. To create a thread or to reply with a post is basically the same as it was in the prior software. The default style of the site is light colored, but i temporarily added a darker colored style, to change you can find a link at the bottom of the site.
You are using an out of date browser. It may not display this or other websites correctly.
You should upgrade or use an alternative browser.
You should upgrade or use an alternative browser.
Oversteer
- Thread starter swodo
- Start date
PrairieSpyder
New member
:agree: Also check your alignment.
metman
Member
BajaRon Sway Bar
BajaRon is too nice a guy to just come out and say it, but I will. The "suspension upgrade" he was probably talking about is one of his heavy duty sway (anti-sway) bars. It will make a big difference on any Spyder's handling.
Mike in KY
I can't find anything about front shock preload in the F3 manual. Can you help me out?
BajaRon is too nice a guy to just come out and say it, but I will. The "suspension upgrade" he was probably talking about is one of his heavy duty sway (anti-sway) bars. It will make a big difference on any Spyder's handling.
Mike in KY
ARtraveler
No longer with us - R.I.P. Dwayne
I posted this information in another thread. Sometimes, it can be a learning curve, over-control issue. It may or may not be helpful in your particular situation.
I have a 2014 RT-S model. No skittering over the highway for me.
I am guessing you were taken over by the famous "death grip." Tightly gripping the bars will put input into the steering that causes the skittering around which you encountered.
The advice above to read the do's and don'ts is very good and covers several issues to make your ride more enjoyable.
Most find that it takes about 500 miles to "unlearn" the two wheeled ways. My first :ani29: took about 1500 miles to get comfortable.
As basic information, I recommend the following.
See how little input your can apply to the bars. Pretend there are eggs between your hands and the bars. Do not break the eggs. (Yuk, messy :roflblack") . I use the push/pull method for input for turns. To avoid "g" forces on real turns, do not brake before the turn (not entering the turn to fast). You should be able to accelerate during the turn. Use the apex method for turns. Enter from the inside of the turn, then cross over to the outside. Keep it between the lines though. Plant the outside foot on the floorboard, and lean slightly into the turn. Your passenger should follow your lead. You can also grab the tank area with your knees. Once perfected, you can exceed posted curve speeds by about 20 mph +--should you choose to do so.
. I use the push/pull method for input for turns. To avoid "g" forces on real turns, do not brake before the turn (not entering the turn to fast). You should be able to accelerate during the turn. Use the apex method for turns. Enter from the inside of the turn, then cross over to the outside. Keep it between the lines though. Plant the outside foot on the floorboard, and lean slightly into the turn. Your passenger should follow your lead. You can also grab the tank area with your knees. Once perfected, you can exceed posted curve speeds by about 20 mph +--should you choose to do so.
I have a 2014 RT-S model. No skittering over the highway for me.
I am guessing you were taken over by the famous "death grip." Tightly gripping the bars will put input into the steering that causes the skittering around which you encountered.
The advice above to read the do's and don'ts is very good and covers several issues to make your ride more enjoyable.
Most find that it takes about 500 miles to "unlearn" the two wheeled ways. My first :ani29: took about 1500 miles to get comfortable.
As basic information, I recommend the following.
See how little input your can apply to the bars. Pretend there are eggs between your hands and the bars. Do not break the eggs. (Yuk, messy :roflblack
. I use the push/pull method for input for turns. To avoid "g" forces on real turns, do not brake before the turn (not entering the turn to fast). You should be able to accelerate during the turn. Use the apex method for turns. Enter from the inside of the turn, then cross over to the outside. Keep it between the lines though. Plant the outside foot on the floorboard, and lean slightly into the turn. Your passenger should follow your lead. You can also grab the tank area with your knees. Once perfected, you can exceed posted curve speeds by about 20 mph +--should you choose to do so.cmarsala
Member
BajaRon Swaybar
I installed the BajaRon swaybar and upgraded to the 2 up shock on my 2015 F3 and I have to say the handling is improved a 100%. The bike should of come with both of these upgrades from BRP before they hit the dealer. :doorag::yes:
BajaRon is too nice a guy to just come out and say it, but I will. The "suspension upgrade" he was probably talking about is one of his heavy duty sway (anti-sway) bars. It will make a big difference on any Spyder's handling.
Mike in KY
I installed the BajaRon swaybar and upgraded to the 2 up shock on my 2015 F3 and I have to say the handling is improved a 100%. The bike should of come with both of these upgrades from BRP before they hit the dealer. :doorag::yes:
Tazzel
New member
I had an RS then I traded it for an F3. For the RS I upgraded the front shocks to Elkas then I upgraded to BaJa Ron swaybar. But I felt very little improvement with the upgraded swaybar and when I purchased the F3 I decided to only do the swaybar since it is a cheaper upgrade. I felt that just adding the swaybar gave me the control in the tight turns that I was looking for in the F3. I will upgrade to the better BRP rear shock to avoid any potential damage to the frame.
I would all so suggest like the others to ride the F3 for awhile before doing any upgrades.
I would all so suggest like the others to ride the F3 for awhile before doing any upgrades.
In a tight turn my new F3 seems to oversteer. The outside suspension compresses and seems light and I then have to correct the turn. Coming from a rigid rear axle HD trike this trait is a little unnerving. If its normal and safe I can live with it. Your thoughts?
Over steer's main cause's is wrong tire pressure or wheel alignment, either one or the other or both.
I have just replaced my front tires after 20,000Ks and decided to check wheel alignment with the handle bars locked at the correct position square off frame both wheels where pointing left and where set with 1mm toe-out instead of 2-3 mm toe in, wheels are now set straight ahead and with 2mm toe-in, what a different bike to ride points straight ahead with hands free and no bump steer, and having BUDS I was able to reset the DPS.
Belrix
New member
So, my Spyder is on the way. I hopefully will have it by next weekend.I installed the BajaRon swaybar and upgraded to the 2 up shock on my 2015 F3 and I have to say the handling is improved a 100%. The bike should of come with both of these upgrades from BRP before they hit the dealer. :doorag::yes:
Your "2-up shock" comment made me say "Hmmmmm". I'm a big guy (aka: FAT) so my joke is I'm always riding 2-up. Add to this that my Diva-sized wife will be with me and I'm wondering if we'll be too heavy for this. What is this "2-up shock" and would the sway-bar help?
So, my Spyder is on the way. I hopefully will have it by next weekend.
Your "2-up shock" comment made me say "Hmmmmm". I'm a big guy (aka: FAT) so my joke is I'm always riding 2-up. Add to this that my Diva-sized wife will be with me and I'm wondering if we'll be too heavy for this. What is this "2-up shock" and would the sway-bar help?
The F3 has a 450lb weight limit with rider(s) and gear/cargo. Not sure of the shock parameters but more importantly you also have to consider frame tolerances. An RT has a weight limit of 530lbs or so, I think. Again, you have to figure in the riding gear you'll be wearing and any cargo you are carrying. Boots and jackets and anything you would put in the frunk could tack another 20lbs onto your already over limit weight. Any two-up shock or sway bar is not going to keep the frame from cracking in certain situations.
Last edited:
BajaRon
Well-known member
I can't find anything about front shock preload in the F3 manual. Can you help me out?
There has to be information in the manual about Front Shock Spring Pre-Load adjustment. But I don't have the manual so this is the best I can do.
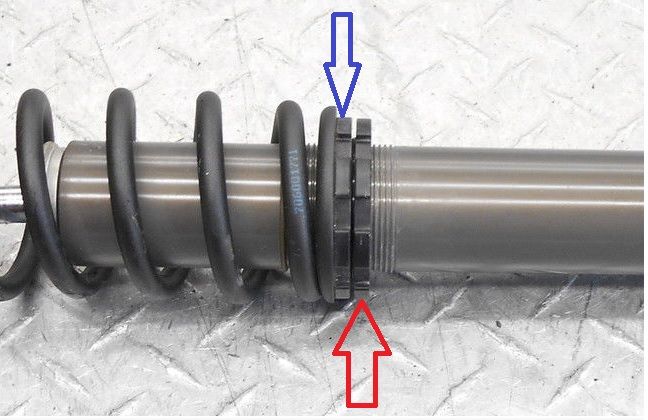
Here is a picture of an OEM F3 Shock (Fox). As you can see it is currently set at a Mid-Load adjustment.
I am told that BRP does NOT supply you with a Spanner Wrench for these shocks. Shame on Them! So here is a link to an eBay listing which you may need. I am not promoting this particular spanner wrench but I may ask for a commission if his sales increase enough! You do need 2 spanners to do this correctly.
2x Motorcycle Shock Absorber Preload Spanner Wrench Tool For Honda Suzuki ATV
You will notice 2 Locking Rings on each shock at the bottom of the spring. The Upper Ring (Blue Arrow) makes the adjustment and the Lower Ring (Red Arrow) serves to lock the assembly once the adjustment is made to prevent any movement.
Before you start it is a good idea to measure the length of each front shock spring (from flat spot on top to flat spot on the bottom). This will tell you if they are currently adjusted equally. This is VERY important. If no one has messed with them from the factory you should find identical spring length on both sides. If not, the first thing you need to do is adjust one side or the other so that both spring lengths match.
To Raise or Lower Spring Pre-Load you need to first loosen the Lower Locking Ring (Red Arrow). Do this by holding the Upper Ring (Blue Arrow) stationary with one Spanner Wrench. And turning the Lower Ring (Red Arrow) clockwise (looking down from the top) with the other Spanner Wrench. This separates the 2 rings allowing you to make the Pre-Load adjustment with the Upper Ring (Blue Arrow)
Increasing Shock Spring Pre-Load. Turn the Upper Ring (Blue Arrow) Counter Clockwise (looking down from the top).
Decreasing Shock Spring Pre-Load. Turn the Upper Ring (Blue Arrow) Clockwise. (looking down from the top).
Once you get the Upper Ring where you want it, you MUST lock the rings together (as they were before you started this process). Do this by turning the Lower Ring Counter Clockwise until it stops up against the upper locking ring. Then cinch the 2 rings together by holding the Upper Ring stationary with one spanner wrench while turning the Lower Ring Counter Clockwise until it is tight against the upper ring using the other spanner. (Opposite of what you did to get the 2 rings separated).
VERY IMPORTANT! You MUST count the turns you have made on the Upper Ring. I highly recommend marking the upper ring (if it is not already) in some permanent way so that you KNOW how many full turns you have made. Making Full turns is the best way to keep track.
Then you MUST make this identical adjustment to the other front shock. And you MUST go UP on both sides or Down on both sides the exact same number of turns. I have seen front shocks that have 1/2" or more difference in Spring Pre-Load adjustment. Talk about something that will mess with your steering, tracking and handling! :yikes:
This is a very easy process and can make a world of difference (improvement) in how your Spyder handles. You might want to experiment a little at a time. I recommend 2 full turns as with 1 full turn, you may not be able to tell any difference at all.
For those of you who LOVE videos. Here is one that should give you a visual of my explanation above. This is for a car but the process is identical.
https://www.youtube.com/watch?v=Me2mdTTOZ6U
Hope this helps! :thumbup:
Last edited:
Belrix
New member
There has to be information in the manual about Front Shock Spring Pre-Load adjustment. But I don't have the manual so this is the best I can do.
<snip>
Thanks, Ron. My BajaRon sway bar (hmm, strange name coincidence?
") ) is on the way and I'll look at the pre-loads. I have spanner wrenches from my big Kawi, hopefully they'll fit the Sypder's front shocks. I wouldn't have thought to balance left and right without the advice, makes a ton of sense, but not completely obvious at first.
) is on the way and I'll look at the pre-loads. I have spanner wrenches from my big Kawi, hopefully they'll fit the Sypder's front shocks. I wouldn't have thought to balance left and right without the advice, makes a ton of sense, but not completely obvious at first.Similar threads
- Replies
- 12
- Views
- 865
- Replies
- 39
- Views
- 6K
- Replies
- 29
- Views
- 5K
- Replies
- 2
- Views
- 402