• There were many reasons for the change of the site software, the biggest was security. The age of the old software also meant no server updates for certain programs. There are many benefits to the new software, one of the biggest is the mobile functionality. Ill fix up some stuff in the coming days, we'll also try to get some of the old addons back or the data imported back into the site like the garage. To create a thread or to reply with a post is basically the same as it was in the prior software. The default style of the site is light colored, but i temporarily added a darker colored style, to change you can find a link at the bottom of the site.

Oops …. Where does this go?

Mike0123

Member
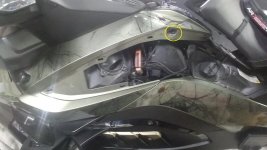
I had all the plastic off the left side of my RTL, and I have two screws left over to attach the top front big red piece. Now, they are supposed to be the same size, but the two I have left are not. Apparently I used a short one where I should have used the long one. Anyone have any idea???
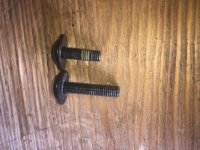
3E91B42F-BEA1-48FF-A327-CB5213553311.jpg

Thanks as always.
 
Last edited by a moderator:
Pull the right side off.
Place the screws, torx and pins in order.
Do a sketch and label it as you go if ya wish.

Then revisit the side where you have the bits left over.
And refit correctly.

The p.
 
I had all the plastic off the left side of my RTL, and I have two screws left over to attach the top front big red piece. Now, they are supposed to be the same size, but the two I have left are not. Apparently I used a short one where I should have used the long one. Anyone have any idea???

View attachment 195475

Thanks as always.

Well there a couple of T-30 torx bolts that need to be a bit longer than the majority of them ..... you have one there .... JMHO .... Mike :thumbup:
 
The long one goes in the hole up by the center console. It has to go thru the panel and center console(black piece with the switches in it).
IMG_20220408_204315941.jpg
 
Last edited:
Thank you all. I haven’t lost any screws, but just have these two. I checked the right side and the screws in the two holes I have left were short...
I ended up going to buy another shot Rt one and put the long one aside, but now I will recheck the top one as suggested.
Thank you all.
 
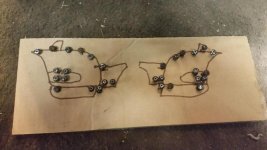
I learned several years ago when dealing with a lot of screws of different lengths on the fairing of a motorcycle, it pays to make some cardboard placement guides. It's really simple to draw a rough pattern/s on a piece of cardboard then punch holes in it to place screws in the appropriate locations as you dismantle. Then when it comes time for reassembly, they will all go back exactly where they came from.

Keep in mind, I'm no artist but here is the pattern board I used on that one bike with a lot of fairing screws.
 

Attachments

  • !20181211_162017.jpg
    !20181211_162017.jpg
    39.4 KB · Views: 38
Hex head is the answer

And I learned a long time ago what a pain Torx machine screws are and replaced them with flanged button-head stainless steel hex machine screws. Easier to see, I choose my own length and my ball-end wrenches allow off-axis torque.

PS I had a Moto Guzzi Norge with full coverage fairing. Took a few tries to get everything right. Gorgeous but was too fast. Gave it to a nephew.
 
Last edited:
Your not alone there Burt. 3 different connector screws on 1 but of tupperware has me mystified as well. Obfuscation comes to mind.
 
Don't feel bad. On my first Spyder (2013 RTL), bought in 2013, I always had a screw or pushpin left over after I took it apart do something to it. Nothing bad ever happened. I'm on my 4th Spyder and I no longer have pushpins and/or screws left over. You'll be fine.
 
Darn, you have some leftovers. You're lucky. When I've done a major tupperware removal I generally end up two short. Somewhere somehow they get away from me. GOD bless Ace Hardware, they come to the rescue.
 
I learned several years ago when dealing with a lot of screws of different lengths on the fairing of a motorcycle, it pays to make some cardboard placement guides. It's really simple to draw a rough pattern/s on a piece of cardboard then punch holes in it to place screws in the appropriate locations as you dismantle. Then when it comes time for reassembly, they will all go back exactly where they came from.

Keep in mind, I'm no artist but here is the pattern board I used on that one bike with a lot of fairing screws.


I like the cardboard. Another way is a plastic ice cube tray. For each panel, I put the bolts/push pins in the tray, left to right. Then when reinstalling, I go right to left
 
Zip lock bags

.

I use a small zip lock bag taped to the part I've removed. Nothing gets lost. Reusable too.

Lew L
 
FWIW, you can catch the small magnetic round parts trays at Harbor Freight for less than $2 sometimes $1. I put labels in the bottom, right mirror panel, right lower panel, headlight trim, right saddlebag, frunk, etc. Each panel section gets its own storage. Then I have several more that are unlabeled, for whatever.
 
.

I use a small zip lock bag taped to the part I've removed. Nothing gets lost. Reusable too.

Lew L

Lew, that's just way too intelligent for some of us to comprehend. We relish the act of crawling around on cold concrete trying to find that 10 cent screw that got swallowed by the back hole of death in the middle of a half torn apart spyder.
:banghead: :cus: :banghead: :cus: nojoke
 
The lost screws are probably hiding out with the missing 10mm sockets and they're all laughing at us crawling around on the floor looking for them.
 
Lew, that's just way too intelligent for some of us to comprehend. We relish the act of crawling around on cold concrete trying to find that 10 cent screw that got swallowed by the back hole of death in the middle of a half torn apart spyder.
:banghead: :cus: :banghead: :cus: nojoke

.

I just hate it when I drop, misplace, or flat out loose a fastener. When I taught small motors class we rebuilt a Brigs and Stratton motor. Each group had to have 10 zip lock bags for the small parts/fasteners. If it worked for 30 kids--- It will work for me.

Lew L
 
Back
Top