-
There were many reasons for the change of the site software, the biggest was security. The age of the old software also meant no server updates for certain programs. There are many benefits to the new software, one of the biggest is the mobile functionality. Ill fix up some stuff in the coming days, we'll also try to get some of the old addons back or the data imported back into the site like the garage. To create a thread or to reply with a post is basically the same as it was in the prior software. The default style of the site is light colored, but i temporarily added a darker colored style, to change you can find a link at the bottom of the site.
You are using an out of date browser. It may not display this or other websites correctly.
You should upgrade or use an alternative browser.
You should upgrade or use an alternative browser.
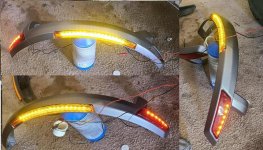
Looking for a DIY way on fender lighting
- Thread starter cruisinTX
- Start date
![IMG_1599[1].jpg](https://www.spyderlovers.com/data/attachments/105/105909-2d40bfd7cbe867fc414e2c8032275c09.jpg?hash=nA31bu_hxW "IMG_1599[1].jpg")
![IMG_1600[1].jpg](https://www.spyderlovers.com/data/attachments/105/105910-1f329c57357c72e3a363198246eb3cb9.jpg?hash=dNfnmT1VsH "IMG_1600[1].jpg")
![IMG_1598[1].jpg](https://www.spyderlovers.com/data/attachments/105/105911-2224c3f405c1d50c2e0044fa5086b2ea.jpg?hash=6XtnrgPQsu "IMG_1598[1].jpg")
YPILOT
Member
So, do you (or anyone else) know how those kits mount? Are they designed to remove the reflectors then mount the LEDs & replace the reflectors? If that's the way they work, then the strips I've been looking at from Oznium might work. I'll have to go back and look at their dimensions, but recall from the earlier read, they are very small.
Mine is a 2014 RT-L
The after market kits are sealed units that come with mounting tape attached for easy installation. They replace the entire reflector. You drill one hole behind old reflector location to connect power to running/signal lights. Usually plug and play connections. The original reflector is not hollow.
BertRemington
Active member
The connector in fetermel's picture is an AMP/Tyco SuperSeal available on Amazon.
FrogmanDave
Active member
So, do you (or anyone else) know how those kits mount? Are they designed to remove the reflectors then mount the LEDs & replace the reflectors? If that's the way they work, then the strips I've been looking at from Oznium might work. I'll have to go back and look at their dimensions, but recall from the earlier read, they are very small.
Mine is a 2014 RT-L
https://www.youtube.com/watch?v=hAJBTXhvIAs
BertRemington
Active member
$10.13 each, 4 left
TX -- I don't think you can beat this price/performance https://www.amazon.com/Lighting-Accent-Strip-Amber-Waterproof/dp/B00XWBK1Q2
TX -- I don't think you can beat this price/performance https://www.amazon.com/Lighting-Accent-Strip-Amber-Waterproof/dp/B00XWBK1Q2
BLUEKNIGHT911
Sadly Passed Oct 2024 - RIP
TX -- I don't think you can beat this price/performance https://www.amazon.com/Lighting-Accent-Strip-Amber-Waterproof/dp/B00XWBK1Q2
:agree: .... However His fenders are the NEW style, the ones in the pic are the OLD style ( like I have ) ...... Mike :thumbup:
cruisinTX
Member
Very helpful video on seeing how it's all put together without having to dismantle anything myself. The only part that surprised me just a little was that he finished off the splicing with electrical tape instead of heat shrink tubing. Otherwise; outstanding presentation.
Since I'm not going with turn signals in my reflectors, I will have a lot less wiring to do. My RT already has small LED strips tapped into the turn signals above each mirror so no need to have others.
I did an E-Bay search but did not see anything suitable. However, I got a very quick response from the folks at Oznium then got on the phone with them to make sure I would be ordering the right items. They have side emitting LED strips that look like will work nicely for the amber reflectors and short surface type for the red ones. I've got them ordered and hope to have things put in place by the end of the month.
Appreciate all the helpful links, suggestions, pictures, etc. Will report back here as the work progresses in the event it is useful enough for someone else to attempt.
cruisinTX
Member
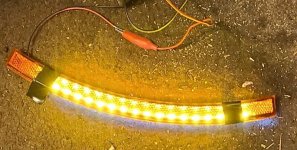
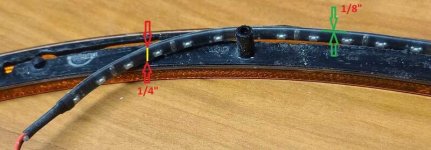
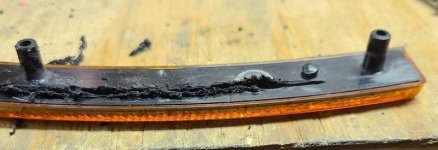
OKIE DOKIE!! I got the LEDs from Oznium today and took a little time late this afternoon to tear into the project. The ones for the amber side reflectors were not quite what I expected after visiting with their rep on the phone a few days ago. They are 1/4" wide and 1/8" thick & designed so the LEDs emit light from the 1/8 side. The 1/4" looked as though it might present a problem, so I removed the amber lens on the right side of the Spyder. As you can see, there is a black plastic panel glued into the back of the reflector.
The first pic shows where I took a carbon cutting wheel in the Dremel tool and cut a slot following the curve making it the length needed to accommodate half of the 20" strip. (these strips are designed with marks where you can safely cut them off and they still work. Lucky for me, they have power wires at both ends so one 20" provided enough length in two working pieces leaving me to buy only one. I did lose 6 LEDs in the middle, however due to no cutting strip right in the center.) Back to the slot cut; I followed a line approximately 1/4" from the top edge and stopped short of cutting into the amber reflector. This takes a pretty steady hand and is not for the weak of heart. I have done lots of work with Dremel tools over the past 40 years or so building various things so this was not a problem.
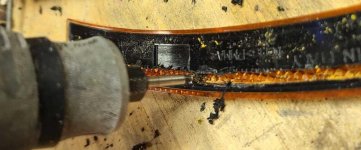
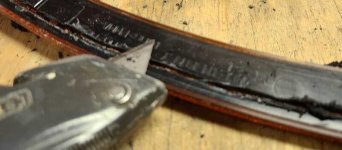
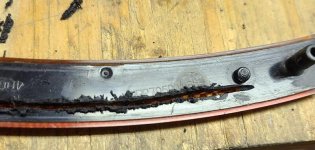
The second pic shows how that carbon wheel leaves a ridge of plastic that needs to be cut away which is easily done with a razor knife (third pic).
Obviously, the slot cut by the carbon wheel was only about half the width needed for the LED strip so my next step was to use a 1/8" wood grinding bit and simply widened the slot. (4th pic). Again, there were slivers of plastic that had to be removed which required some more work with the knife and a little clean up using the same 1/8" bit. Once the slot was wide enough to insert the LED strip fairly easily but still snug, I stripped wires and tested it in place using power from the charging plug on one of my bikes.
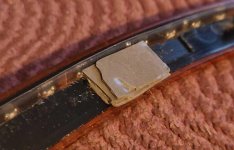
Lastly, it is pretty clear I will have to build up probably three layers of badge tape to get the reflector to fit back on the fender due to the thickness of the LED strip sticking out. I'll be using the same type of tape that has held a set of LEDs on one of the bikes without an issue since first installed in March of 2005 with stainless steel on one side and the plastic back of the LED on the other. I will most likely also seal the perimeter with clear silicone even though Oznium says their LED strips are weatherproof.
I'm pretty sure from measuring the thickness of the badge tape and length of the pins that receive the push nuts, there will still be enough length to install new push nuts ensuring the reflector will stay in place with those and the badge tape holding it firmly in place. I hope to complete this tomorrow provided I can find new push nuts locally on a Saturday. Our best nut & bolt supplier is only open M-F but there is one other open half a day on Saturday and an ACE Hardware open all day.
I'll post an update once this is complete and then occasionally to report durability for a while.
wish me luck and thanks again for all the great suggestions.
The first pic shows where I took a carbon cutting wheel in the Dremel tool and cut a slot following the curve making it the length needed to accommodate half of the 20" strip. (these strips are designed with marks where you can safely cut them off and they still work. Lucky for me, they have power wires at both ends so one 20" provided enough length in two working pieces leaving me to buy only one. I did lose 6 LEDs in the middle, however due to no cutting strip right in the center.) Back to the slot cut; I followed a line approximately 1/4" from the top edge and stopped short of cutting into the amber reflector. This takes a pretty steady hand and is not for the weak of heart. I have done lots of work with Dremel tools over the past 40 years or so building various things so this was not a problem.
The second pic shows how that carbon wheel leaves a ridge of plastic that needs to be cut away which is easily done with a razor knife (third pic).
Obviously, the slot cut by the carbon wheel was only about half the width needed for the LED strip so my next step was to use a 1/8" wood grinding bit and simply widened the slot. (4th pic). Again, there were slivers of plastic that had to be removed which required some more work with the knife and a little clean up using the same 1/8" bit. Once the slot was wide enough to insert the LED strip fairly easily but still snug, I stripped wires and tested it in place using power from the charging plug on one of my bikes.
Lastly, it is pretty clear I will have to build up probably three layers of badge tape to get the reflector to fit back on the fender due to the thickness of the LED strip sticking out. I'll be using the same type of tape that has held a set of LEDs on one of the bikes without an issue since first installed in March of 2005 with stainless steel on one side and the plastic back of the LED on the other. I will most likely also seal the perimeter with clear silicone even though Oznium says their LED strips are weatherproof.
I'm pretty sure from measuring the thickness of the badge tape and length of the pins that receive the push nuts, there will still be enough length to install new push nuts ensuring the reflector will stay in place with those and the badge tape holding it firmly in place. I hope to complete this tomorrow provided I can find new push nuts locally on a Saturday. Our best nut & bolt supplier is only open M-F but there is one other open half a day on Saturday and an ACE Hardware open all day.
I'll post an update once this is complete and then occasionally to report durability for a while.
wish me luck and thanks again for all the great suggestions.
Attachments
BertRemington
Active member
TX -- very nice work. Outstanding description. I've boxed up my reflectors and will send them to you for LED installation as soon as you send me your address.
cruisinTX
Member
You might hang onto those a while longer. If my method works out and doesn't fall apart a few thousand miles down the road, I won't be needing them. If you have them tucked away, someone else could benefit from your generosity.
I'm not sure I will ever be doing this for hire though. It's pretty unconventional and very time consuming.
EDIT: OOPS! pps: I responded here without realizing part of my message should have gone to rmag who had offered to send me an extra set of reflectors a few days ago. sorry; some confusion does accompany old age I guess. :dontknow:
I'm not sure I will ever be doing this for hire though. It's pretty unconventional and very time consuming.
EDIT: OOPS!
pps: I responded here without realizing part of my message should have gone to rmag who had offered to send me an extra set of reflectors a few days ago. sorry; some confusion does accompany old age I guess. :dontknow:
Last edited:
cruisinTX
Member
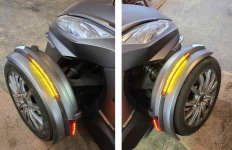
Phase two; got the LEDs mounted and tested in the red reflector of the same fender. Will finish this one up tomorrow and start on the left one.
It's 55° with light winds right now, so I'm pretty certain one of the scooters is calling to get out for a brief ride. Tis far better than the 60mph wind gusts we had yesterday and the 40mph gusts predicted for tomorrow. :yikes:
It's 55° with light winds right now, so I'm pretty certain one of the scooters is calling to get out for a brief ride. Tis far better than the 60mph wind gusts we had yesterday and the 40mph gusts predicted for tomorrow. :yikes:
Attachments
cruisinTX
Member
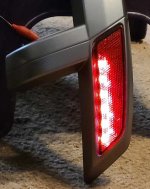
One last test before soldering in all the wiring needed and reassembly. I'm liking the way it has worked out so far. I do wish the LED strips were made a little differently so I could have run them 100% of the lengths needed but sometimes you gotta go with what ya got. ")
Attachments
Last edited:
K80Shooter
Active member
I think they look good. Glad it's working out for you.
Flamewinger
New member
I did mine on all 3 Spyders. What I did was remove the reflector, use a Dremel with cutting wheel to remove the black backing. I then soldered LED strips (non waterproof) together so they fit inside the reflector and used hot glue to seal them. The trick I used was to get a cheap soldering iron hot and used the side of it to flatten the hot glue. Could use an old iron too. Then VHB tape to stick them back on the fender. I used the front white light to power them or running lights for the rear..


Last edited:
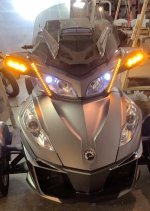
All done!
Very Nice ! You just added $$$ of personal value.
BLUEKNIGHT911
Sadly Passed Oct 2024 - RIP
One last test before soldering in all the wiring needed and reassembly. I'm liking the way it has worked out so far. I do wish the LED strips were made a little differently so I could have run them 100% of the lengths needed but sometimes you gotta go with what ya got.
I have DIY'ed so many things for my 14 RT, I can't rember them all without a lengthy list ( 80 changes ) ..... My hat goes off to you Sir !!!, what you accomplished is OFF the charts sweet ... I have the BASIC fenders so what I had to do was nothing compared to yours :clap::clap::clap: ......Mike :thumbup:
Similar threads
- Replies
- 9
- Views
- 1K
- Replies
- 3
- Views
- 2K
- Replies
- 8
- Views
- 3K
- Replies
- 5
- Views
- 2K