• There were many reasons for the change of the site software, the biggest was security. The age of the old software also meant no server updates for certain programs. There are many benefits to the new software, one of the biggest is the mobile functionality. Ill fix up some stuff in the coming days, we'll also try to get some of the old addons back or the data imported back into the site like the garage. To create a thread or to reply with a post is basically the same as it was in the prior software. The default style of the site is light colored, but i temporarily added a darker colored style, to change you can find a link at the bottom of the site.

2008 Spyder GS SM5 Restoration

I'd say the bodywork, including lights, is about 50-60lbs or so. Most of the weight is in the trunk, seat, and light assemblies. I'm more curious to know how much the motor weighs since I'll be removing that soon.

The rust you see in the battery tray is from the brake fluid, I think. I think it just traveled across the frame and wicked up into the painted areas. BTW, I don't think the frame is powder coated. I believe its painted because its pretty easy to scratch it off.

Here's a pic of my 68 fastback that I finished restoring after about 7 years. A lot of metal work and a lot of sourcing out parts.

View attachment 157542

My first car was a 63 Fastback, which wasn’t fast at all! I bought it for $100 and sold it for the same so it wasn’t a bad investment.
 
Great job. If previous owner over filled the oil tank it would find its way to the airbox causing oil seepage as well. Above suggestions will cure it. Bruce
 
I'd love to have an earlier type 3, but getting parts for that would be a nightmare.

After reading about the oil catch can, I'm going to install one. Also, did anyone have problems with their coolant over flow cracking? The previous owner said hers cracked and replaced it with an aluminum one that doesn't fit and just hangs there. I don't like the way it just sits there loose. I was planning to purchase a new oem one, but was also thinking of modding the aluminum one to make it fit better.
 
I see what you mean from the photo's about how the brake fluid has spread, the damage to that battery tray is quite an eye opener. I'm guessing capillary action between the base and the battery has pulled the fluid up the slope like that. A lot of damage to the paint on the top of the swinging arm as well, your right it must have been leaking for a while. After seeing that I realise why I was taught to wash a bike down after doing anything involving brake fluid:-)

Is there any sign of it on the belt? Just thinking it could have dropped down from the battery box. I'm guessing not because if it had got there it would have been thrown all over the place and made an even bigger mess.
 
Ok, so not much to report other than more disassembly. First thing I removed yesterday was the Hindle exhaust system. When I had the trike running, I thought it was kind of loud and sounded like it had an exhaust leak. Well, that was confirmed. I guess whoever put on the exhaust system didn't install a new gasket on one side as seen in the photo below. The pipe on the right is missing the gasket. Makes me wonder how quiet the trike is with the gasket in place?
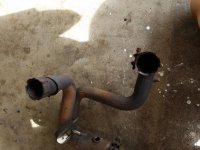
20180205_153051.jpg

Next I started to remove the following items in this order:

1. Rectifier
2. Left side support bar
3. Right side support bar
4. Brake Master Cylinder and Reservoir
5. Passenger foot pegs
6. Rider foot pegs
7. Rear fender and mounts
8. Airbox

All of these were pretty easy. I tried to take out the fuel tank, but it looks like you need to remove the engine before that can come out. When removing the fuel line connectors from the fuel pump, I managed to break the little black restraint clip on the fuel line going to the fuel pressure regulator. I found that you can buy just the clip separately, so that was ordered.
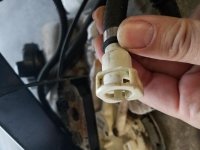
20180205_182402.jpg

Also picked up the seat and I think it looks ok. I might just redo it. Guess it was a mistake to give the upholsterer a choice on how he wanted to do it. hahahaha
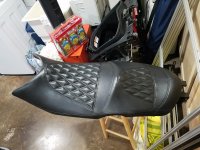
20180205_181255.jpg

I'm taking a lot of pictures along the way so I know how to route the wires and where the tie down points are. If you guys want to see a specific area, let me know. After a couple hours of work, here is how she sits. I'm going to try and leave the radiator and oil reservoir attached to the engine and remove it as a whole so I don't have to mess with those clamps that they use from the factory to connect the hoses. Hopefully I can keep everything intact.
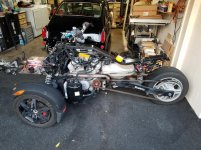
20180205_181204.jpg

Anyone know how to use the tool that is used to lift the engine out from the frame? I didn't purchase one, but If I know how its used, i'm sure I can cut one out from my CNC machine. 3/16" steel plate looks like it'll be strong enough to lift the engine out. Maybe even 1/8"? It looks like it just hooks onto the engine between the cylinder heads and you lift the engine a little then pull it out from the right side. Anyone can confirm that?
 
Last edited:
Also, did anyone have problems with their coolant over flow cracking? The previous owner said hers cracked and replaced it with an aluminum one that doesn't fit and just hangs there. I don't like the way it just sits there loose. I was planning to purchase a new oem one, but was also thinking of modding the aluminum one to make it fit better.

My original coolant reservoir cracked. The new OEM reservoir is more robust and have had no problems since. It's still plastic and you can shine a flashlight on it to read the fluid level.

"I guess whoever put on the exhaust system didn't install a new gasket on one side as seen in the photo below. The pipe on the right is missing the gasket. Makes me wonder how quiet the trike is with the gasket in place?"

The OEM gaskets burn out after 1,500 miles. Install Honda 18392-MAM-000 gaskets on both sides. They last much longer, cut the heat down as well as the sound.


I did not know these gaskets can burn off!? I did end up purchasing new Honda gaskets because of some recommendations that I read in this forum.

I was able to remove the fuel tank today. It's a very tight squeeze. Since my tank as surface rust, I'm going to coat it with some KBS rustseal. I've had really good luck with this product in Hawaii. The POR 15 stuff just doesn't work as well and I can't get masterseries in Hawaii. Anyhow, I plan to install the fuel tank before I install the engine to make it easier.
 
.....I tried to take out the fuel tank, but it looks like you need to remove the engine before that can come out.....

The tank will come out the RHS of the 2013 & earlier models without removing the engine if you get frustrated enough & carefully jiggle it the right way... ;) In fact, I reckon it might be pretty hard to take the engine out without first removing the tank, but luckily I didn't hafta get quite that far! I'd strongly suggest that you check it all out very carefully before trying to put the tank back in before the engine..... that could turn 'a tight squeeze' into 'an impossible task'!! :shocked:

Still, it certainly looks like you are getting a lot done & having fun doing it all, good luck with it - and please, keep the pics coming! :thumbup:
 
Last edited:
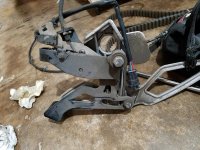
No real updates so far. Still chugging along documenting every single bolt, electrical connector, and location of items. I was able to pull out the wiring harness this weekend though. The rear section of the wire harness goes through the backbone of the frame, which will make it very difficult to pass back through with all the bulky electrical connectors. I did however find out why the parking brake on the trike didn't work. The cable was dry and basically frozen inside the protective housing and it was also pinched by the parking brake lever. You can see the kinked cable by the button head bolt.

20180211_095737.jpg

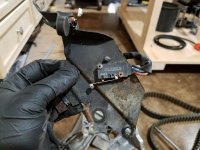
I also found more rust in the support panel where the limit switches for the brake lever was. I guess the brake fluid was able to travel down the rubber lines from the reservoir to the master cylinder. Amazing how far the brake fluid will travel if leaks are not fixed.

20180211_094652.jpg

Started disassembly of all foot pegs to get those powder coated. They were all frozen so that the pegs couldn't swing up and down. A little PB blaster loosened them enough so that I can press the pins out without any drama. Looking forward to reassembling them with the spring and ball bearing! Not really....
 
Still chugging along documenting every single bolt, electrical connector, and location of items

I wish you luck there. A bit like cataloguing the Smithsonian.
 
20180213_085723.jpg

This is where I stand right now. I have the engine all ready to be removed. The mounting bolts are all loose and only hand tight. Can't wait for the engine lifting tool to arrive. All bolts holding the suspension components to the frame is loose and ready to be removed. Once the engine is removed, then all the metal parts go to the powder coater. While all the parts are getting coated, i'll start on the paint work.

The plan for the paint is a matte black for the lower sections where it would get dirty and possibly scratched from debris and feet, center sections of the trike and tail will be either a metallic orange or blue, and the top sections will be gloss black. Good thing I have a bunch of ppg deltron black left over from my VW build. Just need to buy some of the blue or orange. If all goes well, i'll be done with this project by end of March 2018. crossing my fingers! :2thumbs:
 
Suggestion.....

From the picture above it would be a good idea to check that drive pulley (sprocket). Looks like red rust powder associated with it being loose and damaging the splines on both the shaft and the sproket...
 
From the picture above it would be a good idea to check that drive pulley (sprocket). Looks like red rust powder associated with it being loose and damaging the splines on both the shaft and the sproket...

I'm not sure I agree with you there, but worth checking of course. That is far too much rust to come from worn splines. The pulley on my '08 gets rust spots on it after every wash.
I think it is just the climate it was left in causing the non-painted steel to rust all over.
 
Old Goat is correct. The drive pulley is perfectly fine other than the surface corrosion. All it needs is a quick blast and coat of some KBS rust seal. That coating works well and holds up in the Hawaii Climate.
 
I'm not sure I agree with you there, but worth checking of course. That is far too much rust to come from worn splines. The pulley on my '08 gets rust spots on it after every wash.
I think it is just the climate it was left in causing the non-painted steel to rust all over.

If it is only surface rust, you may be correct.
If it is the red dust it is the beginning of a problem. There are a couple threads on pulley rust. Mine went seriously downhill in a few hundred miles after it was first noticed (and it was replaced at less than 4000). The dust grew to be worse than in the pic in only a few hundred miles.It had never been in the rain or under a hose.
He's in that far so it's no big deal to check further.
I will now check my pulley every 1500 mi.
 
Last edited:
While reading the service manual, in order for me to do a complete bleed for the brake system, I would need to connect to the BUDS system. That is a big problem since we don't have a CAN-AM dealer here in Hawaii. Is there any way around this? I wonder if there is a way to manually activate the ABS unit so that I can bleed it that way.
 
super progress!

PM sent.
Might as well do the brakes while its out. Tires, too. If we can help, just ask. Nice job.
Look into a fancan from ISCI. Redirects the heat down from the radiator. Leave off the belly pans. Seat looks fine - once you spend time on it, you will make changes. You have the aftermarket risers. Those are good. Or, any 7/8 motorcycle handlebar will fit in the clamp. You will need a workaround on the switch, but making it fit you and be comfortable is huge! Enjoy the project! Coming along fantastically! Joe
 
I inspected the drive pulley again and it seems perfectly fine. There is some wear on the pulley, but nothing unusual that I can see. Doesn't seem like the pulley is self destructing. The red rust you see on the front isn't a powdery substance.

Anyhow, this weekend was a good one. I was able to remove the motor using the engine lift tool. I didn't think it was going to be as big as it was. It hooks onto the brace between the cylinder heads and you just lift the engine out using a cherry picker or with a bar and two people. If you're using two people, you'd need a bar long enough to stretch past the front wheels or just take off the A-arms like I did. I'd estimate the engine being about 150-175lbs. Didn't think it was going to be this heavy, but I did leave all the oil in the engine.

20180216_145953[1].jpg

20180217_121021[1].jpg

Next on the list is to remove the swingarm. I was expecting the swingarm to drop after removing the long bolt, but it didn't. A look in the service manual shows two spacers with a conical end facing the inside at each end. These have to be removed from the inside out. Well, I didn't have a punch long enough so I guess i'll go have to buy some metal rods and punch them out at a later time. Thats where I am at the moment. I'm expecting everything to be apart by this upcoming weekend and have everything delivered to the powder coater by next week. Yay for progress! :ohyea:
 
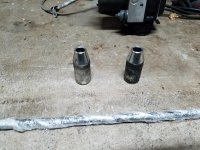
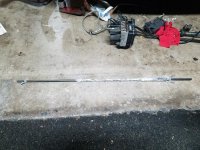
Its been 8 days since my last update. I was able to remove the swingarm after using a 2 foot length of 3/8-inch steel rod from Home Depot to punch out the two cone shaped bushings that hold the swingarm onto the frame. These cone shaped bushings were stuck in the bearings pretty good on the right side, but the left side was snug.

20180222_184629.jpg

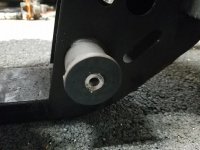
Next tough item was the removal of the 4 circular motor mounts inset into the frame just in front of the swingarm. If removed with the proper tool, a blind hole bearing puller, then the job would've been simple. However, murphy's law kicks in and I am not able to receive the tool that I ordered. I purchased the tool from ebay way in advanced knowing that I have to remove bearings and such from the can am. One week goes by with no tracking number provided. I email the seller and they say it was shipped. I still insisted that they send me a tracking number so I can verify that it was shipped. Another week goes by with no response. By this time, I know they're full of ****. Did a claim and got my money back. Seller responded that their supplier doesn't ship to Hawaii. Couldn't have told me this from the beginning?

Anyhow, I was able to rig something up using a 14" long piece of 3/8" steel rod, two 2-ton 3 jaw pullers, and two long zipties (very important!). I inserted the steel rod into the hole and setup the pullers on each side of the rod. The pullers I used has holes in each of the jaw arms which was used to insert the ziptie to tightly hold the jaws onto the steel washer that's bonded to the rubber bushing. Without the zipties, the puller would slip off the bushing. Using this method, I was able to remove one side. The other side required a backing plate to be held onto the opposite end so that the steel rod could butt up against it and one puller could be used to pull out the remaining bushing. I guess its a little hard to see what I did without any pictures, but I forgot to take some...If anyone needs pictures, I can set it up again to show how I did it.

20180222_184708.jpg


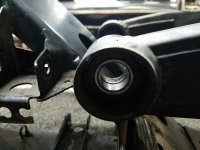
Next was the swingarm bearings. The manual calls out for the blind bearing puller to be used, but you can just press it out if you have a press with a very long push rod. Easy enough.

20180222_184703.jpg

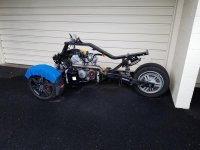
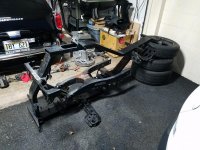
This is how the frame and swingarm sat until yesterday. I took everything to the powder coater and got the quote. $1024.35 to do a total of 45 pieces, including the frame and swing arm. I still have to get the tires removed from the rims and disassemble the mirror assembly to get those powder coated too. For the mirrors, I definitely need the blind hole bearing puller. There is a bushing that locks in the mirror arm to the mounting base that needs to be removed in order to separate them. Looks like my powder coating bill will come out to about $1300 total. YIKES!

20180222_184605.jpg
 

Attachments

  • 20180222_184618.jpg
    20180222_184618.jpg
    97.8 KB · Views: 60
Back
Top