• There were many reasons for the change of the site software, the biggest was security. The age of the old software also meant no server updates for certain programs. There are many benefits to the new software, one of the biggest is the mobile functionality. Ill fix up some stuff in the coming days, we'll also try to get some of the old addons back or the data imported back into the site like the garage. To create a thread or to reply with a post is basically the same as it was in the prior software. The default style of the site is light colored, but i temporarily added a darker colored style, to change you can find a link at the bottom of the site.

2015 Side Case Strengthener Kit

pontow

New member
I had the honor of being Doc's tester for the Side Case Strengthener Kit on a 2015 RT-S. There have been a few discoveries and tweaks along the way but here is my general report.I think this kit will work for its intended purpose. Doc is going to make a few minor changes but the design appears to do the job.

I also found the original instructions somewhat confusing. I'll try to decipher that a little bit right now. For those of you who have not actually experienced a hinge area failure (which I have not), you may find the descriptions a little hard to visualize. In essence, Doc's kit will include the hardware that will strengthen the hinge area by making a metal sandwich from one side of the hinge to the other. This "sandwich" will cover more of the plastic area to spread out the load put onto the plastic area by the metal hinges.

The area to be repaired is the half of the hinges (2 hinges in each side case, 4 hinges total) that connects to the fixed portion of each side case. The half of the hinge that connects to the moveable side case lid does not get changed in any way.

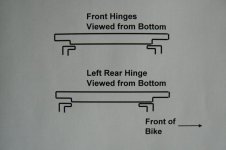
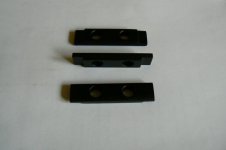
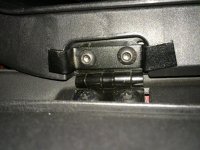
There is a springy, sheet metal bracket supplied for each hinge. It is the one with the intricate bends. This bracket will go directly on top of the existing hinge on the inside of the side case. You remove the existing bolts and bolt this bracket down over the existing hinge using the longer bolts that Doc supplies. The purpose of these brackets is to spread the load to a greater area than just directly underneath the hinge itself. The far left and right tabs that Doc has bent into these brackets will hopefully come into contact with the plastic area of the side case on both the left and right side of the pocket that the hinge sits in. This is the most fiddly part of the entire installation. You may very well find it necessary to "custom fit" these brackets by bending a little bit of a tweak into the outer tab area in order to make sure that it makes contact with the side case plastic and therefore does its job. The variation in the shape and dimensions of year to year side cases and possibly even one machine to the next means that this tweaking will quite possibly be a part of the installation process. Once we figured this out however it was not a big thing to do.

So, you remove the stock bolts from the hinge on the fixed side of the case (don't push out the backing plate on the back side - that's why Doc suggests doing one bolt at a time), put in the proper bracket that Doc supplies (note that the brackets have specific locations for front, back, left and right as well as up and down and Doc marks these) and then bolt down the new brackets over the existing hinge using the longer bolts that Doc supplies. On the backside of the case (between the case and the frame of the bike), these bolts are threading into the existing OEM backing plates.

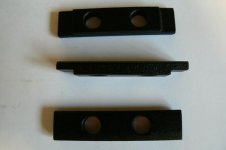
Once that is done, then you add the other half of the "sandwich" that Doc supplies. It is a new backing plate that goes over the existing backing plate. It slips over the protruding bolts and gets nutted into place. There is a step that Doc has milled onto each end of the plate. This milled face goes against the face of the original backing plate. It allows the two backing plates to be a face to face contact and then provides for a "clamping action" over the top of the plastic "barbs" that help to hold the original backing plate into position. By having the new backing plate pushing down on the top of these "barbs", that is how he is spreading some of the load on the backside of the hinge connection area.

Overall, I think this is a good fix and is basically 8 old bolts out, 8 new bolts in and 8 additional nuts (together with the new brackets and backing plates). With some tweaking in betrween.

For you 2015 owners I have another suggestion which I did not do but probably should have. Doc tells me that the muffler has been repositioned on the 2015 to be up higher. This puts it closer to the bottom side of the side case and limits the access you have in this area. I have long skinny fingers and it was still a bit of a contortionist act to get to the backside of the hinge area behind the right side cases. It appears that the muffler heat shield will come off with just the removal of (3) bolts. If this is the case, you may want to remove that to give you some more room.

Farkle On!!
 

Attachments

  • image.jpg
    image.jpg
    80.2 KB · Views: 272
  • image.jpg
    image.jpg
    32 KB · Views: 255
Last edited:
Thanks for the excellent report!! I am so glad that with a few changes the kit will work on the 2015's. In fact, I will slightly increase the milled area on all the milled plates so that they will fit either model. Now we are waiting on Bob's report!
My machinist is very far behind and it will be later on in the week before we have the modified kits for the 2015s. PM me to get on the list for them.

Thanks again for the excellent report and all your hard work on this!!
 
Thanks for the excellent report!! I am so glad that with a few changes the kit will work on the 2015's. In fact, I will slightly increase the milled area on all the milled plates so that they will fit either model.
Thanks again for the excellent report and all your hard work on this!!

From the photo, it looks like the backplates fit just fine. Or did the OP have to grind out the milled area a little further to make them fit? It may just be case-to-case variation as the part numbers have not changed from 2014 to 2015. Maybe I'm missing what you're both saying here.

I concluded, perhaps incorrectly, from the original instructions that the new bike-side backing plate would not be drawn up tightly against the OEM backing plate. That would require too much repeatable precision on the part of the plastic molded tabs that aren't a precise piece. I figured you would just draw the new backing plate up against the molded tabs and tighten the nuts enough to apply gentle pressure to the tabs. Too much and you'll wreck the tabs and the case. You end up with a tiny gap between the new plate and the old plate but that's OK. The new plate is resting on the tabs. Am I off base here, Doc??

Any other changes needed?

Good write-up. Thank you.

Gypsy -

Yes, I did have to grind out 3 of the 4 new backing plates to clear the barbs holding in the original backing plates. One of them fit perfectly. The backng plates were very consistent so it was a variation within the plastic parts, mostly due to moving and bending of the plastic at assembly. Doc is going to clear these in general so there should not be any more problem with that. Regarding pulling them down, I found that in all cases they pretty much pulled "tight" with new to old backing plates achieving a face to face fit. You still don't want to put much torque on those nuts as they also pull on all of the plastic from the other side. The nuts go on with Loc-Tite. For the right case where the muffler was so much in the way, I ended up putting Loc-Tite on the inside thread of the nuts because I couldn't reach up to the bolts to get a drop to fall on them. Guess I could have used a small acid brush or something but putting it on the nut seemed to work as I ended up removing them the next day to make adjustments to the sheet metal brackets after talking things over with Doc and there was definitely some resistance when I took the nuts off the day after installing them.
 
Gypsy -

Yes, I did have to grind out 3 of the 4 new backing plates to clear the barbs holding in the original backing plates. One of them fit perfectly. The backng plates were very consistent so it was a variation within the plastic parts, mostly due to moving and bending of the plastic at assembly. Doc is going to clear these in general so there should not be any more problem with that. Regarding pulling them down, I found that in all cases they pretty much pulled "tight" with new to old backing plates achieving a face to face fit. You still don't want to put much torque on those nuts as they also pull on all of the plastic from the other side.

Thanks. I'd be amazed if Doc can find a perfect grinding depth that will allow the plates to always be drawn face-to-face and never result in damaging the plastic tabs. But maybe the tabs are more precise than I think. That would certainly make for a nice, repeatable installation.
 
Thanks. I'd be amazed if Doc can find a perfect grinding depth that will allow the plates to always be drawn face-to-face and never result in damaging the plastic tabs. But maybe the tabs are more precise than I think. That would certainly make for a nice, repeatable installation.

Gypsy -

Actually, there was no problem with the depth of the milled area, that worked out just fine and I think will be totally consistent from one machine to the next. The area that I had to clear was the left to right length of the milled area. On the first bracket, it fit perfectly. On the next one, I had to increase the length of each milled end (thereby reducing the length of the unmilled center section) in order to get the plates to clear the top of the barbs. I think it's a plastic straightness issue much more than an issue of their length.

Long story short, I don't think that the backing plates will be a problem. Just keep your eye on the final fitup when installing.
 
SHIMS

A factor I have been toying with on the bracket is instead of milling the piece using shims to make up the difference. I am thinking of 18 gauge shims to build up the backing plate are in each case to compensate for the thickness of the plastic tabs on each side. We would include 12 extra shims that would be drilled so they could be set on the threads on the bolts so a correct fit would be made not only from bike to bike, but also hinge to hinge.
With the the spring brace adjusted correctly and the bracket adjusted correctly it actually increases surface contact with the plastic by over 1000%. The pictures do an excellent job of showing how much stronger these will become.
I will be doing a video in the next couple of days.
 
A factor I have been toying with on the bracket is instead of milling the piece using shims to make up the difference. I am thinking of 18 gauge shims to build up the backing plate are in each case to compensate for the thickness of the plastic tabs on each side. We would include 12 extra shims that would be drilled so they could be set on the threads on the bolts so a correct fit would be made not only from bike to bike, but also hinge to hinge.

Makes sense to me. I would be surprised if all cases were exactly the same in that area. I'll let you know how mine fit as soon as I receive them.
 
It's here!!

:yes::ohyea::yes::ohyea::yes::ohyea::yes::ohyea::yes:

As soon as I can start the process; I'll keep you all informed! :2thumbs:
 
Feedback on Hinge Upgrade Kit

Hi Doc. Spent the morning in the garage with your new kit. The differences between your 2014 and my ‘14 are significant. The protruding area between the milled ends of the backing plate would not fit between the plastic tabs in any of the four hinge locations. I’ve pasted in a drawing below. The fronts were different from the rears in the way they overlapped the tabs. The fronts were almost centered; the rears would just about clear on the rear tab and were totally overlapped on the front tab.

attachment.php


attachment.php


attachment.php


Here are some measurements I took:

Distance between inner edges of plastic tabs, in other words the maximum allowed length of the protrusion created by milling the ends of the backing plate: 1-3/8” or 36mm. The current protrusion on the backing plate is about 1-5/8” or 41mm. As seen in the drawing above, it is also not necessarily centered. Amazing difference between your ’14 and mine.

If you decide to go with your idea of a flat plate and providing shims to fill the gap rather than a machined protrusion, here are some rough measurements (at least for my 2014): the shims would have to be no more than 1-3/8” in length or a tad less; bolt-hole center-to-center is about 7/8” or 22mm. I’m sure that is the same and that is what your current backplates measure.

Gap depth is about 1/8” or 3mm. I measured the current protrusion depth on the backplate at about 1/16” or 1.5mm. Half of what my requirement is. I estimated that depth by holding the flat side of the backing plate against the tabs and measuring the gap. If bolted on it would tighten up a little but not much or you’d break the plastic tabs. Interesting because pontow reported that the depth of the protrusion worked just fine and allowed him to draw the new plate against the original. But his length of protrusion had to be decreased by increasing the length of the milled ends (his tabs were closer together like mine). Now mine is off on both counts – depth and length. Don't know why my gap is so much greater. I checked all four locations and they were the same. Clearly something is different between these three bikes.

I'd like to say I hope this helps but it's probably not the kind of help you were hoping for. :sour:
 

Attachments

  • P1010925.jpg
    P1010925.jpg
    32.3 KB · Views: 677
  • P1010930.jpg
    P1010930.jpg
    22.5 KB · Views: 680
  • P1010938.jpg
    P1010938.jpg
    28.9 KB · Views: 676
For Doc's Eyes Only

Doc, I would have sent you a PM on this but I don't see a way to attach photos to a PM so here goes...

I found individual-size containers for LocTite 242 (blue):

attachment.php
attachment.php


As you can see, this contains 0.017 oz or 0.5 ml. Part number is 24205. FYI.
 

Attachments

  • P1010904.jpg
    P1010904.jpg
    58.3 KB · Views: 597
  • P1010903.jpg
    P1010903.jpg
    58.1 KB · Views: 595
Will these fit a 2013 RTL? I've not had a problem with the hinges as of yet, but I am a believer in "an ounce of prevention is worth a pound of cure".
 
Will these fit a 2013 RTL? I've not had a problem with the hinges as of yet, but I am a believer in "an ounce of prevention is worth a pound of cure".

The 2014 and 2015's have identical part numbers for the cases themselves and the hinges and the backing plates. The 2013's have the same hinges and backing plates but the black plastic cases have different numbers. So it's anybody's guess at this point. They could be totally the same in the hinge area and just shaped differently somewhere else. Or they could be different in the hinge area. Let Doc chime in on this. I think right now he's probably occupied trying to figure out the "identical" '14's and '15's.

We put tens of thousands of long-distance miles on our 2011 with the side cases crammed full -- Alaska, Natchez Trace Parkway to southern MS, New Brunswick, around the Great Lakes, etc. Never had a problem either. So I don't know if it's a rare event across all years or if the 1330's (with their different part number) are more susceptible to it. The 2011 again had the same hinges and plates but yet another variation on the plastic case numbers themselves.
 
:shocked: It looks as if I'll be tackling mine on Saturday morning. I'll keep an eye out for this... :shocked:

Just to be clear. I didn't install anything. The first thing I did was get underneath to see how the backplates would fit. When I saw they would not fit, I spent my time trying to document what I found. I don't plan to go any further with installation until Doc comes up with something that will handle all these variations. If that is even possible. He's probably sorry he started this project!

It will be interesting to see what you find on your '14. Since both of ours are Cognac, they're bound to be the same. :roflblack:
 
Back
Top