• There were many reasons for the change of the site software, the biggest was security. The age of the old software also meant no server updates for certain programs. There are many benefits to the new software, one of the biggest is the mobile functionality. Ill fix up some stuff in the coming days, we'll also try to get some of the old addons back or the data imported back into the site like the garage. To create a thread or to reply with a post is basically the same as it was in the prior software. The default style of the site is light colored, but i temporarily added a darker colored style, to change you can find a link at the bottom of the site.

Windshield arm replacement problem. Thoughts requested

cognaccruiser

New member
I am in the process of replacing my windshield arm and have run into a small problem. Before it gets to be a big problem I thought I would ask for some thoughts.
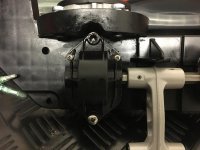
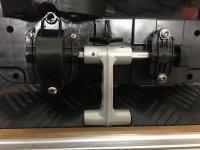
I'm at the point of taking off the screws from the pieces covering the gear head and magnet holding the arm.
The 2 torx screws covering the magnet end are off. The 2 Phillips screws are the problem. Specifically 1 of them. One came out but was extremely hard to get moving. The second one will not budge and the head is starting to strip a little bit. I don't want to strip it if I can avoid it. I'm using a ratchet and the correct size Phillips head and even pushing down as hard as I can and turning the ratchet, I can't get it to budge.
I was thinking of using some heat in the form of a hair drier. I don't have a heat gun. I could also use a soldering iron and touch it to the head if it generates enough heat.
I also thought about using JB Weld to weld a small nut onto the top of the screw and then using a socket to turn it out. Leaving the nut on wouldn't be a problem.
So I'm asking for thoughts on how to get this thing out without having to drill it out and I know there are tools designed to get striped or hard to remove screws out but I don't presently have any.

Thanks,
Gary
 
I take it these are the screws that clamp down to hold the sharft down
I had the same problem I did not try heat as one of the screws broke off and I couldn't drill it out
The clamp was re-secured. by using 2 self tapping screws each side
I did replace all the other screws with new ones and use some grease on them so I could remove them in the future to repack the shaft with grease

Here are some photos

IMG_0726.jpgIMG_0728.jpg

The middle bracket has since been replaced with the Noboot one

Sorry I know this won't answer your problem but take care as the screw may break off
 
Phillip Headed Screws

I try to always use ACR phillips bits and screwdrivers...I find that they are the best chance of removing phillip headed screws...but sometimes they even fail...larryd
 
Hello,
You need a pozidriv #2 Philips screwdriver. A standard #2 Philips will not fit the screw properly. You may be able to get a set of needle nose vise grips on the screw.

Good Luck,
Louie
 
THE TOOL FOR THIS

Damn - I bought the tool for just this type of thing 40 years ago..... and now I can't tell you what it's called ..... it came with a few HARDENED BITS in different types and sizes ..... with a spring loaded handle/tube you put the bits into .... you could either re-move or tighten anything by hitting the tube with a hammer ..... I think the spring tripled the force /torque of the bit for an instant ...... just what you needed to break the hold....... try this tap the Philips bit with a hammer firmly but first heat it with a Soldering iron....... that's what I did with my assembly ...... good luck ................. and the one on the end by the gear wheel I had to cut off .......................Mike ...... Mike :thumbup:
 
Damn - I bought the tool for just this type of thing 40 years ago..... and now I can't tell you what it's called ..... it came with a few HARDENED BITS in different types and sizes ..... with a spring loaded handle/tube you put the bits into .... you could either re-move or tighten anything by hitting the tube with a hammer ..... I think the spring tripled the force /torque of the bit for an instant ...... just what you needed to break the hold....... try this tap the Philips bit with a hammer firmly but first heat it with a Soldering iron....... that's what I did with my assembly ...... good luck ................. and the one on the end by the gear wheel I had to cut off .......................Mike ...... Mike :thumbup:

That is called a "IMPACT SCREWDRIVER"
 
So this seems to be a common problem and may have something to do with why the arm breaks. We replaced one this week and Joe broke the first screw and I broke the second. They were the top screws. :banghead:
 
If it wasn't screwed down tight I think the Worm when would be trying to push the assembly up and cause all sorts of problems but I feel BRP have gone a little overboard in ensuring the screws stay tight (in more places than one on the Spyder). If they had manufactured an arm that didn't crack and fail we wouldn't be writing any of these posts.
 
arm

I wonder if they put red lock tight on the screws? Hmmm something to think about.... I think I'm going to replace mine as well,you guys spooked me into it ;]
 
RED LOCK TITE

I wonder if they put red lock tight on the screws? Hmmm something to think about.... I think I'm going to replace mine as well,you guys spooked me into it ;]
I don't think so - there wasn't any on mine ............. Mike :thumbup:
 
No locktite

The plastic gets hit/cold/hot. It then siezes up. Use a soldering iron, heat it up, then remove. Of course, we broke them first! Should be a stud, and a nut.
 
The plastic gets hit/cold/hot. It then siezes up. Use a soldering iron, heat it up, then remove. Of course, we broke them first! Should be a stud, and a nut.

I agree, and why have Torx screws on one side and Phillips on the other
 
They are all Philips screw heads, If your referring to my photo I replaced the Phillips ones with some Torx ones I had


The standard configuration is Torx on one side and Phillips on the other. But then again it could be depending on how the assembly line feels and what they have at hand at the time.
 
Yes, mine were torx on the right and Phillips on the left.

Anyway, thanks everyone for your input. It was all helpful and today I'm going to try heating the one Phillips that wouldn't come out with a soldering tip and hairdryer combination and see if I can get it out. If it breaks at least I know I can drill a small hole and use a self tapping screw to hold it down.
I'm really hoping the heat works and I'll post how it turns out so others may have an easier time or learn something from this.

Cheers,

Gary
 
WELLLLLLLL

Yes, mine were torx on the right and Phillips on the left.

Anyway, thanks everyone for your input. It was all helpful and today I'm going to try heating the one Phillips that wouldn't come out with a soldering tip and hairdryer combination and see if I can get it out. If it breaks at least I know I can drill a small hole and use a self tapping screw to hold it down.
I'm really hoping the heat works and I'll post how it turns out so others may have an easier time or learn something from this.

Cheers,

Gary
..........What you want to be careful of .... is getting the outside of the plastic soft ie. hair dryer because it's not localized heat ....... the solder iron will heat the screw and break the grip, but be careful you don't overheat it and melt the plastic......it's a touchy thing - enough heat but not too much ........... that's why I brought up the IMPACT SCREW DRIVER ( thanks again, larryd ) ........ Mike :thumbup:
 
Back
Top