• There were many reasons for the change of the site software, the biggest was security. The age of the old software also meant no server updates for certain programs. There are many benefits to the new software, one of the biggest is the mobile functionality. Ill fix up some stuff in the coming days, we'll also try to get some of the old addons back or the data imported back into the site like the garage. To create a thread or to reply with a post is basically the same as it was in the prior software. The default style of the site is light colored, but i temporarily added a darker colored style, to change you can find a link at the bottom of the site.

Windshield Arm Replacement Dilemma

Purple Guy

New member
Somewhat of a little dilemma on my hands here.
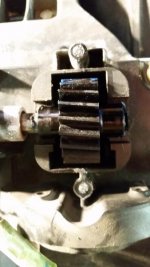
Removing the cover plate for the gear wheel for the windshield arm, not one but both philips screws snapped in half due to the excessive amount of locktite used at the factory.
Suggestions are welcome...


20170317_140350.jpg
 
Oh Nooooooooo not looking good :( Others have been applying heat to the screws (with a Soldering iron ) before removal and or using an impact driver to assist in getting them out. You could still apply heat not to try and get them out but it looks like they'll need to be drilled out.

Also others have found slightly filing the end of the hex shaft before installing the new arm helps with sliding it on.
 
^^ Good info from the Man himself!!

When confronted with similar breakages, some others I know have just left the busted screw as is, so that when re-fitting, it's acted (just a little) as a locator & then they've used two small self tapping screws, one on either side of the broken screw, going into the solid blocks you can see alongside & a bit closer to the gear. This approach seems to work fine, & at least that way you won't do any more damage trying to remove the screw remnants. Might be worth a shot. :thumbup:

Thanks for the tip Peter, that is definitely a solution to my problem. :thumbup:
 
Back
Top