• There were many reasons for the change of the site software, the biggest was security. The age of the old software also meant no server updates for certain programs. There are many benefits to the new software, one of the biggest is the mobile functionality. Ill fix up some stuff in the coming days, we'll also try to get some of the old addons back or the data imported back into the site like the garage. To create a thread or to reply with a post is basically the same as it was in the prior software. The default style of the site is light colored, but i temporarily added a darker colored style, to change you can find a link at the bottom of the site.

HowTo: Replacing OEM windshield lift arm with aftermarket billet one from 'noboot'

UtahPete

Active member
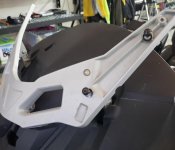
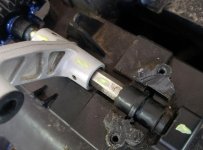
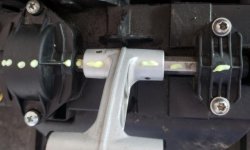
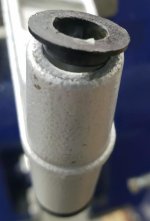
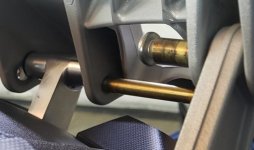
The OEM pot metal windshield lift arm is prone to failure. I've known for some time now that a stronger version, machined from a solid block of aluminum ("billet") has been made and sold worldwide by a SpyderLover in Australia who goes by "noboot" on this forum. So, I ordered one (AUS$160 including shipping) and it arrived within 4 days.

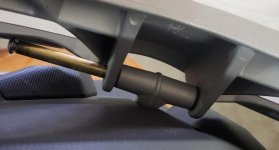
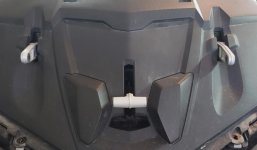
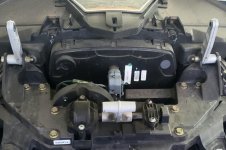
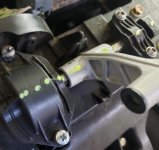
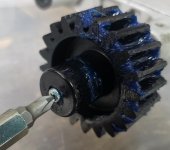
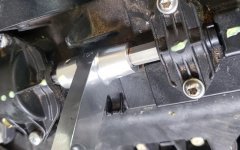
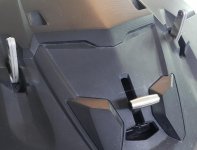
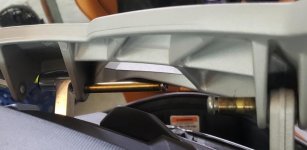
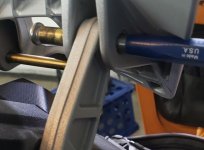
Ron (noboot) provides great instructions with his beautiful billet arm, along with a set of aluminum wedges needed to remove the plastic worm gear from the motor driven shaft. The mechanism, which is located underneath the dashboard cover panel, has to be removed from the bike in order to replace the OEM arm with the new billet one. To get at it requires removing the mirrors, front side body panels, headlight shroud, the windshield and the bracket to which the windshield attaches.

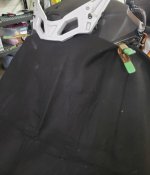
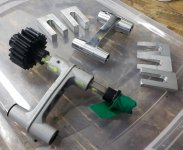
This project is a bit more involved than some others I've documented and requires an assortment of tools the casual D-I-Yer may not have on hand so it's a good idea to read and understand the instructions thoroughly to reduce the number of possible trips to the local hardware store for tools or little parts you've lost down inside the bike (I recommend draping a large cloth over the exposed work area to mitigate this possibility).
 

Attachments

  • 20210708_133029.jpg
    20210708_133029.jpg
    38.7 KB · Views: 54
  • 20210708_133007.jpg
    20210708_133007.jpg
    34.3 KB · Views: 48
  • 20210708_132939.jpg
    20210708_132939.jpg
    31.8 KB · Views: 43
  • 20210708_132116.jpg
    20210708_132116.jpg
    26.4 KB · Views: 41
  • 20210708_132915.jpg
    20210708_132915.jpg
    60.3 KB · Views: 46
Removing the shaft from the bike

Before removing the shaft mechanism, clearly mark the alignment of the shaft, arm and hold down caps. Once the shaft is removed, observe how the magnet on the right end is oriented. Put a mark on it near the edge in line with the other alignment Mark's, so that you are sure the shaft and arm are oriented correctly because the marks on the shaft itself may rub off while working on it!
 

Attachments

  • 20210708_132658.jpg
    20210708_132658.jpg
    52 KB · Views: 41
  • 20210708_132715.jpg
    20210708_132715.jpg
    40.9 KB · Views: 38
  • 20210708_132803.jpg
    20210708_132803.jpg
    37 KB · Views: 35
  • 20210705_172323.jpg
    20210705_172323.jpg
    36.1 KB · Views: 36
Replacing the lift arm on the shaft

To remove the OEM lift arm requires first removing the plastic worm gear from the shaft. For this, Ron provides 5 aluminum wedges (shims); use these as instructed and the worm gear will work its way off the shaft without damage (first remove the tiny, redundant Phillips head screw on the end of the shaft).

You will need a small drift pin punch to remove the two drift pins from the arm and then slide off the old arm and slide on the new, making absolutely sure the shaft and arm are in proper alignment as indicated by the magnet!

Tap the worm gear back on and replace the mechanism on the bike.
 

Attachments

  • 20210708_132634.jpg
    20210708_132634.jpg
    39.8 KB · Views: 29
  • 20210708_132616.jpg
    20210708_132616.jpg
    59.5 KB · Views: 37
  • 20210708_132543.jpg
    20210708_132543.jpg
    59.7 KB · Views: 30
So did yours break ??? or is this just preventive maintenance ???? .... I did my 14 RT shortly after I bought it in 14 .... " Noboot " didn't exist back then so I cut and shaped a couple of pieces of 22 gauge sheet stock I had and then wrapped the entire Arm with a length of 22 Ga. strip .... I welded it all together and still have it on my RT ..... thanks .... Mike :thumbup:
 
Reassembling the dashboard cover and windshield

This is just a reverse of the first steps, really. The only real challenge (orginally encountered when first removing the windshield bracket) is dealing with the three brass barrel nuts that hold the bracket to the three arms. Before doing this remove the black plastic pieces from the old lift arm and install them on the billet arm.

Some model years (like mine) have a retaining screw at each end of each barrel nut. It is only necessary to remove one screw from each arm. Then use an appropriate size punch to drive out the barrel nut from the other end. Reinstalling is just the reverse, the challenge being to hold the windshield bracket in alignment with the arms. I put a punch in the upper arms while working on the lower (lift) arm.
 

Attachments

  • 20210708_132442.jpg
    20210708_132442.jpg
    20.9 KB · Views: 32
  • 20210708_132328.jpg
    20210708_132328.jpg
    52.6 KB · Views: 33
  • 20210708_132304.jpg
    20210708_132304.jpg
    33 KB · Views: 32
  • 20210708_132217.jpg
    20210708_132217.jpg
    46.4 KB · Views: 30
  • 20210708_132237.jpg
    20210708_132237.jpg
    39 KB · Views: 29
So did yours break ??? or is this just preventive maintenance ???? .... I did my 14 RT shortly after I bought it in 14 .... " Noboot " didn't exist back then so I cut and shaped a couple of pieces of 22 gauge sheet stock I had and then wrapped the entire Arm with a length of 22 Ga. strip .... I welded it all together and still have it on my RT ..... thanks .... Mike :thumbup:

Just preventive. Jane's bike has the huge F4 windshield and she likes it all the way up, so I figured hers was most vulnerable to failure.
 
Back
Top