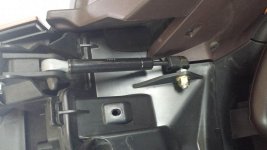
Your solution interests me because my wife's new-to-her RT Limited came with the same trunk rack. I like to contribute to her happiness, so . . . I started researching the parts numbers and here's what I came up with (from PartsShark as I recall). The info is from the exploded parts drawing.
Item 11 - Ball Head Stud (what a great part name!) - part # 250300039 @ $5.99 - one required
Item 12 - M8 Flanged Nut - part # 233281414 @ $1.99 - one required
Item 30 - Gas Shock - part # 708300383 @ $59.99 - one required
Item 31 - Spacer - part # 708300384 @ $10.99 - one required
Item 32 - Torx screw, M6 x 30 - part # 250000398 @ $1.99 - one required
Item 33 - Domed Nut, M6 - part # 232361493 @ $1.99 - one required
So, if all the necessary bits are OEM items, and I haven't made any mistakes in transcribing part numbers or prices, the cost appears to be right at $83US - plus tax and shipping. Not cheap, but in the grand scheme of things not outrageous either.
")


 ray:
ray: