• There were many reasons for the change of the site software, the biggest was security. The age of the old software also meant no server updates for certain programs. There are many benefits to the new software, one of the biggest is the mobile functionality. Ill fix up some stuff in the coming days, we'll also try to get some of the old addons back or the data imported back into the site like the garage. To create a thread or to reply with a post is basically the same as it was in the prior software. The default style of the site is light colored, but i temporarily added a darker colored style, to change you can find a link at the bottom of the site.

HowTo: Replace the Windsheld Arm with Billet Aluminum Arm.

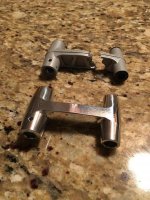
....And another bracket breaks!

Just had my windshield bracket break on the way home from dinner out with the wife this evening. Got home and immediately PM'd noboot.

Count me as another victim of lowest-bidder supply sources to BRP, I guess.
 
Replace Windsheld Arm with Billet Aluminum one.

I truly believe every RT owner will eventually have this happen to them!

Get your replacement part and make the change BEFORE it breaks and messes up a trip you may be in the middle of when it decides to let go. When it does, it comes right back toward you with great force (especially if you're at highway speeds), and you could lose control. Then you have to figure out how to get home with the broken screen laying back in your face.

IMG_9443.jpg


Bill


Sent from my iPhone using Tapatalk
 
Last edited:
Just had my windshield bracket break on the way home from dinner out with the wife this evening. Got home and immediately PM'd noboot.

Count me as another victim of lowest-bidder supply sources to BRP, I guess.

I can only say this:

THANK YOU NOBOOT!!!!!!!!!!!!!!!!!!!!!!!!!!!!!!!!!!!!!!!!

Part arrived yesterday morning; got home from work and got it installed (took me about 1.5 hours as I was being extra cautious/paranoid about cracking the plastic gear!). Ran out of daylight after getting the right-side body panels back on....I'l be able to get out of work a bit early today and finish up the job....then BACK ON THE ROAD!!!!

EDIT:

Spoke too soon; got the remaining body panels on, started ttrying to get the old brass bushings out of the actual windshield bracket.....aaaaand I hit a brick wall. The damn things are wedged in. I'd love to meet the engineer that designed this, no easy way to get wedges in there to pry the bushings out. And who the ^*&!@$#&^% came up with the idea of aluminum bracket, brass bushings, and steel screws?!?!?!?!?!?

If anyone has suggestions, I'm all ears!

EDIT 2: Been doing some hunting on the web, looks like it's going to be a trip to Home Depot for metric screws, then try the "hammer it a bit and pull" method...

FINAL EDIT: Done! the hammer-and-pull method was the trick...and I couldn't believe how corroded it was (then again, this IS eastern Pennsylvania). Judicious application of 160-grit sandpaper, then a light machine oil, then introduce to the new bracket. All went back together well after that.
 
Last edited:
Have a customer with a broken windshield arm. Looking forward to the job!

The part has been ordered from NOBOOT, tracking info already received and the part should be here on Monday. Pretty good service!! Our customer has been riding around on an RT with no windshield for many months so I'm sure she also appreciates the quick service from NOBOOT
 
SpyderAccessories Arm Replacement

It has been asked if the CanAmSpyderAccessories.com arm is equal to the one from NoBoot. Well, here is my report. (Caused by the breaking of the support arm on my 2011 RT-S)

It seems that Ron (NOBOOT) either does not have any more, or maybe they are several weeks out, and the eBay listing is expired, so I went with the SpyderAccessories version because of the turnaround time. It is more expensive (200 + shipping, but I had it in just a few days.

It DOES NOT COME WITH THE WEDGES TO REMOVE THE GEAR!!!!!!!!!!!!!!!! This makes the install a lot more difficult to say the least. Getting the bike apart is not a problem, but getting that gear off of the shaft was nothing short of a monumental task. To start with, the head of the small screw at the end of the shaft broke off as soon as I tried to remove it. There is no information that says if that screw slips inside the gear and into a threaded part of the shaft or if the threads are also in the plastic part of the gear as well, but the gear did not move no matter what i tried. So I drilled out the screw, and still had no joy in getting the gear off. I tried to use the original arm as a "ram" to force off the pulley. I tried several ways to get some force the gear, but nothing seem to get it moving. Finally, I applied some heat and used a "punch" in the hole where the screw was and was able to drive the shaft out of the gear assembly. Not fun, and more than a bit nerve wracking. If I destroyed the thing, then I was looking at multiple hundreds of dollars for a new unit plus the cost of the new arm.

Re-assembly was not too bad, but..... The gear is shaped like the hex shaft inside, and fits just as tight when replacing it as it did taking it off. I think the screw is unnecessary (I hope), so I did not try to drill and tap the shaft but just pressed the gear back on the shaft. The shaft housing has a capped end, so there is nowhere for the gear to go even if does shift. Time will tell!!

The new arm does not allow for the use of the small plastic washers at the windshield end. No big deal as the new part fits better inside the support frame without the washers than the old one does with them!! The new arm also does not use the roll pins to hold it on the shaft. Instead, it uses a set screw with an allen head. The inside of the arm is cut to fit the hex shaft, so the set screw is only used to keep it from moving side to side.

There were no instructions or pictures with this setup. I forget what the size is for the allen wrench, but it comes from Canada, so it was metric. Nothing said I should, but I decided to add some locktite to this screw as I did not want to even think about looking for it if it came loose.

All in all, the product is really well made, and should outlast the bike.

I did post a review to SpyderAccessories, indicating that it would certainly be better if it came with some instructions, a note about the size of the allen wrench, and even better with the wedges!! It is a great product, but not a project for the faint of heart.

As an FYI: When the job was done, the windshield works great! In fact, it does not "wobble" near as much as the original because the tolerances between the arm and the windshield support frame are much tighter! Overall, I am pleased, and really thankful to be done with this project!! It took many hours, and a lot of experimenting, but is a big improvement over the original.

In the spirit of full disclosure: When prying the right side cap off of the shaft, it popped up and then disappeared down one of the many openings into the darkness of the front of the bike. It took nearly 2 hours of looking, removing panels that I had no original intention of removing, and mounting fears about what might be needed if I could not find it!! I eventually used a Ryobi Inspection camera attached to my phone, and with the help of the Spyder Gods found the part lying inside of the U-channel on one of the frame pieces. With the help of a long retrieval tool, I was able to liberate it from the depths and continue on with the project. Just a reminder to be sure to block all of the holes with rags or something when doing this kind of work. This is especially important when replacing the C clips on the windshield frame! You do not want to take the bike all apart to look for them if they disappear.

Follow Up:

I received a call today from Pierre at SpyderAccessories today. He was following up on my review. His operation is really the essence of the Small Business community. It is just him and his significant other doing everything!! Since he does not make these arms, and does not want to infringe on any patents or other liability areas, he just has them made by a local craftsman - (who used to be a tech at BRP and now works as his own repair shop) and markets them to the public, so there is no expectation of videos, directions, wedges, or any additional support. He was really great to talk with, and offered to be of any assistance he could for future purchases, questions, and observations.
 
I still have a few on hand if anyone needs one

Hi noboot.
I'm new to this forum as well as a new Spyder owner. Loving every minute of it except when the windshield arm broke... I was more fortunate than some here since I was 5 minutes from home.
Do you still have some arms available? If yes, I would love to get o e from you.
Thanks for your help and all the info you be provided!


There is one listed on e bay yesterday from Noboot

I would just put in Can AM Spyder RT Replacement Windscreen Arm

In the search box on e bay to locate it
 
Hi noboot.
I'm new to this forum as well as a new Spyder owner. Loving every minute of it except when the windshield arm broke... I was more fortunate than some here since I was 5 minutes from home.
Do you still have some arms available? If yes, I would love to get o e from you.
Thanks for your help and all the info you be provided!
Pete, sent you a pm.
cheers
 
May need to file axle lightly

I ordered my replacement windshield arm from Ron (NOBOOT) two (2) years ago. It took all this time to finally get the job done, as I haven't been riding as much as I would like. Removed all the tupperware and pulled the OEM part that was prone to failure. All was going well with the job until I tried to assemble the hex shaft with the new arm. It would not fit (too tight). Nobody else seemed to have this problem according to previous posts.

I sent a message to Ron and within minutes had a response to "lightly file the end of the hex shaft." That helped but the shaft was still a bit too large for the new arm and would not pass through the arm easily. I filed (very lightly) all sides of the hex shaft. It only took a few light passes and the shaft easily (but still very snug) slid into the new arm.

Overall, the project is relatively easy with Ron's product. The wedges supplied to help remove the plastic gear are a great bonus. I spent more time trying to figure out the hex shaft fitment. Thanks to Ron's fast response, it wasn't more than an hour before I had everything installed and buttoned up. This product gives great peace of mind for a potentially dangerous problem.

Time to get out and ride now!
 
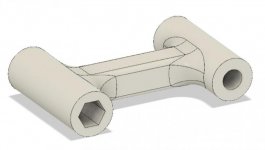
My windshield arm just broke for the second time. First time was within warranty years ago. I'm planning on designing and 3D printing mine out of Carbonfiber infused PETG.
 
I ordered my replacement windshield arm from Ron (NOBOOT) two (2) years ago. It took all this time to finally get the job done, as I haven't been riding as much as I would like. Removed all the tupperware and pulled the OEM part that was prone to failure. All was going well with the job until I tried to assemble the hex shaft with the new arm. It would not fit (too tight). Nobody else seemed to have this problem according to previous posts.

I sent a message to Ron and within minutes had a response to "lightly file the end of the hex shaft." That helped but the shaft was still a bit too large for the new arm and would not pass through the arm easily. I filed (very lightly) all sides of the hex shaft. It only took a few light passes and the shaft easily (but still very snug) slid into the new arm.

Overall, the project is relatively easy with Ron's product. The wedges supplied to help remove the plastic gear are a great bonus. I spent more time trying to figure out the hex shaft fitment. Thanks to Ron's fast response, it wasn't more than an hour before I had everything installed and buttoned up. This product gives great peace of mind for a potentially dangerous problem.

Time to get out and ride now!

happy to hear you DIY'ed a fix ….. however I would have filed the ARM instead …. a lot less filing , IMHO …… Mike :ohyea:
 
My windshield arm just broke for the second time. First time was within warranty years ago. I'm planning on designing and 3D printing mine out of Carbonfiber infused PETG.

If you have the equipment and know how to do this - Kudo's to you ….. You might be able to make a Killing producing them ….. Back in 14 ( before NoBoot 's piece ) I added thein flat pieces of metal to the sides of mine then wrapped a strap around the entire piece and welded the edges … NEVER GOING TO BREAK >>>>>> Mike :ohyea:
 
My windshield arm just broke for the second time. First time was within warranty years ago. I'm planning on designing and 3D printing mine out of Carbonfiber infused PETG.
Do not leave us in the dark. Let us know how this works out.
 
Do not leave us in the dark. Let us know how this works out.

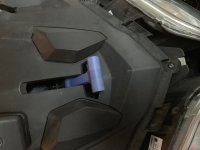
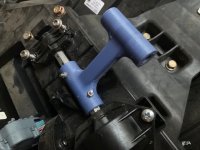
And 'Viola'. It's done. It's not shiny like an aluminum billet, but it sure is strong. This particular filament has 6000psi tensile strength.
I could easily print more and resell. Not sure how much to sell. Send me a PM if you're interested.

It took me a few hours to design, revise and perfect. The hardest part is getting the old one off. I chose to remove the small end with the magnet; preserving the integrity of the gear.

I could trim down the locking bolt as I didn't have a 22mm bold on hand, just 25mm's. OH, in case someone want to critique it: The layers are printed from barrel to barrel. This part will not split like the original. :)

Spyder Windshield Bracket.jpg
IMG_5595.jpg
IMG_5597.jpg
 
Back
Top