You may have seen this in the regular threads. I thought I'd clean this up, add some more info, and include it as a separate post for those interested. I know, I'm being a little pretentious.
I'm surprised at how little attention there is in this arm outside of this forum. I guess it really isn't as big of a deal as I had originally thought.
For those who aren't familiar with the issue, here's what all the hubbub is about.
There are three mechanical arms used to control the motion of the windshield on the Spyder RT. Two of the arms (left and right) are not powered and just guide the windshield into position.
The center arm, the mechanized control arm, is powered and provides the motive force to raise and lower the windshield.
When this mechanized control arm breaks, the windshield drops and lays down on top of the dashboard. The guide arms don't seem to let go, so it's unlikely the windshield will fall off and hit someone, but when you are at speed, the resultant blast of air can take one by surprise and cause a real "Uh-Oh!!!!" moment that tends to leave skid marks in your shorts.
The control arm is not available as a separate unit from BRP. You have to purchase the entire windshield drive mechanism from BRP to get a new control arm. The cost of the repair is somewhere in the $700 range, most of that cost is in purchasing the new drive mechanism. If this happens within the 2 year OEM warranty, BRP will pick up the replacement cost. If it happens after the 2 year warranty, the owner has to pick up the entire cost, even if the Spyder is covered under the BEST warranty.
On my 2010 RT, I had two windshield control arms break and consequently two complete new windshield drive mechanisms, all paid for by BRP.
Each of these arms lasted roughly 13,000 miles. I traded my 2010 RT in at about 30,000 miles.
Sadly, the new 2014 RT has exactly the same design control arm. In my opinion, it's unlikely the 2014 control arm will be more reliable.
An alternate billet aluminum arm is now available that replaces only the OEM control arm.
This requires dis-assembly of the windshield drive mechanism, something that is clearly outside the normal scope of BRP repair.
When installed, the new billet arm is expected to outlast the Spyder.
I chose to install the billet aluminum arm as a preventive measure, rather than wait for my OEM arm to fail.
Here is a photo of my second arm that was cracked and replaced before a catastrophic failure.
Here are two catastrophic failures. This next picture I have shamelessly stolen from Teddy's Dave (CyncySpyder)
This next picture I have, again shamelessly stolen from eddieshep999
There have been many other failures posted. I don't know how many in total. I'd guesstimate as much as 5% based in CyncySpyder's poll
http://www.spyderlovers.com/forums/...-check-this-on-your-machine&highlight=warning
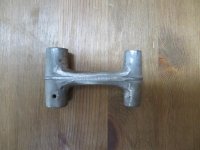
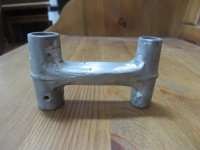
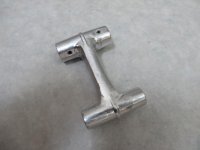
Here is a photo of the billet arm that I received.
I’d like to say a hearty Thank You to two people:
First, noboot (Ron) for making these beautiful works of art. As sturdy as they are beautiful. I understand there is a move afoot to have these arms available through one of the established vendors here on this site.
Second is John (JRWW). I had contacted JRWW who had installed the billet arm himself. He was able to give me some general directions to follow and a few keen pointers, some of which I neglected, much to my detriment. I will quote parts of his email at appropriate times
The billet arm is exactly that, a single piece of metal. Manufactured by cutting away unwanted material from one piece of aluminum. There are no welds to fail, nor is there any grain such as the pressed metal OEM pieces. The existing arm has often times proven inferior.
My 2010 went through two of these arms and a friend of mine surprisingly had his arm fail as well.
Talking with others, it seems the Florida contingent has no problems with these arms. It may well be that only those in the Northeast (AKA potholes) have reliability issues.
I photographed everything, mostly so I would know how to reassemble things.
First, remove the windshield and the windshield support. This comes out pretty easily with just a few bolts and bushings. This takes about 15 minutes.
Next, remove the fascia around the windshield operating arms to get to the one we want to replace.
There are two screws on the top, take them out.
You have to take off the mirrors, both left and right upper panels and the fascia around the headlights to get to all the bolts to remove the windshield fascia. This doesn’t take a long time.
At this point we’re about an hour into the project.
Now that the windshield mechanism is exposed, you need to start removing the arm from the mechanism in order to replace it.
Next is a photo of the windshield mechanism exposed with the OEM arm in place.
At this point, I’ll quote John:
"Gidday Steven,
I'll try and explain as best I can from memory, now been awhile since I did this. Once all the Tupperware is removed the tricky bit is prying the top plastic parts either side of the arm apart. They are glued down and after you remove the screws, use a flat bladed screwdriver, I gently tapped it between the top and bottom section, it takes a bit of force to break the glue and mine went flying across my workshop. Then the arm lifts out, make sure you mark the position of the arm on either side before removing. The next difficult part is removing the arm from the shaft, on one end is a magnet, put some tape over it so you don't lose it. I placed the arm in a bench vice to remove a pin that locks the arm in place. I sacrificed a small drill of the same size to tap it out, make sure you don't damage the hexagonal shaft in anyway as you won't get the new arm on. Then using a hair dyer to heat the toothed plastic wheel I used a small open ended spanner slightly bigger than the shaft placed on the wheel and very gently tapped the spanner with a hammer to remove the wheel. Did I mention gently!!!!! Take your time here!!!! Apply plenty of heat and take your time. Once you have the wheel removed then with a rubber mallet gently tap the hexagonal shaft out of the old arm. Again take your time and be gentle!!! The installation of the new arm is just the reverse, make sure the hole in the arm lines up with the hole in the shaft to replace the metal pin. Forgot to mention I had real difficulty in removing two of the screws on one side of the plastic holding the arm in place, ended up removing with multi grips and destroying the head, so went to my local bolt place and bought new bolts with Allen key head. Also once you have put the arm back in place and fitted everything, start your bike and operate the electric button to ensure the arm moves up and down without any issues. If you mark the position as I mentioned everything should be fine. Best of luck and let me know how you go.
Regards
John"
The arm/shaft/gear can be removed from the lifting mechanism without removing the mechanism from the Spyder.
I removed the screws that hold the top part of the plastic pieces in place. In both cases, the lower screw could be removed easily. I broke the heads off the upper screws. The plastic pieces came off with no problem at all. No, or little glue.
Removing the arm assembly was quite easy, and I was left with the next biggest problem. Removing the plastic gear to make way for removing and replacing the arm. There is a small screw at the end of the gear that retains the gear on the shaft. This needs to be removed. The head is a small phillips head, which I promptly stripped. I used a hacksaw to cut a new slot for a straight bladed screwdriver and carefully removed the screw.
I tried the spanner (wrench) trick John spoke of with one minor difference. Rather than putting the wrench around the plastic shaft of the gear, I put the wrench around the sprocket and began rapping. This was not wise. Not much happened, so I continue to rap with increasing force until I finally broke the gear. I should have paid more attention to the "gently" part.
Once the gear was broken, it was much easier getting the plastic shaft off the main shaft. I understand Ron is now including wedges in his kit to help with uninstalling the plastic gear.
Next is a photo of the broken gear.
So, now I had to fix the gear. I degreased the plastic parts and got out Devcon Plastic Welder, my go to glue for all things plastic from ABS to Styrene. It glues everything except polypropylene. If you ever use it, one safety tip: The instructions say “Use in a well ventilated area”. They aren’t kidding. This stuff is great, but it smells very bad. This glue forms a chemical bond with the plastic, so it's much stronger than a simple glue.

An hour later, the gear is repaired. I used one of my miniature screw drivers as a punch and hammered it to remove the pins on the old arm. I removed the old arm, installed the new arm reusing the pins and reinstalled the now repaired gear. I had to use a hammer to rap the plastic gear back into place. The outside diameter of the new arm is a little bigger than the old arm. When re-installing the pins, keep this in mind to try to install the pins to get maximum grip from both ends of the pin. Also remember to transfer the bushings from the old arm to the new arm.
Please note the plastic repair to the gear. I filled in the entire void space with glue, so instead of the 1/16" ring mounting the gear to the plastic shaft, now there is 3/8" of plastic mounting the gear to the plastic shaft. I was careful to make sure the gear was square to the shaft before the glue set. I'm confident that the plastic gear is now stronger than it was in its original configuration.
Here is another picture of the final assembly of the shaft. Notice the holes in the arm with the pins installed. You can clearly see that Ron has stamped the word "TOP" into the billet arm as another means to ensure the correct alignment.

I put the gear shaft and arm in place and locked it down with only one screw in each of the plastic retainers. I used the up and down buttons to cycle the mechanism and make sure it worked properly before I fully reassembled everything. You just need to make sure that you put the arm back in the same position you took it out from so the magnet lines up. The magnet is what controls the position of the arm. I used my favorite glue again to fill the screw holes of the broken screws to make sure the plastic parts stay in place tightly. This is very important. In my opinion, the control arm breaks because it is absorbing the energy from the twisting or bouncing motion of the windshield. The absorbed energy is what breaks the arm. The new arm doesn’t absorb the energy; it is strong enough that it just transmits the energy to the rest of the mechanism, so be sure the plastic parts are all locked down firmly, even if you need to use additional glue. This will ensure that other parts of the mechanism are strong enough to support the load of the bouncing windshield.
Next is a picture of the new arm assembled into the lifting mechanism.
Notice the two new screws in the upper holes of the plastic hold down pieces. These are also glued in place for additional strength.
After re-installing the front fascia, I ran the arm up and down again to make sure it operated properly.
All told, going from old arm to new arm took about 4 hours, and that included an extra 90 minutes figuring things out and repairing all the stuff I broke. Figure about 2 and a half hours if most goes well. I waited another 6 hours or so before I put the windshield support and windshield back in place to allow all the glued pieces to reach maximum strength before use.
I've had the new arm on for 1500 miles now. No operational issues with the lifting mechanism at all.


