• There were many reasons for the change of the site software, the biggest was security. The age of the old software also meant no server updates for certain programs. There are many benefits to the new software, one of the biggest is the mobile functionality. Ill fix up some stuff in the coming days, we'll also try to get some of the old addons back or the data imported back into the site like the garage. To create a thread or to reply with a post is basically the same as it was in the prior software. The default style of the site is light colored, but i temporarily added a darker colored style, to change you can find a link at the bottom of the site.

Peacekeeper6 Mod Thread

Not much mod per se, but just a quick tip.

I also frequent the many pages on Facebook involving Spyders. Many times, I run across owners breaking their latch release on their side compartments when they're trying to open them. I think this happens because the compartment doesn't open, so they end up using MORE force, hoping it'll release.

DO NOT PULL THE LATCH WITH GORILLA FORCE !! IT WILL NOT OPEN, AND YOU WILL END UP BREAKING IT !!!!

My left side compartment wasn't releasing open, so I decided to YouTube the problem. Lo and behold, there's some helpful Spyder Ryder who has documented the cable adjustment, and I just followed his clear and thorough instructions. Fifteen minutes later (I take my sweet old time), the problem was solved, and I now have a fully functional side compartment latch release.

So, what's the lesson here ??

IF you encounter the same problem, do NOT force the issue. You WILL end up making the problem worse. If you don't know the difference between a Torx 30 and a 4mm Allen, find a fellow rider who can turn a wrench and see if you can offer him a six-pack of his favorite drink while he adjusts your cable. Trust me, it's no skin off his back, and you *may* actually learn something about fixing your bike should the other side happens to start acting up.

Anyway, that's my rant.

Have a good day ....
 
Last edited:
BTW, if anyone is interested in TWO Lidlox helmet locks, please don't hesitate to PM me.

(They are about 2 years old, but I dropped and lost one of the small set screws when I initially installed it. However, I've found that it still works without it).
 
23) Trimming off some plastic underneath engine oil drain plug

Difficulty Level - 1.0

Tips - Jack up the bike for easier access. You can use a Dremel and trim off a small section just forward of the drain plug while it's still attached to the bike. If you do not have access to such tool, the panel can be easily removed because it is attached with only push pins. You can then use a pair of tin snips to easily cut through the plastic. I had to do the latter because I couldn't find my Dremel for the life of me, LOL.

Notes: "Why would you do such a thing", you ask yourself. Well, the last time I performed an oil change, the part of the hot oil stream that was draining was hitting this panel. This resulted in a mess, but was easily cleaned by removing the lower left body panel (the one that seems to always fly off) and then wiping the top of the panel. By making the hole a bit bigger, it will result in cleaner oil changes in the future.

(I'm betting dimes to donuts that there are a lot of Spyders out there that have this panel with a THICK coat of oil and dirt, resulting is a layer of "insulation", which isn't a good thing. This is why it is imperative (IMHO, anyway) that when the oil is draining that some of it isn't being caught by this panel).
 
Last edited:
23) Trimming off some plastic underneath engine oil drain plug. Difficulty Level - 1.0

(I'm betting dimes to donuts that there are a lot of Spyders out there that have this panel with a THICK coat of oil and dirt, resulting is a layer of "insulation", which isn't a good thing. This is why it is imperative (IMHO, anyway) that when the oil is draining that some of it isn't being caught by this panel).

Great idea.
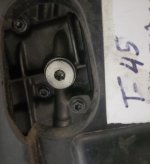
20220703_110009.jpg

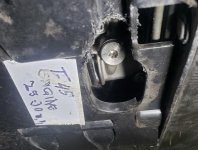
20220703_105944.jpg
 
Last edited:
Just take it off and leave it off. Help a lot with the rising heat. Thought it would cause a lot of crud to collect but that has turned out not to be the case.

Yeah, or you can do that.

However, it is my opinion that it's better to leave it on for two reasons:

(1) it offers protection against any road debris (small rocks, gravel, etc.) and decreases the dirt collecting in the nooks and crannies of the machine, and

(2) it aids in the airflow from front to back when the bike is traveling at speed, which gives it a more efficient cooling effect.
 

Love the small sticker denoting the size of the bit to use. I ended up buying the magnetic engine and transmission oil plugs that are hex, and will install them on the next oil change.

My cuts are a bit neater. I started with my Dremel Saw-Max tool and made one cut, but quickly realized that that it would end up pretty sloppy. The tool wasn't as manueverable as I thought, so I ended up removing the panel and finished it off with a pair of tin snips. Pretty happy with the results because it looks stock.

Too bad it's not easily seen and admired, lol.

A craftsman I'm not!

The "sticker" is a piece of white duct tape. I use it a lot to label stuff.
 
Last edited:
Welp, after much deliberation and thought, I finally decided to pull the trigger on a Baja Ron Sway bar.

Anyway, can't wait to receive it and get started. I even went to the garage and did a quick survey on what to take off. Guess my LED bumpskid will be the first one to go....

I didn't have to remove the bumpskid for the sway bar replace project.
 
24) Lamonster IPS Belt Tensioner

Difficulty Level - 1.5

Tips - Before you start, MAKE SURE THE BELT IS POSITIONED CORRECTLY !! If you tend to reverse your bike in your garage and start to work on it, you *MAY* find out that it won’t be centered after stopping in the forward motion, as in pulling forward into a parking spot. Why ?? The belt tends to “walk” a millimeter or two (perhaps more) between the forward and reverse motion of the rear wheel. If you install it after you reverse your bike into your garage, the roller might not be perfectly centered in the forward motion where it is supposed to be, and it is IMPERATIVE that it is dead center on the belt to maximize its effectiveness.


You WILL take off a few body panels, so if you tend to forget which fasteners go to which panel, try this trick as explained to me by my fellow Spyder Ryder Lew: when you remove the screws and push pins of a body panel, place ALL those fasteners in a Ziploc baggie and tape it on that panel. Then, when the time comes to install that panel back, you know EXACTLY which fasteners to use on it.

Notes: Lew was kind enough to give me his old tensioner (more like a dampener really) because I was still “on the fence” and very undecided on whether or not to install one. To me, it’s just another thing that can fail. But after watching this particular YouTube video, https://youtu.be/3eDlpv7Ks54, I decided I would install it. When I inspected the dampener that Lew gave me, I noticed that the roller was incredibly dinky. The small diameter roller would mean that it would end up spinning at stratospherically high rpms when I’m riding above 65 mph, resulting in A LOT of heat that would make the tensioner’s roller fail. Perhaps that is the reason why he upgraded to Lamonster’s tensioner, because his roller is substantially larger with TWO bearings. This means that the larger roller (which also seems smoother) will spin at lesser rpms and with those two bearings, result in less heat buildup and longer tensioner/roller life. These two reasons are why I decided to go ahead and purchase the IPS Belt Tensioner, instead of installing the one that Lew gave me.

I would’ve given this mod a 1.0, but the rear bolt proved just a bit difficult to install. The front one was easy, but I was a bit surprised that the second one fought me a little. I don’t feel too bad, because in the installation video, Lamont Bryden (the Mastermind behind Lamonster Garage) was also having the same problem, LOL.

I tested it the next day by going on the interstate and accelerating to 85 mph. When I didn’t have the tensioner, my bike would experience severe vibrations that were unnerving at speeds above 65 mph. However, I’ve found that my new tensioner GREATLY reduced the vibrations, to the point of not being able to feel them any longer. Smooth as silk !! This may also be because Lew, Dave (another local Spyder Ryder) and I reduced my belt tension from the factory setting of 220 to 150 using the Gates Krickit device. Lowering the tension AND installing this beefy (it really is a work of art: form AND function, “ya cain’t beat it !!”) tensioner completely changed my bike for the better.

Honestly, the only negative I can think of is inspecting/replacing the roller every 15,000 miles, as recommended by Lamont, who I believe is the designer of this worthwhile, high-quality product. (It seems like all of his IPS products are not only aesthetically pleasing, but screams “QUALITY”. That is why I didn’t hesitate buying this tensioner. Again, there is a reason why his products are on the upper end of the price scale, because quality and durability don’t come cheap). He really did an awesome job improving a poorly-designed part and making it look good AND, more importantly, making it perform flawlessly.
 
Last edited:
"I am glad for the improved cornering ability when pushing the machine's limits, but I didn't need it for routine riding." -UtahPete

I see that, LOL.
 
Back
Top