3Willie
Member
Like many, I could not find floorboards that were comfortable without spending a fortune, so made the ones shown.
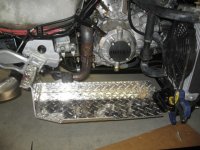
The material is 3/16 aluminum diamond plate that was shaped at a local shop. The boards are 8 inches wide with a 5/8 'lip' on the outer edge and 1 3/4 inch lip on the inner edge. The upturned lips give more integrity and strength to the floorboards. The inner lip is tall enough that I ran a 1/4 polished stainless carriage bolt through the hole in the peg bracket. A fender washer holds it to the bracket and really adds stability. I opted to keep the outer lip turned up to give something to grip to if the board was ever slick or during harder cornering. From the floor board to the next bend over the pegs is 5 1/4 inches with a 1 1/2 bend over the top of the peg. The floorboards that I had been using before also used the top of the peg for support which made sense. I did have to make an aluminum filler to fill the space where the peg grips were. Again used stainless carriage bolts to attach to the pegs.
The front of the floorboards fit between Street Magic Spyder Footrest brackets and the front frame supports. As noted in Street Magic advertising, these supports are only designed to rest your feet on and not for total body weight support. Combined with the other support I have built into my floorboards and the large flat area by the front frame support, neither the floorboards or brackets have any movement. When using the highway pegs, there is some slight flexing of the outer part of the footrest bracket. I can stand on my floorboards and not see any flexing of floorboards or support mounts. The floorboards are parallel to the ground and have as much ground clearance as the rest of the bike. It is a little hard to tell from the pictures, but the floorboards are level. They even had room for my 6'5" friend's size 13 feet when he gave it a test sit.
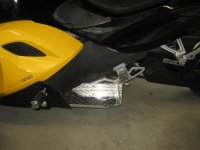
As you can see from the photos, the brakes is still functional as normal. You will see an extra cable from the cable driven hand brake that I had added under an earlier modification. With these new floorboards, I can now use either or both braking options. Either braking choice activates all of the normal braking function so I tend to use both depending on traffic or driving conditions.
The pictures of the floorboards without holes and other modifications was taken outside and shows a greenish cast. The floorboards are highly polished aluminum and were reflecting the green from the trees. Unfortunately, I did not notice that at the time I took the pictures.
I am not looking to become a vendor or supplier, but will give more dimensions if you PM me. The local shop would make of these up, but did require modifications to the inner lip on the clutch side to clear all transmission stuff. You would also have to mark and drill all holes. I did all of the custom fitting after I got home. If you want to contact them, I will give you their info.
I broke them in on a 150 mile ride yesterday and found they worked very well. Still a few sharp corners that I need to round off so I do not bang my shins, but overall very happy with the design. The diamond plate kept my feet very well in place, but have not ridden in the rain yet.
The material is 3/16 aluminum diamond plate that was shaped at a local shop. The boards are 8 inches wide with a 5/8 'lip' on the outer edge and 1 3/4 inch lip on the inner edge. The upturned lips give more integrity and strength to the floorboards. The inner lip is tall enough that I ran a 1/4 polished stainless carriage bolt through the hole in the peg bracket. A fender washer holds it to the bracket and really adds stability. I opted to keep the outer lip turned up to give something to grip to if the board was ever slick or during harder cornering. From the floor board to the next bend over the pegs is 5 1/4 inches with a 1 1/2 bend over the top of the peg. The floorboards that I had been using before also used the top of the peg for support which made sense. I did have to make an aluminum filler to fill the space where the peg grips were. Again used stainless carriage bolts to attach to the pegs.
The front of the floorboards fit between Street Magic Spyder Footrest brackets and the front frame supports. As noted in Street Magic advertising, these supports are only designed to rest your feet on and not for total body weight support. Combined with the other support I have built into my floorboards and the large flat area by the front frame support, neither the floorboards or brackets have any movement. When using the highway pegs, there is some slight flexing of the outer part of the footrest bracket. I can stand on my floorboards and not see any flexing of floorboards or support mounts. The floorboards are parallel to the ground and have as much ground clearance as the rest of the bike. It is a little hard to tell from the pictures, but the floorboards are level. They even had room for my 6'5" friend's size 13 feet when he gave it a test sit.
As you can see from the photos, the brakes is still functional as normal. You will see an extra cable from the cable driven hand brake that I had added under an earlier modification. With these new floorboards, I can now use either or both braking options. Either braking choice activates all of the normal braking function so I tend to use both depending on traffic or driving conditions.
The pictures of the floorboards without holes and other modifications was taken outside and shows a greenish cast. The floorboards are highly polished aluminum and were reflecting the green from the trees. Unfortunately, I did not notice that at the time I took the pictures.
I am not looking to become a vendor or supplier, but will give more dimensions if you PM me. The local shop would make of these up, but did require modifications to the inner lip on the clutch side to clear all transmission stuff. You would also have to mark and drill all holes. I did all of the custom fitting after I got home. If you want to contact them, I will give you their info.
I broke them in on a 150 mile ride yesterday and found they worked very well. Still a few sharp corners that I need to round off so I do not bang my shins, but overall very happy with the design. The diamond plate kept my feet very well in place, but have not ridden in the rain yet.