PW2013STL
Active member
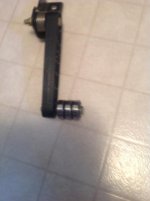
As many have done I installed the F3 belt tensioner on my RT.
I made a extension plate and mounted the stock BRP F3 tensioner. I read with interest the posts about them failing and Doc's improved arm and roller, but since my was working fine I waited to see if I would have that issue. Well after 11,000+ miles mine started to sing a song that reminded me of the saying that it's over when the fat lady sings.
My wife was driving at the time so I have her pull over into a parking lot and I laid on the ground and checked the roller. I could move it around quite a bit so I tied it up so it was off the belt and removed it when we got home.
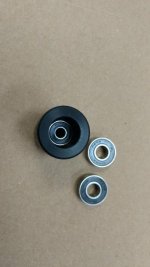
The roller itself looked good so I assumed it was the single little bearing that was the issue. I decided I would make it a two bearing roller.
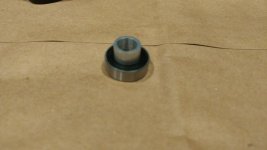
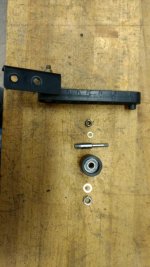
I machined out the roller so that the two bearings would be equally spaced in the roller with a presss fit that would trap the outer race and keep it from moving. I machined a spacer that goes between the two bearings that captured the inner races. My mastake on the bearings I chose was going with a larger inner opening (ID) which forced me to machine a stepped shaft. I used washers on the out side that only touched the inner races, and lock nuts on both ends. By doing it this way when all was assembled the roller only turns on the ball bearings.
I also machined off .28 of the arm that the new roller assembly mounts to as this was needed to keep the distance correct due to the added bearing.
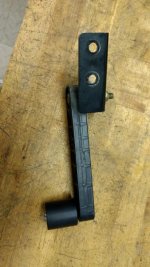
The roller now rolls smooth and easy without any side play.
Time will tell how well this works, but since I have less then $25 tied up in material it's a low $ risk.
I made a extension plate and mounted the stock BRP F3 tensioner. I read with interest the posts about them failing and Doc's improved arm and roller, but since my was working fine I waited to see if I would have that issue. Well after 11,000+ miles mine started to sing a song that reminded me of the saying that it's over when the fat lady sings.
My wife was driving at the time so I have her pull over into a parking lot and I laid on the ground and checked the roller. I could move it around quite a bit so I tied it up so it was off the belt and removed it when we got home.
The roller itself looked good so I assumed it was the single little bearing that was the issue. I decided I would make it a two bearing roller.
I machined out the roller so that the two bearings would be equally spaced in the roller with a presss fit that would trap the outer race and keep it from moving. I machined a spacer that goes between the two bearings that captured the inner races. My mastake on the bearings I chose was going with a larger inner opening (ID) which forced me to machine a stepped shaft. I used washers on the out side that only touched the inner races, and lock nuts on both ends. By doing it this way when all was assembled the roller only turns on the ball bearings.
I also machined off .28 of the arm that the new roller assembly mounts to as this was needed to keep the distance correct due to the added bearing.
The roller now rolls smooth and easy without any side play.
Time will tell how well this works, but since I have less then $25 tied up in material it's a low $ risk.