markyodo
New member
I took some of the best information from around the forums (here & elsewhere) and decided to try my hand at building a reliable trailer for our Spyder. The build started on Saturday and I finished this afternoon. I have been working on it a few hours each day as I get the supplies. When we return from our weekend trip I will be adding an LED light to the inside of the trailer and connect it to a pressure switch on the lid.
I apologize in advance if this post is long winded.
First here's a break down of my costs not including registration and plates.
$13.90 Cargo Net http://www.amazon.com/gp/product/B00K73QBKS/ref=oh_aui_detailpage_o02_s00?ie=UTF8&psc=1
$3.99 Split Loom http://www.amazon.com/gp/product/B0006301MS/ref=oh_aui_detailpage_o03_s00?ie=UTF8&psc=1
$5.81 4 Pole Connector http://www.amazon.com/gp/product/B004BE60ZU/ref=oh_aui_detailpage_o08_s00?ie=UTF8&psc=1
$7.40 Heat Shrink http://www.amazon.com/gp/product/B00EXLLXK8/ref=oh_aui_detailpage_o08_s00?ie=UTF8&psc=1
$7.41 Grease http://www.amazon.com/gp/product/B0077K8WJC/ref=oh_aui_detailpage_o08_s00?ie=UTF8&psc=1
$5.64 Paint http://www.amazon.com/gp/product/B003CT4AQQ/ref=oh_aui_detailpage_o08_s01?ie=UTF8&psc=1
$6.57 Eyebolts and nuts from Local Hardware Store
$9.36 Liquid Nails from Local Hardware Store
$16.07 6x8 Area Rug from the Bargain Outlet (next to Harbor Freight)
$40.00 LED Trailer lights http://www.harborfreight.com/one-pair-submersible-trailer-led-lights-94137.html
$329.00 Trailer from Harbor Freight http://www.harborfreight.com/600-lb-capacity-78-inch-tag-along-trailer-66771.html
Unboxing
We picked up the trailer on Thursday and I took some photos of the un-boxing for those not familiar with the HF Tag Along trailer. The packaging was "ok" the box was visibly damaged but everything was inside and in good condition.


Wheel Bearings
The first thing recommended by many was to repack the wheel bearings. The original state was pretty dismal and the "vasoline" they used was scarce.
I took it apart and cleaned them before applying the new grease and reassembling.


Paint the Wheels
Next I wanted to paint my rims black to match the trailer and Spyder. I lightly sanded the existing paint and wiped everything clean. I prepped the area with some tape and a plastic trash bag.


Carpet Installation
When we purchased the trailer I had an idea that I wanted to try carpeting the inside. We stopped by the Bargain Outlet to see if they had any remnants but what we found was a nice roll of indoor outdoor area rug. I wanted a permanent carpet mounted to the roof of the trailer and removable carpet in the bed of the trailer. I prepped the surface with a good wash before gluing the carpet to the roof of the trailer. Then weighted it with a few small items till dry. I then used smaller strips to complete the wrap around effect on the roof.
Total weight added is maybe 4-5 lbs total. The carpet was really light.


The bottom carpet is held on with the eye bolts, and a second piece was added which has slits in it that just slide over the eye bolts. Easy to remove and clean.


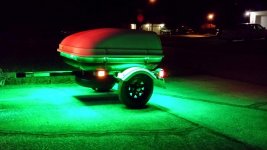
LED Lights
I wanted to upgrade the light kit that comes with the trailer and simply based on suggestions and convenience I decided to go with the Harbor Freight LED trailer light kit. The installation was easy and the lights are very effective.
All wires were cut, soldered, and shrink wrapped. Each light's ground is attached to the trailer.

4 Pole Connector
I had to do some research to find this. I found the part on Amazon and it was a simple install. I cut the standard connector off, stripped the wires, soldered the new connectors wires, and added the shrink wrap.

Split Loom
To give all the wiring a finishing touch I added split loom. Covering the entire length of the main wire run to the bike, and small sections on each tail light which go into the frame for a short length.


Rubber between springs and frame
One part of the install I forgot to take photos of was my placement of high density impact resistant rubber strips between the support springs and the frame. There was quite a gap, I guess by design, and I had read about some others placing scraps of automotive belts in there to help with vibration and sound.
Final Look
Overall I am very pleased with this build. I have taken the trailer out for a few miles and it tows so quiet I had to keep checking my mirrors.
I think it will add huge value to our extended trips this summer.


To do - I will be installing the LED light after the first trip, and I am coating the under side of the trailer with some Rustoleum rubber coating to protect the frame and trailer.
Thanks for looking! :f_spider: hyea:
hyea:
I apologize in advance if this post is long winded.
First here's a break down of my costs not including registration and plates.
$13.90 Cargo Net http://www.amazon.com/gp/product/B00K73QBKS/ref=oh_aui_detailpage_o02_s00?ie=UTF8&psc=1
$3.99 Split Loom http://www.amazon.com/gp/product/B0006301MS/ref=oh_aui_detailpage_o03_s00?ie=UTF8&psc=1
$5.81 4 Pole Connector http://www.amazon.com/gp/product/B004BE60ZU/ref=oh_aui_detailpage_o08_s00?ie=UTF8&psc=1
$7.40 Heat Shrink http://www.amazon.com/gp/product/B00EXLLXK8/ref=oh_aui_detailpage_o08_s00?ie=UTF8&psc=1
$7.41 Grease http://www.amazon.com/gp/product/B0077K8WJC/ref=oh_aui_detailpage_o08_s00?ie=UTF8&psc=1
$5.64 Paint http://www.amazon.com/gp/product/B003CT4AQQ/ref=oh_aui_detailpage_o08_s01?ie=UTF8&psc=1
$6.57 Eyebolts and nuts from Local Hardware Store
$9.36 Liquid Nails from Local Hardware Store
$16.07 6x8 Area Rug from the Bargain Outlet (next to Harbor Freight)
$40.00 LED Trailer lights http://www.harborfreight.com/one-pair-submersible-trailer-led-lights-94137.html
$329.00 Trailer from Harbor Freight http://www.harborfreight.com/600-lb-capacity-78-inch-tag-along-trailer-66771.html
Unboxing
We picked up the trailer on Thursday and I took some photos of the un-boxing for those not familiar with the HF Tag Along trailer. The packaging was "ok" the box was visibly damaged but everything was inside and in good condition.
Wheel Bearings
The first thing recommended by many was to repack the wheel bearings. The original state was pretty dismal and the "vasoline" they used was scarce.
I took it apart and cleaned them before applying the new grease and reassembling.
Paint the Wheels
Next I wanted to paint my rims black to match the trailer and Spyder. I lightly sanded the existing paint and wiped everything clean. I prepped the area with some tape and a plastic trash bag.
Carpet Installation
When we purchased the trailer I had an idea that I wanted to try carpeting the inside. We stopped by the Bargain Outlet to see if they had any remnants but what we found was a nice roll of indoor outdoor area rug. I wanted a permanent carpet mounted to the roof of the trailer and removable carpet in the bed of the trailer. I prepped the surface with a good wash before gluing the carpet to the roof of the trailer. Then weighted it with a few small items till dry. I then used smaller strips to complete the wrap around effect on the roof.
Total weight added is maybe 4-5 lbs total. The carpet was really light.
The bottom carpet is held on with the eye bolts, and a second piece was added which has slits in it that just slide over the eye bolts. Easy to remove and clean.
LED Lights
I wanted to upgrade the light kit that comes with the trailer and simply based on suggestions and convenience I decided to go with the Harbor Freight LED trailer light kit. The installation was easy and the lights are very effective.
All wires were cut, soldered, and shrink wrapped. Each light's ground is attached to the trailer.
4 Pole Connector
I had to do some research to find this. I found the part on Amazon and it was a simple install. I cut the standard connector off, stripped the wires, soldered the new connectors wires, and added the shrink wrap.
Split Loom
To give all the wiring a finishing touch I added split loom. Covering the entire length of the main wire run to the bike, and small sections on each tail light which go into the frame for a short length.
Rubber between springs and frame
One part of the install I forgot to take photos of was my placement of high density impact resistant rubber strips between the support springs and the frame. There was quite a gap, I guess by design, and I had read about some others placing scraps of automotive belts in there to help with vibration and sound.
Final Look
Overall I am very pleased with this build. I have taken the trailer out for a few miles and it tows so quiet I had to keep checking my mirrors.
I think it will add huge value to our extended trips this summer.
To do - I will be installing the LED light after the first trip, and I am coating the under side of the trailer with some Rustoleum rubber coating to protect the frame and trailer.
Thanks for looking! :f_spider:
hyea:
Last edited:
")