• There were many reasons for the change of the site software, the biggest was security. The age of the old software also meant no server updates for certain programs. There are many benefits to the new software, one of the biggest is the mobile functionality. Ill fix up some stuff in the coming days, we'll also try to get some of the old addons back or the data imported back into the site like the garage. To create a thread or to reply with a post is basically the same as it was in the prior software. The default style of the site is light colored, but i temporarily added a darker colored style, to change you can find a link at the bottom of the site.

Making the 2013 Spyder RT-S "Perfect"

So today was going to be spent installing the ISCI front hand brake, but that got derailed when I realized that the main bracket of the kit bolts to the frame at the right side frame rail.

My problem is that when my dealer performed the heat related recall work back in October, they snapped off one of those bolts and NEVER told me. I realized it a few weeks ago as I removed the header pipes. The ISCI bracket is solid and heavy and I'm sure needs to be secured by both of those bolts and not just one.

I tried to get the bolt out with a screw extractor and I ended up snapping the screw extractor. If you look hard, you can see it right in the center of the bolt. Not good since drilling through the screw extractor would be extremely difficult.
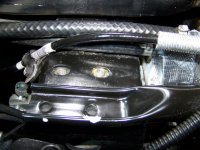
Broken Bolt - 1.jpg

Luckily, since the bolt did not snap flush, I ended using a hardened steel dremel bit and carved away the outer part of the bolt away from the screw extractor to where just the screw extractor was exposed. Luckily, I was then able to turn it out. You can see it laying next to the broken bolt.
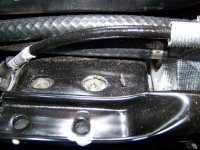
Broken Bolt - 3.jpg

After that, I had to use cobalt drill bits to drill out the screw. It was an exercise in patience to say the least. From there, I used an M8 tap to re-thread it and the ISCI bolt will now thread into it.
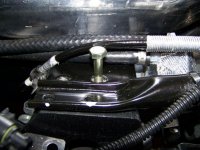
Broken Bolt - 5.jpg

So that burned most of the day, but I was happy to get it done. I'm still burning about the fact that the dealer snapped it off and never said anything about it. At this point, I'm debating about whether it is worth bringing it to their attention or not as I'm sure it was something that the mechanic did not want to come clean on.
 
I got the rear Elka shock installed this weekend. I can honestly say that I had no perceived issues with the stock shock. All of my complaints were with the front shocks, but since I was replacing the fronts with the Elkas, I figured it would offset the balance of the Spyder if I didn't replace the rear shock as well. This is the 1+R shock and compared to the stock shock, you can clearly see the difference in quality. It looks much more solid in design as well. The 2nd picture was taken from the right side of the bike. I have the purge valve facing the front of the bike and the rebound adjuster facing out the right side at the bottom. I got a good tip from a friend on the forum who said that there are reports of the lower shock bolts bending, so he hooked me up with a hardened steel replacement bolt instead.

View attachment 81622 View attachment 81623

Stewart,

In looking at your oem spring, if you measured the little gaps between the tightly wound coils (it looks like the bottom three coils) at the bottom of the coil spring and added them up, what total measurement would you get?

Jerry
 
Stewart,

In looking at your oem spring, if you measured the little gaps between the tightly wound coils (it looks like the bottom three coils) at the bottom of the coil spring and added them up, what total measurement would you get?

Jerry

The lowest one has a 1/10" gap. The next two up from there each have a 1/4" gap.
 
The lowest one has a 1/10" gap. The next two up from there each have a 1/4" gap.

Thanks Stewart. I am guessing the next gaps are progressively wider?

I'm thinking of using the 2013 spring as it has less wimpy coils and can be made to work. The 2010-2012 rear coil might be able to be made to work, but it would require a big spacer. I added a 0.85" spacer and it helped, but still bottoms out. Here is the thread on the work:
http://www.spyderlovers.com/forums/showthread.php?61674-2012-RT-S-SE5-Rear-Suspension-(shock)

The total gap of the bottom 3 coils is 0.6" (0.1 + 1/4 x 2), so a 0.85 spacer should negate those gaps and get you to the stiffer portion unlike the earlier year springs.

I think this is the cheapest replacement coil out there. It's not perfect out of the box, but I think it can be made to work and is hard to beat the price.

Jerry
 
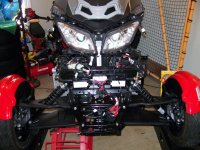
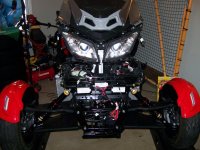
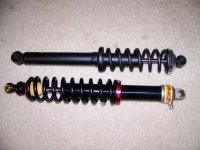
Today I got the front Elka shocks installed. Below is a before and after look at the front end. Also a side-by-side comparison between the Elka and the stock shock. It is hard to tell in the picture, but there is definitely a huge quality difference between the two. My complaints with the front OEM shocks are that they tend to let the front end wander on less than perfect roads and they allow the Nanny to kick in way too easily going through turns. I have definitely gotten good at riding around the Nanny, but the OEM shocks allow the bike to lean way too much and way too easily at speed. Everything I have read and from talking with Len at PitBull, the Elkas should be a huge improvement over the OEM suspenders.

Front Elka - 2.jpg Front Elka - 3.jpg Front Elka - 1.jpg
 
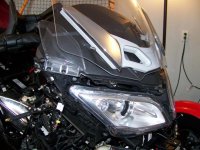
Since I am sparing no expense with this project, I decided to swap out the stock wind deflectors with the chrome ones. They retail for $105 and I got them for $90, which is a drop in the bucket compared to the rest of the updates :)

The one thing that I didn't like about the stock (clear) deflectors is that you can't really clean behind them very well. I am a neat freak and I like keeping my stuff spotless. I figure that the chrome not only looks better, but you can't see the dirt wedged behind it.

In addition, I also bought the adjustable wind deflectors in chrome, so they should match well.

Wind Deflector - 1.jpg Wind Deflector - 2.jpg
 
Today I got the front Elka shocks installed. Below is a before and after look at the front end. Also a side-by-side comparison between the Elka and the stock shock. It is hard to tell in the picture, but there is definitely a huge quality difference between the two. My complaints with the front OEM shocks are that they tend to let the front end wander on less than perfect roads and they allow the Nanny to kick in way too easily going through turns. I have definitely gotten good at riding around the Nanny, but the OEM shocks allow the bike to lean way too much and way too easily at speed. Everything I have read and from talking with Len at PitBull, the Elkas should be a huge improvement over the OEM suspenders.

View attachment 81919 View attachment 81920 View attachment 81921

the Elka's should be much better than stock. They should be the last shocks you will ever need for the bike as they are rebuildable.

That said, You should still check your preload once you get your bike back together. It is easy to adjust the preload as you have a threaded shock body. To increase preload you just screw down the the red piece at the end of the spring to increase preload on the spring. You will note the working range of the Elka looks to be less than the stock shock - the exposed chrome rod between the bumper and shock body is shorter than the oem shock spacing. So you don't want to use any more of that precious space than you need to at rest.

It looks like the end to end length is greater for the Elka's - is that correct? To me, that suggests the bike should sit a little taller. The stock shock working range of 2.5" allows the front suspension to operate over a 5.9". Depending on your Elka working range, I bet the bike will be at least 2" higher when the shock is fully compressed. That means you are not likely to scrape your bottom anymore.

Keep posting.

jerry
 
It looks like the end to end length is greater for the Elka's - is that correct? To me, that suggests the bike should sit a little taller.

It's funny you say that. Unfortunately, I did not measure both when I had them off. Visually, the Elkas do look a little longer, but when I put the first one on the bike with the stock shock still on the other side, the Elka side sat a little lower. After replacing the other OEM shock, the bike was level. Again, I did not measure, but to me, it looks like the bike sits a little lower.
 
You may not have enough preload on the Elka shock. If you do not have the nylon washers, have your wife take a pic of the shock with you on the bike. The pic you want is of the bumper end. Since you have the frunk off, you should have a clear view of the shock. Perhaps if you have a camera stand and can put it on a timer shot, your wife can get on the bike. I would hope the shock doesn't compress too much, I'd hope you have at least 1 to 1.5" remaining.

I could swear most people that put Elka's on say the bike sits higher.

jerry
 
Last edited:
You may not have enough preload on the Elka shock. If you do not have the nylon washers, have your wife take a pic of the shock with you on the bike. The pic you want is of the bumper end. Since you have the frunk off, you should have a clear view of the shock. Perhaps if you have a camera stand and can put it on a timer shot, your wife can get on the bike. I would hope the shock doesn't compress too much, I'd hope you have at least 1 to 1.5" remaining.

I could swear most people that put Elka's on say the bike sits higher.

jerry

I ran it by a friend who put Elkas on his 2013 and he seemed to think that it sat slightly lower as well. I wish I had measured.....
 
It's only 2 bolts and its off...

After I get the jack back under it and maneuver the A-arm to get it out then back in. You actually need 3 hands to do it. With all of the work I have left, it is low priority for now. I should have measured when I had the chance, but I think I'll ride it first and go from there.
 
What MAP for the fuel mgmnt are you starting with?

I contacted Dyno Jet directly about this. They have 2 maps available. The first map is a stock map. The second map is for a Two Brothers exhaust and a Green air filter. I have those two mods (Akrapovic & KewlMetal Kit) plus the cat removal. They said to start with the second map and the AutoTune will have no problem adjusting from there. Once I get things running in the spring, I'll probably check the AutoTune Trim tables weekly and apply them to the map which will bring it up to date. The AutoTune will continue making adjustment using the updated map as the starting point.
 
I contacted Dyno Jet directly about this. They have 2 maps available. The first map is a stock map. The second map is for a Two Brothers exhaust and a Green air filter. I have those two mods (Akrapovic & KewlMetal Kit) plus the cat removal. They said to start with the second map and the AutoTune will have no problem adjusting from there. Once I get things running in the spring, I'll probably check the AutoTune Trim tables weekly and apply them to the map which will bring it up to date. The AutoTune will continue making adjustment using the updated map as the starting point.

What I was wondering do you think you really need the dual channel with a water cooled engine? Seems to me even though the air flow may not hit the rear cylinder as much, the water jacket and temprature is constant. Much more so than an air cooled engine.
 
What I was wondering do you think you really need the dual channel with a water cooled engine? Seems to me even though the air flow may not hit the rear cylinder as much, the water jacket and temprature is constant. Much more so than an air cooled engine.

You're 100% correct in your assumption, but take a look at the picture of my plugs that I posted a page or two ago. The rear cylinder is running richer than the front. Considering they are driven by the same FI module, you would think they would be equal. That's why I spent the extra $100 to get the dual channel AutoTune. That way each cylinder will have a map that is tuned to how it is running.
 
Where did you source the O2 bungs?

They come with the AutoTune. You just have to have them welded in. I hope to get the headers back at the end of the week, so I can post photos of where I had them placed. The rear header was the tricky one because it is very short and with the OEM O2 sensor still needing to be in place and the frame rail just to the right of it, I found only one good place to put it. If you go with the AT-200, that requires just a single O2 sensor bung to be welded in and that can easily go on the front header pipe.
 
They come with the AutoTune. You just have to have them welded in. I hope to get the headers back at the end of the week, so I can post photos of where I had them placed. The rear header was the tricky one because it is very short and with the OEM O2 sensor still needing to be in place and the frame rail just to the right of it, I found only one good place to put it. If you go with the AT-200, that requires just a single O2 sensor bung to be welded in and that can easily go on the front header pipe.

You have been good with posting pics, so please do so with these as well showing the location of all 3 O-2 sensors please.

Jerry
 
My running theory on why some bikes are running hotter than others and why cylinders are showing different mixtures is the O2 sensors BRP seems to be using have a larger than desired range of calibration. I would dare bet that if you swapped O2 sensors front to rear, your lean cylinder would swap in time too.

What I would really wish one of our vendors would come up with is one of the adjustable 02 sensor devices that plug in in-line and slightly modifies the signal the ECM sees from the sensor, thus offsetting the mixture slightly. On the Harleys these are called an XIED but there are none available for the 4 wire O2 sensors BRP is using. They work very well.
 
Back
Top