• There were many reasons for the change of the site software, the biggest was security. The age of the old software also meant no server updates for certain programs. There are many benefits to the new software, one of the biggest is the mobile functionality. Ill fix up some stuff in the coming days, we'll also try to get some of the old addons back or the data imported back into the site like the garage. To create a thread or to reply with a post is basically the same as it was in the prior software. The default style of the site is light colored, but i temporarily added a darker colored style, to change you can find a link at the bottom of the site.

Just bought - 2014 Spyder RT-S SE6 77K miles with RT-622 trailer

As usual Peter you are spot on ...... to the OP, if I understand your last post ... you already swapped out the Crapenda's for the Vredestein' s AND they don't feel right !!!!! .... I would look at the Alignment I think that's a problem right now ..... AND FOUR end links for the sway bar .... I think they only use TWO ..... good luckl .... Mike :thumbup:
 
Vredestein Quatrac 5 165/60R15 and 205/70R15 arriving tomorrow

Peter -- you have the persistence of my sister.:D

But I listen to my sister because she's usually right. Tire Rack will deliver the tires tomorrow if snow permits. Weather has been cold and wet so I probably won't see my tire guy until next week.
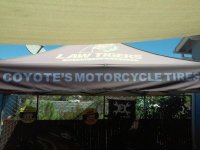
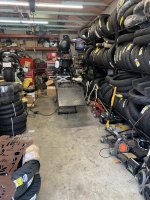
Coyote Business.jpg Coyote Shop.jpg Coyote Helmet.jpg
Yep that's a real coyote skull facing backwards on that helmet.

Next I'll walk through the Parts Catalog and see what front suspension wear parts I can replace.

When the weather is a bit warmer and drier I'll explore the upper portion of the steering linkage.

WRT to DPS, yeah that power feed looked to be at least an 8AWG, maybe 6AWG. The battery is a new Shorai LFX36L3-BS12 https://shoraipower.com/battery?type=175&make=380732&model=380733&year=380733 although I didn't clean any terminals past the battery. So I will do the DeoxIT thing https://caig.com/deoxit-d-series/ for both fuse boxes and any heavy current connections I can reach without removing too much bodywork.

I too was concerned about DPS surge currents which is one of the reasons I replaced the SLA Yuasa and installed a voltmeter. The voltmeter doesn't show any drop while turning (turn-in and steady) although I had considered a second Shorai. BTW the oil pressure doesn't change during shifts up or down. So I'm happy with gauges, voltage and oil pressure.

I'll ask BajaRon for his thoughts on sway bar links and bump steer mitigation.

Racetech Suspension is just up the road 1.5 hours away so may pay them a visit too. They will be my supplier if I need to replace the shocks.

Thanks for the analysis and recommendations. I'll keep you informed on my findings.
 
I went through the Parts Catalog looking for front suspension wear or weak parts:

A-arm bushing: 706201519; 8@$11.99; appear to be non-greasable rubber; unclear difficulty but I done this for my cars
Upper ball joint: 706201371; 2@$41.99; some specialized tooling needed
Lower ball joint: 706201739; [email protected]; some specialized tooling needed
Sway bar bushing: 706201391; 4@$8.41; appear easy to replace; BajaRon uses 11/16" Delrin bushings
Sway bar end link: 706200671; 2@$15.99; easy to replace; BajaRon offers metal alternative
Tie rod: 709400833; [email protected]; don't look hard to replace
Lower steering column: 709401411; [email protected]; will have to raise upper bodywork to replace just like for spark plugs

Can-Am doesn't offer shock bushings (most OEMs don't). BajaRon has replaced his shock bushings and I may do the same using Energy Suspension polyurethane. I expect some fabrication will be required.

The front wheel bearings are cone (tapered?) so will be looking to lubricate and adjust if possible. I also discovered my wheels are Base not -S which is not a surprise. They don't appear to be damaged but will use dial gauge to verify.

I'm not sure how to test the A-arm bushings. I'll visually inspect them of course. I'll take the wheels off and see if I can detect any fore-aft motion. And maybe use a crowbar to detect twisting motion. Beyond that I have no ideas. For $100 I might just replace them anyway.

Extensive reading about the BajaRon sway bar points to increasing the margin of safety as well as improving cornering performance so that is on the Buy list for next month.
 
Vredestein Quatrac 5 205/70R15 didn't fit and some other stuff

Took the Vredestein Quatrac 5 tires to Vey's Powersports this morning. The front 165/60R15 are mounted. The tire installer will find a new home for the rear 205/70R15 because it rubbed the top of the shock asorber. Thought I would downsize to /65 profile but research showed people liked the 215/60R15. TireRack had one left of a closeout Uniroyal Tiger Paw Touring -- it will be here Wednesday. The reviews said it performed satisfactorily and was quiet.

Vey's remounted my old tire for free which was very nice of them.

My /70 profile excursion looks to have cost me about $200.

In other news, EBC pads, SpeedBleeders and fresh ATE 200 at all three corners. I couldn't retract the rear piston. The groove on the rear Brembo pads was almost gone while the fronts were in good shape so at 77K miles I think the fronts had been replaced and the rears were original so maybe the piston was over-extended? Anyway I bought a rear brake assembly on eBay $40 from swing arm bracket to hardline. Piston retracted just like it was supposed to. And Yes the BajaRon tool is wonderful. As are the SpeedBleeders.

I'm proceeding one thing at a time on suspension and steering. After the rear tire is installed, I will find a laser alignment place (Vey's no longer does that service). And from there probably bushings as needed.

As part of suspension/steering investigation, I started disassembling the handlebar. What a surprise -- it's not a bar but rather a multi-part assembly. I discovered there is a "height" adjustment although if the bars were tilted higher my hands would intrude into the mirror rear view. Haven't found any smoking guns yet.

I also discovered the LH heated grip wire had been repaired and the RH heated grip wire had been damaged by pinching from the bar cover. I was already unhappy with the unlighted two-position switch so will replace it with a 12-to-24V booster and adjustable PWM to provide more heat with a visible indication (knob).

I've pretty much gotten used to driving the center of the lane. Still shaving the corners a bit too close. I like the paddle shifter. And that trailer I never intended to buy sure is handy. Takes me about 10 minutes to install/remove the hitch. Fit for purpose.:D
 
In other news, EBC pads, SpeedBleeders and fresh ATE 200 at all three corners. I couldn't retract the rear piston. The groove on the rear Brembo pads was almost gone while the fronts were in good shape so at 77K miles I think the fronts had been replaced and the rears were original so maybe the piston was over-extended? Anyway I bought a rear brake assembly on eBay $40 from swing arm bracket to hardline. Piston retracted just like it was supposed to. And Yes the BajaRon tool is wonderful. As are the SpeedBleeders.

I'm proceeding one thing at a time on suspension and steering. After the rear tire is installed, I will find a laser alignment place (Vey's no longer does that service). And from there probably bushings as needed.
The pistons on the front brakes can be pushed in. The one on the back brake has to be screwed in. You cannot push it in. Use long nose pliers or whatever you can to turn the piston. Baja Ron has a tool to do the turning. The kit that NAPA has for loan doesn't have a disc with correctly spaced pins.

I see a post above where you mention working with the upper steering column. The U-joints might be worn. You can determine that most likely by checking for play in the handlebar. The bad part about replacing the steering column is you have to remove the frunk and front dash module, i.e., open up the front end completely. It's not a 2 hour job!
 
Spyders have a primitive type steering design, not counting the fancy smancy Electric Power Assist.

Without, idler arms, or correctly positioned inboard tie rod ends, the design suffers from bump steer concerns.

For troubleshooting purposes, since what you describe regarding turn in and twitchiness indicates insufficient toe in, for the moment, avoid a laser alignment and just measure toe directly.

Without knowing your weight, I suggest have some of similar weight sit on the Spyder. Check the toe setting and be certain you have toe in, not toe out. If needed, carefully adjust equally both tie rods, striving for about 3/16” toe in at the tread.

If this stabilizes the handling, at your discretion, either immediately get a correct alignment done with resetting BUDS, or accomplish your suspension component replacements, the align.

Understand too, it is highly likely that even though mechanically the steering system is correct, electronically the steering system can be incorrect. The steering angle sensor has a small range left or right of center before it combines with the steering torque sensor, and adds input to the steering. Once in alignment these both must be nulled in the straight ahead mechanical position.

Regardless, having previously had a twitchy ill handling Spyder in our house, a simple alignment check and reset with tape measures cured the issue. These days I have BUDS and a ROLO setup, but my basic setup I accomplished was well within specs without the fancy equipment.
 
No I am lifting and shifting backwards, just a few inches, the entire upper half of the bodywork. Since I was working by myself I wasn't sure if I could handle the frunk. And since I was replacing BRP fasteners with stainless steel it was easier for me to move the upper bodywork. I believe the process took three days. The spark plugs themselves were easy. Take care with the electrodes (don't even check the gap -- it's correct) and apply the thermal paste exactly according to instructions.

A couple of notes: (1) it's vital to completely remove the crossbar as Idaho describes; (2) separate the various connectors so you don't stress them; (3) as Idaho said, the right-hand air box fitting is magic -- you fuss and fuss and then suddenly it comes out or goes back in and you have no idea why.
 
Ikon shocks fully met expectations

BLUF -- the front shocks are plush, with negligible stiction, supple motion and great dynamic range. This is exactly what I wanted! The rear shock seems similar but in my Aerostich Roadcrafter my butt-sensor isn't very sensitive.
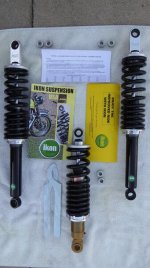
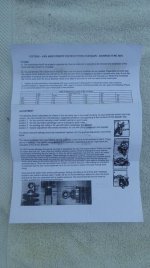
Unpacked.jpg Instructions.jpg

Highlights:

The Ikon front shock travel and spring length is about 1 inch longer than BRP. It has rod end bearings (heim joints) on both ends with stainless steel shoulder bushings to match BRP's mounts. The 4-position adjuster is at the top with readable markings. A wrench is included for adjusting spring length.

The Ikon rear shock travel is about 1 inch longer and the spring length is about 2 inches shorter than BRP. The upper end has a rod end bearing with shoulder bushings to match BRP's mount and the lower end matches the BRP bushing. The 4-position adjuster is at the top with readable markings. A wrench is included for adjusting spring length.

Ikon said they pre-adjusted the spring lengths to my specified riding weight.

Front Shocks Installation Notes:
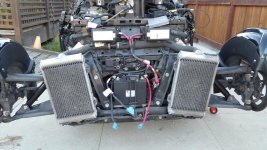
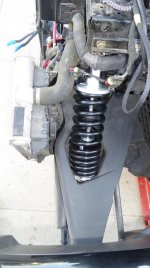
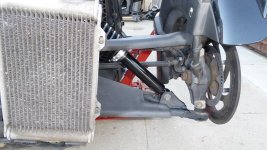
Frunk removed.jpg Left Top.jpg Left Bottom.jpg

Remove the front wheels. To prevent tipping off the lift jack, use jack stands at the ends of the A-arms.

The frunk must be removed for access to the top shock bolts, preferably onto a small dolly. Remove the three pushpins on both sides of the frunk fascia for access to connectors and the inlet air tube (7mm socket). Remove the upper (headlight) fascia for access to the top four frunk fasteners and lid latch. Lift the latch release cable out of its U-clamp and then wiggle the cable end dogleg out. Electrical connections are:

Left Side

Fog Light -- 3-position, 2-occupied, SuperSeal
Frunk Light -- 2-position, SuperSeal

Right Side

Fog Light -- 3-position, 2-occupied, SuperSeal
Lid Switch -- 3-position, fussy disconnect: keep wiggling
AAPTS -- 4-position flat, fussy disconnect (this is an ECM-critical sensor)
DLC-1 -- 6-position Deutsch, 5-occupied, pull straight out (CANbus-critical)

Mount the Ikon shock with the adjuster at the top facing outwards. After feeding the shock through the A-arm, install the bottom bushings, and lower it through the bottom mount until you have room to install the top bushings. Lift the shock into position and install the top bolt. Lift the A-arm into position and install the bottom bolt. With rod end bearings you needn't place riding weight on the wheels when tightening the bolts.

Rear Shock Installation Notes:

Raise the rear a few inches but leave the rear wheel on the ground. Move the evaporative canister pre-filter out of the way (two of four pushpins). Release the upper end of the suspension height sensor. Using a small LED flashlight, examine your access to the right-side mounting nut. If you have air suspension, take a deep breath this ain't gonna be easy. The compressor blocks direct access to the nut. I squeezed in a 15mm 3/8" socket but I had also removed the air inlet of the compressor (I'm replacing most of the air suspension). I think a 15mm 1/4" socket or a 15mm crowfoot wrench would work. Once you have the nuts off raise the rear until you can remove the bolts. The bottom bushing has two rubber protectors. Tap the bushing out, clean and grease (I recommend a water-displacing grease), and reassemble. Install the top bushings, lift the shock into position with the adjuster facing left and insert the top bolt leaving only two threads exposed on the right so you can more easily start the nut. Install the bottom bolt. With the top rod end bearing and lower BRP steel bushing you needn't place riding weight on the wheel when tightening the bolts.

But that's not all!

Explaining why I chose Ikon over the alternatives involves negatives so I'll just say our friends in Australia have a well-earned reputation for a well-made shock absorber tailored to their target community. Ikon has a representative in the USA with overnight technical support from Australia. Give Roger a ring to see if Ikon is right for you.
Ikon USA.jpg

You'll notice in my Frunk removed picture some dinguses above the radiators and some battery cables hanging loose below. The dinguses are for my 4,500K 35W CANbus-safe HID headlights. The cables are for my second Shorai LFX36L3-BS12 (a future post).

While the frunk was off I installed 3,000K 5,000LM LED foglights (which will also be turn signal repeaters but that's a future post).

The headlights are for illumination (4,500K is the best match to the human eye) and the foglights are for conspicuity (3,000K is distinct from the higher headlight temperatures).

I didn't take rear shock installation pictures because it was really hard removing the top bolt and I was cold and tired. I'll take them when I replace the air suspension (soon).
 
Last edited:
"(I need new front tires)" Federal Formoza AZ01 tires up front and the BajaRon' sway bar are great improvements in handling and tracking straight. I have settled on 16.5 PSI in the AZ01s for best pressure for ride and handling. Discount tire could not balance them, as they did not have the correct cone. Tire tech did state that he mounted them with the colored dot lined up with the valve stem, which he said was a manufactures recommendation that I had never heard of before. I said fine just refund that charge. I had read here that the Federal hardly need any weight to balance, so I gave it a try and they are smooth as can be.

Recalibrate Turn Signal Flash Rate on your model year for LED bulbs.

1. Turn the engine ON.
2. Press and hold the Hazard button until the Dashboard lights flash once (20-30 seconds).
3. Release the Hazard button.
4. Turn on LH turn signal.
5. Let it blink once and turn the engine OFF.
6. Turn the engine ON.
7. Press and hold the Hazard button until the Dashboard lights flash once (20-30 seconds).
8. Release the Hazard button.
9. Turn on RH turn signal.
10. Let it blink once and turn the engine OFF.

Repeat 1-10 completely if either LH or RH flash rate is incorrect.

To be fair, I have a new 2021 RT Limited and the OEM tires it came with aren't that bad. Mine tracks straight and true and corners reasonably well for what it is. I'm sure better dampers with stiffer spring rates would improve handling with my weight, perhaps even a better sway bar too, but it seems OK as it is in normal use. How long it continues to run like this as the miles clock up of course remains to be seen, but at least I know it will be possible to return it to the proper state by replacing wear items, even using OEM parts if necessary.

I think I'm going to put some miles on it before I change anything, then it will be one thing at a time so I can understand which direction I'm going in. All they have to do under warranty now is fix the never ending C210A rear suspension codes, but it doesn't seem to effect the handling to be fair.

Would I buy the OEM tires again, I don't know, it probably depends upon wear rate rather than tire performance. Perhaps the newer K9 ones are better than the older specification. Mine run true and grip fine in wet or dry. They are not obviously the stickiest tires I've ever owned, but for a touring motorcycle they seem fit for purpose as far as performance on the road goes. Wear life may be a another matter of course. Considering my Triumph Trophy TTSE ran through back tires pretty rapidly, and they weren't cheap, I think anything will seem long lasting after that.
 
Burt - Thanks for all of the past posts.
I really appreciate the installation details that you present.
I'm looking forward to seeing the completed Spyder.
 
To be fair, I have a new 2021 RT Limited and the OEM tires it came with aren't that bad..
The general consensus is the tread wear of the front OEM Kendas is fairly decent, 20k miles +. The main complaints with them are balancing is a problem with some of them, and some are out-of-round, and some have other quality issues. So by and large the front Kendas are OK, but not great. It's the rear tire that most every owner hates, and mostly because of its p*** poor tread life.
 
The general consensus is the tread wear of the front OEM Kendas is fairly decent, 20k miles +. The main complaints with them are balancing is a problem with some of them, and some are out-of-round, and some have other quality issues. So by and large the front Kendas are OK, but not great. It's the rear tire that most every owner hates, and mostly because of its p*** poor tread life.

I guess it's down to expectations too. With my 3 previous long distance touring bikes, BMW K1200GT, R1200GS, and Triumph Trophy TT SE, my expectations are about 8,000 miles or so for a rear tire and to replace the front tire at the same time because they were close enough to make installing them as a pair feel nice. They were mostly 2 up with full luggage miles.

So if the expectations are at least double those distances with the Spyder I would be delightfully surprised. No one likes to spend money on tires for sure, but if I hadn't read anything anywhere else about tire life, I would have been a happy camper with mileage predictions of 16,000 miles.

All of the BMWs and Triumphs I have owned have had at least 2 official recommendations for replacement tires, so it might have been nice if BRP had 2 sources of replacements for covering supply chain problems, if not just quality and performance issues.

So far no comments on the quality of construction or tire life, just the experience of reasonable performance. Time will tell of course.

If I were to go with car tires, I would feel better if front and rear tires were from the same vendor and preferably the same family of tire, in the OEM sizes, so they exhibit the same characteristics under differing conditions. It's not a show stopper, but it would be nice if it were possible to make that choice.
 
Bert

Replace the seals and grease in the RT-622 Trailer and then forget about having any problems with it after that. (of course check the tires for age rot).

stay with the same size tires on the trailer, we have tried several different widths and sizes all to no avail.

Cruzr Joe
 
Back
Top