Ikon shocks fully met expectations
BLUF -- the front shocks are plush, with negligible stiction, supple motion and great dynamic range. This is exactly what I wanted! The rear shock seems similar but in my Aerostich Roadcrafter my butt-sensor isn't very sensitive.
 Highlights:
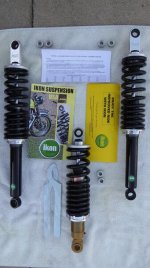
The Ikon front shock travel and spring length is about 1 inch longer than BRP. It has rod end bearings (heim joints) on both ends with stainless steel shoulder bushings to match BRP's mounts. The 4-position adjuster is at the top with readable markings. A wrench is included for adjusting spring length.
The Ikon rear shock travel is about 1 inch longer and the spring length is about 2 inches shorter than BRP. The upper end has a rod end bearing with shoulder bushings to match BRP's mount and the lower end matches the BRP bushing. The 4-position adjuster is at the top with readable markings. A wrench is included for adjusting spring length.
Ikon said they pre-adjusted the spring lengths to my specified riding weight.
Front Shocks Installation Notes:
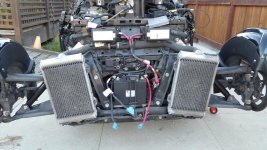
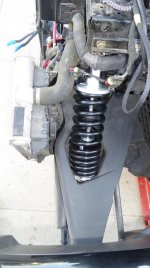
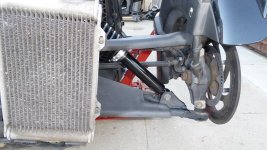
Remove the front wheels. To prevent tipping off the lift jack, use jack stands at the ends of the A-arms.
The frunk must be removed for access to the top shock bolts, preferably onto a small dolly. Remove the three pushpins on both sides of the frunk fascia for access to connectors and the inlet air tube (7mm socket). Remove the upper (headlight) fascia for access to the top four frunk fasteners and lid latch. Lift the latch release cable out of its U-clamp and then wiggle the cable end dogleg out. Electrical connections are:
Left Side
Fog Light -- 3-position, 2-occupied, SuperSeal
Frunk Light -- 2-position, SuperSeal
Right Side
Fog Light -- 3-position, 2-occupied, SuperSeal
Lid Switch -- 3-position, fussy disconnect: keep wiggling
AAPTS -- 4-position flat, fussy disconnect (this is an ECM-critical sensor)
DLC-1 -- 6-position Deutsch, 5-occupied, pull straight out (CANbus-critical)
Mount the Ikon shock with the adjuster at the top facing outwards. After feeding the shock through the A-arm, install the bottom bushings, and lower it through the bottom mount until you have room to install the top bushings. Lift the shock into position and install the top bolt. Lift the A-arm into position and install the bottom bolt. With rod end bearings you needn't place riding weight on the wheels when tightening the bolts.
Rear Shock Installation Notes:
Raise the rear a few inches but leave the rear wheel on the ground. Move the evaporative canister pre-filter out of the way (two of four pushpins). Release the upper end of the suspension height sensor. Using a small LED flashlight, examine your access to the right-side mounting nut. If you have air suspension, take a deep breath this ain't gonna be easy. The compressor blocks direct access to the nut. I squeezed in a 15mm 3/8" socket but I had also removed the air inlet of the compressor (I'm replacing most of the air suspension). I think a 15mm 1/4" socket or a 15mm crowfoot wrench would work. Once you have the nuts off raise the rear until you can remove the bolts. The bottom bushing has two rubber protectors. Tap the bushing out, clean and grease (I recommend a water-displacing grease), and reassemble. Install the top bushings, lift the shock into position with the adjuster facing left and insert the top bolt leaving only two threads exposed on the right so you can more easily start the nut. Install the bottom bolt. With the top rod end bearing and lower BRP steel bushing you needn't place riding weight on the wheel when tightening the bolts.
But that's not all!
Explaining why I chose Ikon over the alternatives involves negatives so I'll just say our friends in Australia have a well-earned reputation for a well-made shock absorber tailored to their target community. Ikon has a representative in the USA with overnight technical support from Australia. Give Roger a ring to see if Ikon is right for you.
You'll notice in my Frunk removed picture some dinguses above the radiators and some battery cables hanging loose below. The dinguses are for my 4,500K 35W CANbus-safe HID headlights. The cables are for my second Shorai LFX36L3-BS12 (a future post).
While the frunk was off I installed 3,000K 5,000LM LED foglights (which will also be turn signal repeaters but that's a future post).
The headlights are for illumination (4,500K is the best match to the human eye) and the foglights are for conspicuity (3,000K is distinct from the higher headlight temperatures).
I didn't take rear shock installation pictures because it was really hard removing the top bolt and I was cold and tired. I'll take them when I replace the air suspension (soon).

