• There were many reasons for the change of the site software, the biggest was security. The age of the old software also meant no server updates for certain programs. There are many benefits to the new software, one of the biggest is the mobile functionality. Ill fix up some stuff in the coming days, we'll also try to get some of the old addons back or the data imported back into the site like the garage. To create a thread or to reply with a post is basically the same as it was in the prior software. The default style of the site is light colored, but i temporarily added a darker colored style, to change you can find a link at the bottom of the site.

Installing aftermarket ground-effect lighting on my RT

Dead Man Rydin

New member
I know there are numerous Spyders out there with great aftermarket lighting. If all goes well, I plan on buying my ground-effect lighting and installing it myself. Are there any suggestions, do's or don’ts I need to know about? I'm not going off the deep end, just under the main body so that it looks cool. I'm not trying to be seen by a NASA satellite.
Is there a particular brand or style that best suits this type of installation?

Thanks for any information. :f_spider:
 
TricLED.com site sponsor has just what you are looking for. I've used there products and they work well and look great. Simple installs that don't bother the nanny!The new kits even come with remote and off on switch just to keep LEO happy .
 
If your handy with a soldering iron. There is an inexpensive way to go. i bought mine onebay for $50 comes with 16ft of RGB(red, green, blue/to make what ever color you want). All you have to do is cut the strip to length and solder 4 conducter wireto jpoin the different strips together. It also comes with a 44 button remote so you can choose whatever color you want. Or you can have it flash or fade between different colors.

Here is a link.

http://www.ebay.com/itm/5M-Waterpro...=260826200280&ps=63&clkid=3083215032753568279

Here is a video. It does it no justice. But will give you an idea of what I have.

 
Ground-effect lighting

Thanks a lot. I can't wait to get this started. Christmas is coming early! Now onward to the web-sites to order. On second thought...I may want to be seen by a NASA satellite!:ohyea:
 
Led lighting

TricLed is one of the dealers on SpyderLovers home page, Reggy uses the best quality and if you click on each option on his website, if it is not there, it probably is not being made. He uses really neat connectors that eliminate soldering and splicing wires. You can even make your lights blink to the music of a special song, this is on his website. He can make them blink, fade, change brightness, directions are great and simple.:2thumbs:
 
ESI(One of our own) has a great set called Magical Wizard...decent price and lots of lights.:thumbup: I did up my RS last year,lots of fun!
 
lights

I have lot of my lights for my cars and bike on ebay. If you go into ebay and type in 12 volt led strips you will find all kinds. The one thing you want to remember is to look for the one that can be used in wet weather. I have gotten some trips for as little as a dollar. It may take some time to get them because they come from overseas, not all. You can also just type in 12 volt leds also and get results.
 
where should the wire go?

I'm installing the Tric Led now. I problem at this point is running wires from the back to the front. All I see is Belt on one side and heat on the other side. This looks like a problem. Rubbing belt or melting wires. I have the panels off the bike and thinking I will get them up higher and drop back down forward near the trunk. Any suggestion.
 
Love the lights!

If your handy with a soldering iron. There is an inexpensive way to go. i bought mine onebay for $50 comes with 16ft of RGB(red, green, blue/to make what ever color you want). All you have to do is cut the strip to length and solder 4 conducter wireto jpoin the different strips together. It also comes with a 44 button remote so you can choose whatever color you want. Or you can have it flash or fade between different colors.

Here is a link.

http://www.ebay.com/itm/5M-Waterpro...=260826200280&ps=63&clkid=3083215032753568279

Here is a video. It does it no justice. But will give you an idea of what I have.


Phantom888,

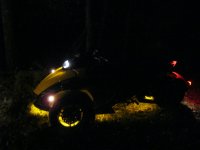
I love the uniform glow your lights put out. It makes the Spyder look like it is floating an not rolling down the street. VERY COOL!

Can you note or show us using photos exactly where you mounted the strips. From the video I am guessing:

Under the Front Chin.
Front of and under the lower A Arms.
Down each side of the center of the frame. (Can you still jack the Spyder up for oil changes?)
Behind the belt guard.
Behind the rear Fender brackets.

Please correct me if I am wrong and let us know if I missed any.

I have an RT-S so I cannot do exactly what you have here but it is a good place to start and looks awesome!
 
I'm installing the Tric Led now. I problem at this point is running wires from the back to the front. All I see is Belt on one side and heat on the other side. This looks like a problem. Rubbing belt or melting wires. I have the panels off the bike and thinking I will get them up higher and drop back down forward near the trunk. Any suggestion.

You should have recieved directions. Run a red wire from the battery with a fuse at the battery, along the frame and ziptie them every 8in. or so to the toggle switch then to the lights. Ground the black wire from the light to the frame.
 
sorry, routing wires

From the last post, I know the wiring for the LED's. It was just getting the route in which they wouldn't get damaged. I was looking
at the swingarm lights and how I would get them up out of the way. Belt on one side and heat on the other. Anyway managed to do
that and get everything fixed ok. Really happy with the glow under the bike now.
 
Ground Effect Wiring

Well I have ordered my TricLed pre-cut RT kit. I asked the salesperson and he said I should get a small (possibly 4 position) fuse block from my local auto parts store. (just in case I wanted to wire in some other accesories later) and put it inside the frunk area under the plastic access cover where they plug in the computer stuff. He said it wouldn't hurt to wrap it in plastic to protect it from moisture just in case. I am buying the one with the remote controller. He said it would be simple to run all of the connectors to the central location into that area and to use a 10amp fuse.
I can hardly wait..........
I'm not real sure of myself, so if anyone sees a sudden blue flash (that would be a brief burnout of my new blue lights) & a large black cloud somewhere over Texas, call 9-1-1. :pray:
 
:shocked: That's the last thing that we want to be seeing from your neighborhood! :shocked:
Good luck with the first installment of this modification... You'll know you're almost done when NASA calls and tells you to turn them down because they're getting too much glare in their satellites' cameras! :roflblack:
 
Installed Joe Florida 120 LED Amber Motorcyle LED kit on wife's yellow RS. Already had Amber Strips mounted under the front of the trunk and front arm of the A-frame. From the Joe Florida kit I mounted the two longest strips on the trear arms of the A-frame ( Zip tie bothends and center of strips for added security). Under the body I mounted the 6-led strips which are designated "wheel lights" neat the outside of the body on the outward brace and on the center frame just as it starts to curve up at the rear. Also mounted strips on each side of the swing arm. Wires from the wingarm lights I joined near the hing point, ziptied to existing wires there then ran a single wire to the front along the frame along the fuel tank. Have all wires connected to a PB switch and to leverlock connecters that came with the lighting kit. Whatever you use for lighting be certain to clean all surfaces that you will be mounting LED strips very Very well with cleaner then clean the surface again with alcohol wipes or a clean rag and rubbing alcohol the let everything dry well.
spyderlit.JPG
 
TricLED all the way!!!

Michael and I have done our bikes and the "glow" is AWESOME! People flippin' drive WAY over on the right side of their lane coming at us cuz they don't know what we are. LOL

Love the lights. They are sturdy and virtually problem free. Not to mention, Reggy, they guy who sells them is great!

I've started installing them on the side for extra cash and have done 7 bikes not including my own. I don't think you'll be sorry. ;)

Ps... mine is the one opposite of Spyderwolf's in his sig. pic. I'm the GOOD Tron. ;)
 
Ground effect lights

Well I got my Christmas package yesterday with my new light kit from TricLED. I'm not sure about where I should run the power wire. I am considering a suggestion to place a multi-position fuse block in the front area where the computer hook-up is. I kinda like this idea just in case I need to wire in other accessories later. (and I know I will). I guess my real worry is what I must do to run the wires in a good place where there will not be any damage to the Spyder or the wires. Is there a common route that a simpleton like me could use? Has anybody got suggestions or other ideas. thanks....... :spyder:
 
I know it's obvious, but how you run them depends on where you're heading with them :)
Now that I have that out of the way.....
There are a couple of principals I've used.
  1. REMEMBER that parts WILL have to come off the bike at some point in time. Try to put your lights in places where removal is not a huge pain.
  2. Use waterproof connectors to all parts with lights on them, actually to be removed without cussing without cutting and rewiring. **See pic below**
  3. Like you, I put a fuse block near the computer. I added a noise reducer circuit because I have lights AND audio feeding from this block.
  4. From the battery to the new block, I used a #8 stranded with an extra flex armor on it, plus VERY well attached lugs on each end/
  5. For front to back runs, I tied all lines along a common structural member.
  6. Do NOT use the thin wires that come on some LEDs for longer than 1-2' runs away from the light. Trust me, you want a sheath around all wires. I went to Lowes and bought a 75' spool of #22 'Rotor Wire'. It has 3 wires encased in a black sheath that is really well designed. Most of the time, I use only the red/black 2 wires and cut back the green 3rd wire.
  7. When you wire, remember that at some point you will have to trouble shoot a problem. Wire with that in mind. If a fuse blows, you'll need to be able to easily isolate the problem.
  8. To clusters of lights, I ran a feeder from the fuse block to a section of the bike, then branched from there. Helps with #7.
  9. I tooks lots of pics as I went so I could remember what I did!
  10. TEST AS YOU GO. Then, as you are putting the tupperware back, TEST again!! Voice of experience.
There are some more tips in My Spyder Mods- http://www.spyderlovers.com/forums/showthread.php?24907-Phil-s-Mods
Here's a pic that shows using the waterproof connector for lights on the back fender-----
d1ac0be5.jpg


You can also see the flex armor and the use of waterproof tape. I chose to do something less than 100% correct here. I used wire nuts so I could easily add or delete LED sections. They can be problematic in most cases and unreliable. BUT, stabilizing them with rubber tape and thus waterproofing, It should be ok. One half of the LED power looks like it is dragging on the tire (it's not). The other end is off screen to the right. Use heat shrink a LOT to help stabilize and water-resist connectors. The 4 pin connector with blue wire in the lower left is for the run/brake/turn light that is on the upper shroud, above this fender.

There are guys here with loads more experience than me (Like Michael SpyderWolf... and that Good Tron gal (:))) You're not that far away. Feel free to call or email me if you get stuck. Cell is in my profile. email= [email protected]

Last- Make SURE you have fun!!!
 
Last edited:
Ground effect lights

Thanks for the good information and of course, .....guys like me always like the visuals. This has been a huge help. Maybe I'll ride out to East Texas some day.
Well now I'm going where no one has been before....except the person who assembled this beast. :clap::bowdown:
 
Back
Top