• There were many reasons for the change of the site software, the biggest was security. The age of the old software also meant no server updates for certain programs. There are many benefits to the new software, one of the biggest is the mobile functionality. Ill fix up some stuff in the coming days, we'll also try to get some of the old addons back or the data imported back into the site like the garage. To create a thread or to reply with a post is basically the same as it was in the prior software. The default style of the site is light colored, but i temporarily added a darker colored style, to change you can find a link at the bottom of the site.

Installing a RT Touring Upper Tail-light

kpspyder

New member
Is this something a ordinary joe can install without cursing or pulling out your hair?
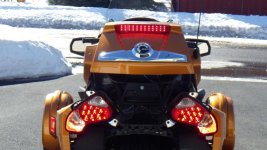
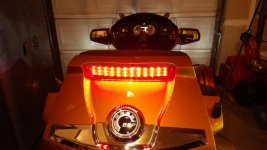
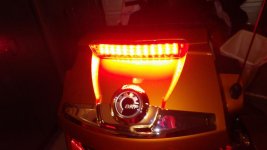
Where is the best place to get one that is running all the time, and is a brake light?

Also has anyone put the lower arm front lights on? Same question as above.

Thanks for any advise you can give.
 
I've got all three of the TricLED brake items on the back of mine and give them all a thumbs up.

My advice is if you think you're going to want more than just one or the other, get what all you want at once and save yourself the time of having to pull the tupperware apart more than once.

The running light on those is pretty bright and almost blinding when you hit the brake. Pricey items, but well made and Reggie stands behind his products. Worth it IMO.
 
I've got TWO of them... lights 007.jpg
Getting everything tied into the existing wiring harness is the toughest part... But ONLY because it's a real bear to get your hands onto the wiring harness. A lot of folks pull the left taillight out (And the rear fender/mudguard), and they say that it makes it real easy... :thumbup:
 
HIgh Mounted Tail Light

Take a look at the following link.
http://www.customdynamics.com/instructions/spyder_rt_HMT_instructions.pdf
It will take you to Custom Dynamics installation instructions for their HMT light. Their instructions have you connect to the right tail light harness. I recommend you remove the tail light whether you connect to the right or left side. Also, it helps to remove the passenger backrest. Both are easy to figure out once you start looking at it. The backrest is 3 bolts inside the trunk, and loosen 2 screws at the top of the backrest. The tail light is 3 bolts, I think. The most difficult part is removing the plastic panel that requires the removal of 8 screws. You'll have to do some bending at the sides to facilitate removal. Take note of tabs on the panel that will cause you some heartburn if you don't get them into place upon reinstallation. Good luck. Great time to do some bonding with your Spyder.
 
I have installed 2 of these....

Take a look at the following link.
http://www.customdynamics.com/instructions/spyder_rt_HMT_instructions.pdf
It will take you to Custom Dynamics installation instructions for their HMT light. Their instructions have you connect to the right tail light harness. I recommend you remove the tail light whether you connect to the right or left side. Also, it helps to remove the passenger backrest. Both are easy to figure out once you start looking at it. The backrest is 3 bolts inside the trunk, and loosen 2 screws at the top of the backrest. The tail light is 3 bolts, I think. The most difficult part is removing the plastic panel that requires the removal of 8 screws. You'll have to do some bending at the sides to facilitate removal. Take note of tabs on the panel that will cause you some heartburn if you don't get them into place upon reinstallation. Good luck. Great time to do some bonding with your Spyder.

IF you go this way, you'll need to buy the dual converter in order to have your running lights on as well as the brake light. Without the dual converter, it's just a brake light - fyi. :thumbup:

I like the looks of the High Mount Brake Light and had it on my 2012 RT Limited and now have it on my 2014 RT Limited. Very bright! First pic show it just after install outside - the colored rear panel is off as well as the lower black panel -- need that removed to access the tail light assembly removal to wire it!
 

Attachments

  • IMGP5009.jpg
    IMGP5009.jpg
    56.4 KB · Views: 50
  • IMGP5024.jpg
    IMGP5024.jpg
    44.3 KB · Views: 51
  • IMGP4981.jpg
    IMGP4981.jpg
    30.1 KB · Views: 50
Last edited:
Take a look at the following link.
http://www.customdynamics.com/instructions/spyder_rt_HMT_instructions.pdf
It will take you to Custom Dynamics installation instructions for their HMT light. Their instructions have you connect to the right tail light harness. I recommend you remove the tail light whether you connect to the right or left side. Also, it helps to remove the passenger backrest. Both are easy to figure out once you start looking at it. The backrest is 3 bolts inside the trunk, and loosen 2 screws at the top of the backrest. The tail light is 3 bolts, I think. The most difficult part is removing the plastic panel that requires the removal of 8 screws. You'll have to do some bending at the sides to facilitate removal. Take note of tabs on the panel that will cause you some heartburn if you don't get them into place upon reinstallation. Good luck. Great time to do some bonding with your Spyder.
Not sure why you would remove the backrest when you route the speaker wires behind the speakers?
 
Back
Top