• There were many reasons for the change of the site software, the biggest was security. The age of the old software also meant no server updates for certain programs. There are many benefits to the new software, one of the biggest is the mobile functionality. Ill fix up some stuff in the coming days, we'll also try to get some of the old addons back or the data imported back into the site like the garage. To create a thread or to reply with a post is basically the same as it was in the prior software. The default style of the site is light colored, but i temporarily added a darker colored style, to change you can find a link at the bottom of the site.

Give Me A Brake, RTS Third Brake Light That Is

Interesting! They always do things differently on the West Coast. :D They stopped writing tickets for things like "reckless driving", "tailgating", "excessive noise", and such here years ago, after they found the standards were up to officer discretion, and were too vague to be upheld in court. Now the only tickets issued are after accidents..."speed too fast for conditions." One trip down I-94, with cars drafing like the front straight at the Daytona 500, will put fear in your heart for a lifetime. These idiots just don't get it, and our law enforcement seems powerless to stop it.

I have a solution...outlaw power steering and power disc brakes. :joke: When drivers are in fear of their lives, and have to keep both hands on the wheel just to turn a corner, things will get better. OK, I'm joking, but too many people are saved by the available technology, so they have developed bad habits...like talking on the cell phone while driving with one hand...or even while parking! End of rant!

These are some of the things that drive me to make the safety lighting items I do for my Spyders and then sell to all you good folks. :2thumbs:

If even one of the items I have invented help people been seen better and save just one Spyderlovers life, (or even my own) it will all have been worth the long hours and hard work to bring them to market. :thumbup:

MM
 
Last edited:
These are some of the things that drive me to make the safety lighting items I do for my Spyders and then sell to all you good folks. :2thumbs:

If even one of the items I have invented help people been seen better and save just one Spyderlovers life, (or even my own) it will all have been worth the long hours and hard work to bring them to market. :thumbup:

MM

And we appreciate it! :thumbup:
 
Thanks... As to your 2 second rule thoughts... I was a trainer for many years... The 2 second rule ended for us around the late 80's to early 90's.. The four second took over... Some today call it the "Smith System" Here is a quick link why... http://smith-system.com/articles.shtml

My state can and does ticket for this. And our new favorite... "Road Rage"... If a person is seen zig zagging in traffic, or slamming on their brakes because someone is following to close (For a few examples).. BAM... Big fine, car towed... Classes in your future... :thumbup:

I do realize every state is different of course.. But I live by one simple rule... Drive like I am invisible... AKA Defensive/offensive

I agree. Our Driving schol teaches 3 to 4 seconds here in Ohio. I say that is the alsolute minimum.

A question you might ask your local driving school, is do they teach motorcycle awareness ? I teach a two hour block on sharing the road with motorcyles, bikes and semi trucks.
Old Man Zues
 
Nope, we're gonna have people guess how it installs. :joke:

These instructions may not be put online for awhile , but the instructions wiil come with the units. :thumbup:

MM

What's the latest on the RT brake light. Is it available for order? I went to your website and do not see it listed.
 
This is the order of the information that was provided by MM for each of his updates. Hope this helps!


#1

Originally Posted by Magic Man
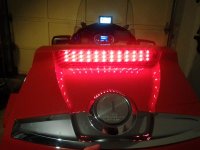
Well we just finished fitting up the first Beta unit of the New Street Magic Gesesis Series LED RTS HMT Brake Light! :2thumbs: (High Mount Third)

I have to tell you, it fits and looks even better than the CAD renderings! :yes:

I think anybody seening this would be hard pressed to not know it was factory. :dontknow:

This unit features 36 Genesis Series LEDs for unmatched brightness, and come in a contoured to your trunk chrome housing.

Filling in the "void" area along the trunks top edge, this is the light that BRP should have had there in the first place. It's "high mount" design is much more noticable for drivers behind you just like the third brake light in a car's rear window.

With a very easy install procedure, and plug and play connections to your RTS wiring harness. We think even those not normally confortable doing their own mods will be able to do this one no problem. Giving them a Quick Convenient, Safe and Secure installation they can do at home themselves! :ohyea:

Now that the Beta unit has been checked, full production will begin with the first units being for sale towards the end of the month. :yes:

We will also be offering an optional 2 in 1 harness that will allow this light to also finction as an additional running light as well as a HMT Brake Light. :doorag:

So, to increase the safety and visibility of your RT, be sure to add a Street Magic HMT! :thumbup:

#2
Well we just finished fitting up the first Beta unit of the New Street Magic Gesesis Series LED RTS HMT Brake Light! :2thumbs: (High Mount Third)

I have to tell you, it fits and looks even better than the CAD renderings! :yes:

I think anybody seening this would be hard pressed to not know it was factory. :dontknow:

This unit features 36 Genesis Series LEDs for unmatched brightness, and come in a contoured to your trunk chrome housing.

Filling in the "void" area along the trunks top edge, this is the light that BRP should have had there in the first place. It's "high mount" design is much more noticable for drivers behind you just like the third brake light in a car's rear window.

With a very easy install procedure, and plug and play connections to your RTS wiring harness. We think even those not normally confortable doing their own mods will be able to do this one no problem. Giving them a Quick Convenient, Safe and Secure installation they can do at home themselves! :ohyea:

Now that the Beta unit has been checked, full production will begin with the first units being for sale towards the end of the month. :yes:

We will also be offering an optional 2 in 1 harness that will allow this light to also function as an additional running light as well as a HMT Brake Light. :doorag:

The MSRP for the Street Magic Genesis LED HMT Brake Light will be $239.00, and the optional Street Magic 2 in 1 Harness will have an MSRP of $29.95. :2thumbs:

So, to increase the safety and visibility of your RT, be sure to add a Street Magic HMT! :thumbup:

#3
We now have a shipping window for the New Street Magic RT HMT Brake Light.

Units should arrive here and start shipping out from us the week of 6/14.

So, starting today we will be taking Pre-Orders for these units. :yes:

As usual, all Pre-Ordered Units will receive FREE SHIPPING! :clap:

However, this time one lucky person who places there Pre-Order before the units arrive, will receive their RT HMT for FREE! :ohyea:

We will draw one name from the list of Pre-Ordered units, and that lucky person will receive a Brand New Street Magic RT HMT Brake Light for FREE! :firstplace:

So, get your Street Magic RT HMT Brake Light Pre-Order in now! :agree:

So who knows? Maybe your HMT will be FREE! :dontknow:

All Pre-Orders must be placed by phone and made before units arrive and are in stock, so just call us @ (518) 859-8183. :thumbup:

MM


This is an AWESOME PRODUCT, Highly Recommend, but I have a question???

20120114_173223-picsay[1].jpg1326581275-picsay[1].jpg1326580872-picsay[1].jpg1326580973-picsay[1].jpg20120114_172721[1].jpg
OK fellow SpyderLovers, Teddy & I need your help. On our thousand mile trip to ThreeFeets last weekend, our HMT Brake Light stopped working. It came pre-installed on his 2011 Viper Red SpyderFest Eddition RT-S #1 of 5 & has worked great til now. It is an AWESOME mod & really helps light up the rear of the RT not to mention, the safety factor of having a more eye level running/brake light for ppl following you.

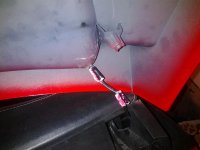
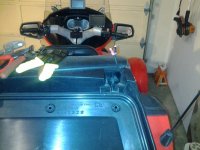
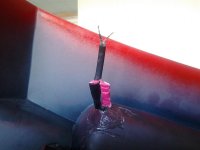
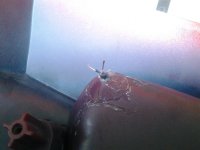
I checked ESI's website, and found the installation instructions so I was able to easily get the rear trunk lid off & readily discovered the problem is a broken wire, as you can see in the pics I've posted. I have left a msg for Kevin at ESI, but being a weekend, I will have to wait til Monday or Tuesday to talk with him.

My question for you all is, how do I get the 3M mounted light bar off the rear trunk lid without scratching up either the Viper Red paint of the RT or the finish of the HMT light bar. I thought about taking a small flat head screw driver, but I'm afraid that would cause nicks & scratches to the paint. Any suggestions?

Also, once I get the light bar off the rear trunk lid, how do I go about fixing it? Anyone know how to take the light apart & if the wire can be reattached & if so, how I would go about that?

Sorry for all the questions, but I make a GREAT cheuffer for Teddy, but sadly, not so much for being an Electrician tho. Teddy & I both thank y'all for any suggestions or help.
 
Dave
Don't use a screwdriver. Damage waiting to happen.

Those lights have dual side tape on the back and bottom of the unit.

I'd recommend a heat gun to apply heat from the inside of the panel to help remove the unit. Being careful obviously to not melt the panel or damage paint.

In addition to the heat you might use an exacto knife or something similar to begin working on freeing one corner. Popsicle sticks may come in handy as you begin prying the unit off slowly.

Remember to let the heat do the work, you will just apply steady pressure as mentioned above to begin working that tape loose.

It won't be easy!

I've never done it, but that is the way i'd approach it.
 
Last edited:
Dave

The 3M tape is a pain to work with but I have been very successful using Nylon Lacing Tape basically doing the see saw back and forth while pulling under the HMT. It takes some time but it will come off. Isopropyl Alcohol helps also once you start working the tape between the lid and HMT. Sub for the lacing tape could be dental floss but you will have to double or triple it up.

Doc

Maybe fishing line.

Dave , I agree with these suggestions. I have used fishing line before to remove automotive trim. Use the saw back and forth method and it works great, take your time . You might want to wear gloves so the fishing line won't dig into and cut your fingers.
 
I shoulda posted this in a sepperate thread, didn't mean to Hijack this one

Thanks everyone for your suggestions. I got out the hair dryer and started heating the area in the picture, and this part of the wire popped up. Its seems to be still solidly connected inside the HMT light-bar and must have somehow gotten caught in the rear trunk lid when I closed it, and cleanly cut it off. Its only about a half inch in length, so I'm not sure if its long enough to work with. I ordered some posi-locks from their web-site & figure I will wait til I get them to mess with it any more for right now.
1326639821-picsay[1].jpg
Again, thank you all for your help. I love this web-site, BEST on the web for anything and everything Spyder related!
 
I would use heat to remove the light bar, then some 3M adhesive remover. Fishing line is a good idea, however since you're not working on a flat surface, I think it would be near impossible to remove this way.
Be sure to tape off the area around the light if you decide to use a solvent since it may dull the paint.
If you're planning to install another light, I would drill that hole a little bigger and run the line thru the hinge and down to the light connector, per the instructions. There should be nothing rubbing against the wire.
Good luck Dave!

-Anita
 
Good News, it may not be pretty, but that parts hidden & Best of all, it Works

20120115_140024.jpg20120115_135418.jpg20120115_135141.jpg20120115_134811.jpg20120115_140055.jpgThank you everyone for your suggestions. We got'r done :yes::yes:
 
Back
Top