• There were many reasons for the change of the site software, the biggest was security. The age of the old software also meant no server updates for certain programs. There are many benefits to the new software, one of the biggest is the mobile functionality. Ill fix up some stuff in the coming days, we'll also try to get some of the old addons back or the data imported back into the site like the garage. To create a thread or to reply with a post is basically the same as it was in the prior software. The default style of the site is light colored, but i temporarily added a darker colored style, to change you can find a link at the bottom of the site.

Front shock installation

Trickie Dick

New member
I'm getting ready to install RT shocks on my GS. I read Lamonsters installation instruction concerning the elka's and I'm a little confused as to the sequence of jacking the spyder up and unbolting the old shocks. I understand you remove the top bolt first but do you remove the bolt before or after you jack it up?
Would someone walk me through it please:helpsmilie:
 
I doubt you can remove the bolt without taking the weight off and if you could the front would collapse. :yikes:
 
Sorry, I do not remember Lamont's instructions. But I can tell you it was pretty simple.

I used my motorcycle jack (Slid in from the font of the Spyder) and got the front tires about 1/2" off the ground...

Then unbolted the lower shock mount, then the top. This way I did not bugger up my Tupperware as I could hold onto the shock as I slid out the bolt up top.

Now I did all of this with the Tupperware installed. As long as you go slow and easy you should be fine :2thumbs:

Keep track of what direction the bolts go (If I remember correctly the top goes one way and the bottom goes another). Otherwise you will fight to your death on getting the bolt back in up top. Or worse... You do this with the Tupperware off, do not pay attention and have to remove (Or your dealer) all the Tupperware in order to remove them again down the road...
 
Thanks to both you. I will jack it up first and then remove the bolts. Lamonster, I think you said top first.
I would not have thought about the direction of the bolts. Thanks for the tip. I have the tupperware already off since I am replacing by grease fittings so I can reach them without taking the plastic off in the future. So, I can reach everything now pretty easily.
 
I would take the bottom bolt out first. Not sure why I would have said top bolt first but I'll take your word for it.
 
I would take the bottom bolt out first. Not sure why I would have said top bolt first but I'll take your word for it.
I did a search earlier and came up with your post dated 11/6/09.

**********************************************************
Elka Shocks Install and review I had a chance to install these the other day and yesterday was my first ride with them and it's time to do a little report. :doorag:

My stock shocks had been ridden pretty hard and it's no wonder that they were pretty much shot after 42K. I decided to give the Elka Suspension a shot as I've heard good things about them on this board and they were quite a bit cheaper than the competitors setup.

The install was pretty easy. You will need a jack for sure but other than that no special tools are required.

First you need to jack the Spyder and take some of the weight off of the shocks. I did the front shocks first.

You'll have to remove the two body panels that cover the top shock bolts.

I have fog lights on my Spyder and the shock wouldn't come out with them installed, or so I thought. I removed the fog light on the first shock but on the other side I just lifted the Spyder higher so the A-arm could drop a little lower. That was just enough to fish the shock out.

Remove top bolt
picture.php


Remove bottom bolt and jack the Spyder up to remove shock

picture.php
 
2011 RS SM.
This is how I did mine:
Frunk off (I was doing the fog light installation too.) Removing the frunk makes it so much easier to access the top bolts....there's only an electrical connection on each side and four bolts top and two at the bottom....five minutes and the frunk is off...!!!
I removed the nuts on the top and bottom complete...the bolts will not drop out...the shock is still loaded.
With a jack under the center frame, just take the weight of the machine...you can gauge that by trying to rotate the front tyre.
When the tyre just breaks free of the floor, both bolts will come out just fine. Further elevate the frame by about 2" and you can work the shock out.
Work in the new shock, locate the bottom outer end and slip in the bolt from front to back and start the nut on the end.
My jack has a nice pressure release screw so it's easy to control the rate of descent, so start to go down and control the rate so that by guiding the top with one hand and looking at the attachment bolt hole you can stop the jack right on target and the top bolt will slip in from rear to front. If you miss, stop the descent, give a short pump up and go again.
Tighten top and bottom bolts to specs and do the same on the other side.
This was my first time doing this and I was done in thirty minutes.

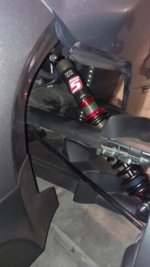

:agree: with this jack method and removing nuts before you jack the Spyder up.

With that being said.......When re-installing the new shocks, put the top bolt in first on the new shock and then decend the jack to line up the easier bolt which is the bottom. It will make it way easier.:thumbup:

You do not need to remove the trunk or any panels to install these. No question install the top bolt first on the new shocks if your tupperware is still on the bike.
nojoke
 
Last edited:

You do not need to remove the trunk or any panels to install these. No question install the top bolt first on the new shocks if your tupperware is still on the bike.
nojoke

True, but it's definitely MUCH easier to reach that top bolt if you've removed that side panel first.
 
My question is, why are you installing RT shocks on your GS? At SpyderFest I got RS shocks installed on mine. (or what's the difference?)
 
My question is, why are you installing RT shocks on your GS? At SpyderFest I got RS shocks installed on mine. (or what's the difference?)

It's been determined by some that 2011-2012 OEM RT shocks provide better performance for a GS/RS than standard OEM GS/RS shocks. Some people prefer the lower cost of this mod to purchasing aftermarket high performance shocks.
 
I located the bottom bolt first 'cos it was easier to control the jack with one hand, the other thumb guiding the top of the shock with the fingers holding the bolt in line with the hole waiting for the shock top to arrive. As I said my jack has a very easy pressure release screw and that made it real easy. The system was designed with there being no need to remove the frunk but I had the front end all off for the fog light installation so it was a clear case of "while you're at it...."
 
EVEN MORE STRANGE / WIERD IDEA'S

I just did an RT shock swap on my GS, first I painted them ( you have to see them to believe them ) then I did as suggested here in the mounting procedure......But I reversed the shocks end for end....now my springs are on the bottom and the ring adjuster is much more accessible for the tool...Mike....:agree:.....:2excited:
 
I just finished my stage 5 elka installation. Think I got them on correctly. :) ... Took about an hour with substandard tools and just a hand jack.

uploadfromtaptalk1340935682085.jpg

Sent from my HTC VLE_U using Tapatalk 2
 
Back
Top