• There were many reasons for the change of the site software, the biggest was security. The age of the old software also meant no server updates for certain programs. There are many benefits to the new software, one of the biggest is the mobile functionality. Ill fix up some stuff in the coming days, we'll also try to get some of the old addons back or the data imported back into the site like the garage. To create a thread or to reply with a post is basically the same as it was in the prior software. The default style of the site is light colored, but i temporarily added a darker colored style, to change you can find a link at the bottom of the site.

F3 two up shock

Remove the splash pan??????

Installed mine yesterday, and it was easy, but (as always) a bit of learning curve the first time..I could do the second one in half the time) :f_spider: The test ride was surprising, in that the ride is much less-harsh; the rear end doesn't sag as before when I mount up; and the ride on the local bumpy roads was MUCH smoother!

Some might suggest that it's just the old thing about the bike running better after an oil change, but I honestly feel the difference in my butt and back...no bottoming out and much smoother...the best $180 I've spent on "Buster".

I'll try to post a link with photos and instructions, but here's a starter:

1. Chock both front wheels so the spyder doesn't move when the rear is jacked up.
2. Place a small hydraulic jack of your choice under the rear of the box frame (just forward of the primary muffler), and lift until the rear tire is barely off the ground...then lower it until the rear tire barely touches the ground (this will be about the right position to take the load off the shock and yet keep the shock bolts from being under tension when removing them).
3. Remove the rear seat only.
4. (if you have BRP side cases, remove both of them)
5. Get a 15mm box wrench and socket with extension(s) for the shock bolts.
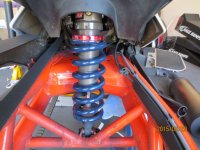
6. Pay attention to the orientation of the bolt head...they are different from top to bottom...the bolt head at the top of the shock is on the left side, and on the bottom it's on the right side.
7. Remove the plastic splash pan under the seats. There are 2 torx screws on top under the rear seat, and 15 underneath (12 of which are in the 4 panels you'll see readily. I'll send photos of the two on top under the seat, as there are a bunch, and you only remove two...the CORRECT 2 :f_spider:
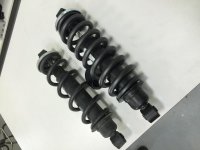
8. Remove the original shock and put it aside.
9. Install the new shock..you may need to make slight adjustments to the jack height in order to slip in the lower bolt so as to NOT bugger up the threads on the bolt. When you get it lined up correctly, the bolt will slip into place without forcing it.
10. Reinstall the plastic splash pan.
11. Reinstall the rear seat.
12. GO FOR A TEST RIDE AND ENJOY THE FRUITS OF YOUR LABOR!

Cheers JB

I was under the impression that the shock could be replaced by going thru the slots that the stiffener covered up to get at the top bolts??? Sure would appreciate any photos and further directions on removing this splash pan. I am contemplating ordering and will indeed install it myself.

Thanks,
 
Thanks for the inquiry

I was under the impression that the shock could be replaced by going thru the slots that the stiffener covered up to get at the top bolts??? Sure would appreciate any photos and further directions on removing this splash pan. I am contemplating ordering and will indeed install it myself.

Thanks,

The instructions that come with the new shock suggest taking off the tupperware on the right side of the F3. It also suggests removing the splash pan under the seats in the tire well. I did NOT remove any tupperware, only the splash pan, and was able to get to all the bolts rather easily.
As promised, photos are below...please click on the link below to see photos. Sure hope this helps!
JB

https://picasaweb.google.com/107114...authkey=Gv1sRgCIjP5oqm5rSC5AE&feat=directlink
 
Many thanks

The instructions that come with the new shock suggest taking off the tupperware on the right side of the F3. It also suggests removing the splash pan under the seats in the tire well. I did NOT remove any tupperware, only the splash pan, and was able to get to all the bolts rather easily.
As promised, photos are below...please click on the link below to see photos. Sure hope this helps!
JB

https://picasaweb.google.com/107114...authkey=Gv1sRgCIjP5oqm5rSC5AE&feat=directlink

I will study these photos with much interest!

Thanks again,
 
New Shock

Got my new shock installed this week while I had my F3 in for the recall. Got a bit of riding in today and it is awesome. The ride is much better and it no longer has the drifting sensation left and right that it had before. Love it. :doorag::spyder2:
 
Put my shock on last night. Going to ride today and let you know how it works. Mine had no instruction's with it so As usual I had to rely on this sight. Made it easy.

Also wife wanted the passenger boards and that was more of a hassle that the shock. A design that made an easy job a pain.
 
Shock Install

Just ordered mine today as well, thanks for all the info.

How difficult was it to install?


Got mine yesterday and installed it today, took about 45 minutes. If you have the right tools the only thing you need to remove is the seat. The top mount bolt can be removed using a 15MM socket on a universal joint thru the slot under the seat, a wrench for the nut thru the bottom access, was able to torque the bolts as well.
The ride is much better and smoother and handling is much better in the curves. The best $167.00 I spent so far.
Sorry I should of taken pictures of wrench placement, but I didn't think of it until I was done.:doorag::yes:
 
Got mine installed today and put about 15 miles on it so far. I have a couple hour ride slated for tomorrow so I'll wait till after that to give my thoughts.

HOWEVER.... I thought I would do a little pre-post install experiment. So I broke out the tape measure and with a little help from a friend....


  • Original shock with 3,940 miles on it measured 32 1/2" from ground to the rear tip of the passenger grab handle.
  • Original shock with with me on the passenger seat (let's just say I'm about 235ish) from ground to the same point on the grab handles measured 29 3/4".
  • Two up shock with no passenger measured 32 3/8" from the same points.
  • Two up shock with me on the back measured 29 7/8".

I'm a casino marketing guy and by no means a mechanic but I assume this means the benefit of this "upgrade" comes towards full compression of the spring.

Thoughts?
 
To me you've experienced no benefit. Your saging almost three inches with no one sitting on driver seat. Go measure how far you sag with just you on it.
 
From my sport bike days that's a LOT of intial Sag.Anyways ,just a thought,the F3-T rear air adjustable preload shock should fit and may be an viable option to stiffen up the pre load and intial sag for better handling and maybe no bottoming out.Can Anybody with a new F3-T chime in.
 
After 150 mile ride today all I can say is that the "mushiness" in my F3 is gone.

I've never bottomed out like others have stated with the stock shock but I did feel a lot of movement. Now, it's a bit deal more firm which I like so all in all I'm content.

Should it have come from the factory like this? I dunno. I have a feeling that if it did there would be a thread with people commenting that the rear is to firm. It's impossible to make everyone happy.

-Cheers
 
From my sport bike days that's a LOT of intial Sag.Anyways ,just a thought,the F3-T rear air adjustable preload shock should fit and may be an viable option to stiffen up the pre load and intial sag for better handling and maybe no bottoming out.Can Anybody with a new F3-T chime in.

The new 2016 F3's should be fine they are a RT incognito. Not the same animal.
 
Got mine installed today and put about 15 miles on it so far. I have a couple hour ride slated for tomorrow so I'll wait till after that to give my thoughts.

HOWEVER.... I thought I would do a little pre-post install experiment. So I broke out the tape measure and with a little help from a friend....


  • Original shock with 3,940 miles on it measured 32 1/2" from ground to the rear tip of the passenger grab handle.
  • Original shock with with me on the passenger seat (let's just say I'm about 235ish) from ground to the same point on the grab handles measured 29 3/4".
  • Two up shock with no passenger measured 32 3/8" from the same points.
  • Two up shock with me on the back measured 29 7/8".

I'm a casino marketing guy and by no means a mechanic but I assume this means the benefit of this "upgrade" comes towards full compression of the spring.

Thoughts?
Not sure how this comes into play but based on these numbers it does not indicate much difference. It only compresses 1/4" less the than original shock.
 
Jerry has the correct Hyperco 800# rear shock spring on F3 Spyder to stop bottoming

Good post to stimulate rider discussion on the board. There are a number of ways to address the weakness of the OEM design; weak springs front and rear especially when riding 2 up.

My experience has been that the damping function of the shock is good enough; its the weak springs you have to fix. So now we have an option to swap out oem shock with one with a better spring for $213.49 + tax. Or... just swap out the springs with a Eibach, Hypercoil, or custom spring. Springs are in the ~$85 each range. Depending on your total weight range for the RT bike, I think you can get by with 450 lbs/in for the front and 850 lbs/in. I used 550 lbs/in up front (a bit stiff for solo work, but not objectionable) and 800 lbs/in for the rear. With the springs I used and they were very nice with 2 up riding.

Jerry

Jerry, Thanks for posting this helpful shock/heavier spring needed info to solve F3 rear shock bottoming problem.
My 2015 F3S has an Elka rear shock with Hyperco 800# single length 8" long X 2.25 ID spring.
Larry's F3S has an Elka rear shock with a 1000# single length spring for 2 up riding with his wife.
Both have only about 1" sag when riding; raising rear end ride height up to balance front & rear of F3S Spyder.
A little firm but work excellent, for over 12,000 miles!
These spring #s were recommended by Hyperco spring computer chart, tech guy Mark.
(the new F3 BRP replacement shock with not strong enough spring is a waste of money, as rear of F3 will still bottom, even after paying over $200, (my 2 cents).
(MMMII with new BRP rear replacement shock/spring only sags 1/4" less than stock F3 spring, 2 1/2" rear spring sag ride height is way too much).

The F3 Elka shock comes with a short 2 3/4" long 800# spring, a spacer and a 5 1/4" long 800# spring; the 2 short Elka Dual springs Rate are Half the force of a Single spring; or about a 400# spring (only 50# more than the 350# stock rear F3 spring). So F3 Elka rear short springs will sag 3" with Larry & his wife on it!!!
We put the 1000# Hyperco single 8" long single spring on Larry's rear Elka shock & only sags 1", firm but does NOT bottom with 2 up riding!!
Bottom line
: 2015 F3 Spyder needs a much heavier rear shock spring (single Hyperco spring 8" long 2.25 ID, 800#-1000# on a F3 Elka rear shock).
Hope this helps explain why stock F3 rear 350# shock spring ride height sags 2-3", & can bottom with a driver & passenger riding.
You can replace F3 stock rear spring with a stiffer spring like Jerry suggests; buy an Elka rear shock, or BRP upgraded F3 rear shock/spring, of course it is your choice!
Enjoy your rydes!!
Jim

attachment.php
 

Attachments

  • F3S rear Elka shock 800 # Hyperco single spring IMG_3467.jpg
    F3S rear Elka shock 800 # Hyperco single spring IMG_3467.jpg
    83.4 KB · Views: 1,037
Last edited:
Same spring?

having looked at the stock spring vs the 200 upgraded spring, they look nothing alike. Are you sure it's the same spring?

attachment.php
 

Attachments

  • image.jpg
    image.jpg
    37.8 KB · Views: 995
Last edited:
Elka shock

Jerry, Thanks for posting this helpful shock/heavier spring needed info to solve F3 rear shock bottoming problem.
My 2015 F3S has an Elka rear shock with Hyperco 800# single length 8" long X 2.25 ID spring.
Larry's F3S has an Elka rear shock with a 1000# single length spring for 2 up riding with his wife.
Both have only about 1" sag when riding; raising rear end ride height up to balance front & rear of F3S Spyder.
A little firm but work excellent, for over 12,000 miles!
These spring #s were recommended by Hyperco spring computer chart, tech guy Mark.
(the new F3 BRP replacement shock with not strong enough spring is a waste of money, as rear of F3 will still bottom, even after paying over $200, (my 2 cents).
(MMMII with new BRP rear replacement shock/spring only sags 1/4" less than stock F3 spring, 2 1/2" rear spring sag ride height is way too much).

The F3 Elka shock comes with a short 2 3/4" long 800# spring, a spacer and a 5 1/4" long 800# spring; the 2 short springs are equal to a 400# spring (only 50# more than the 350# stock rear F3 spring). So F3 Elka rear short springs will sag 3" with Larry & his wife on it!!!
We put the 1000# Hyperco single 8" long single spring on Larry's rear Elka shock & only sags 1", firm but does NOT bottom with 2 up riding!!
Bottom line
: 2015 F3 Spyder needs a much heavier rear shock spring (single Hyperco spring 8" long 2.25 ID, 800#-1000# on a F3 Elka rear shock).
Hope this helps explain why stock F3 rear 350# spring bottoms.
You can replace stock rear spring, if you like, with a stiffer spring like Jerry suggests; of course it is your choice!
Enjoy your rydes!!
Jim

attachment.php
Did you install the Elka shock yourself and if so how hard was it to install?
 
Jerry, Thanks for posting this helpful shock/heavier spring needed info to solve F3 rear shock bottoming problem.
My 2015 F3S has an Elka rear shock with Hyperco 800# single length 8" long X 2.25 ID spring.
Larry's F3S has an Elka rear shock with a 1000# single length spring for 2 up riding with his wife.
Both have only about 1" sag when riding; raising rear end ride height up to balance front & rear of F3S Spyder.
A little firm but work excellent, for over 12,000 miles!
These spring #s were recommended by Hyperco spring computer chart, tech guy Mark.
(the new F3 BRP replacement shock with not strong enough spring is a waste of money, as rear of F3 will still bottom, even after paying over $200, (my 2 cents).
(MMMII with new BRP rear replacement shock/spring only sags 1/4" less than stock F3 spring, 2 1/2" rear spring sag ride height is way too much).

The F3 Elka shock comes with a short 2 3/4" long 800# spring, a spacer and a 5 1/4" long 800# spring; the 2 short springs are equal to a 400# spring (only 50# more than the 350# stock rear F3 spring). So F3 Elka rear short springs will sag 3" with Larry & his wife on it!!!
We put the 1000# Hyperco single 8" long single spring on Larry's rear Elka shock & only sags 1", firm but does NOT bottom with 2 up riding!!
Bottom line
: 2015 F3 Spyder needs a much heavier rear shock spring (single Hyperco spring 8" long 2.25 ID, 800#-1000# on a F3 Elka rear shock).
Hope this helps explain why stock F3 rear 350# spring bottoms.
You can replace stock rear spring, if you like, with a stiffer spring like Jerry suggests; of course it is your choice!
Enjoy your rydes!!
Jim

attachment.php

Most Excellent!

If you didn't catch it in my suspension thread(s), try adding the nylon washer or the rubber bumper (if it hugs the shock shaft firm enough to stay where it was last pushed to) to verify max suspension range used. This thread was written for the front shock but is applicable to the rear shock too: http://www.spyderlovers.com/forums/showthread.php?76070-Dialing-in-your-front-shocks-lots-of-pics

Jerry
 
Last edited:
Did you install the Elka shock yourself and if so how hard was it to install?

Yes, you can change out F3 rear shock, not hard.
Jack up rear of F3 under rear portion of frame, with the rear tire barely touching floor.
Just take off small inspection plastic plates (#30 Torx) on underside of fender black splash guard.
With help from another guy holding 15 mm socket end wrench on top bolt nut on left side from underneath, & a 15mm socket with long extension on right side, in between & just above right side inspection hole/rear splash guard. Pull top bolt out right side. Remove bottom bolt holding rear shock so it does not fall.
Install top bolt thru upper shock mount hole thru new Elka rear shock; then put lower shock bolt in by raising or lowering F3 frame enough to slide bolt thru; I use small dab of Blue Loctite on shock bolt threads/nuts.
Not sure if John at Elka will install a Hyperco single 800# spring 8" long x 2.25 Inside Diameter on rear F3 shock he sells.
Larry & I had to buy our own rear single 800# & 1000# Hyperco springs for our rear F3 Elka shocks!!
Because John would not acknowledge both our F3S Spyders were bottoming out using Elkas two short Dual 800# springs (half the force of a single spring, or about a single 400# spring rate, only 50# more than stock F3 rear shock spring). (Makes a difference in Hyperco spring #, of your weigh & if you ride F3 double a lot).
The Dual Spring system is linear just like the single spring system is with one exception, it uses a COMBINED spring rate. If the shock were compressed one inch then BOTH of the springs would compress a little to add up to that inch. Also, since each springs rate is not added together the combined spring rate can be considerably lower than a single spring system. http://shocktherapyst.com/the-truth-about-dual-rate-springs/
PM me if you need help changing rear F3 shock.
The F3 rear Elka shock has excellent dampening & eliminates the harshness of the stock shock.
Jim
 
Last edited:
No, the unequal length pair of 800 lbs per inch springs supplied by Elka are NOT the same as a single 400# spring.

They are only 400 lbs per inch during the first approx 1.25" of travel. As the shorter spring nears full compression, the effective spring rate rises toward 800 lbs per inch. The pair of springs gives and effective progressive rate coil that is 400/800.

Thus providing control on larger jounces and better ride quality on smoother roads.

I have never had the dual coil Elka bottom out on my F3 and I am no lightweight. The factory spring/shock was horrid and bottomed out easily on slow speed rail road crossings. I have been very pleased with my set of Elkas even though they were expensive.
 
Back
Top