• There were many reasons for the change of the site software, the biggest was security. The age of the old software also meant no server updates for certain programs. There are many benefits to the new software, one of the biggest is the mobile functionality. Ill fix up some stuff in the coming days, we'll also try to get some of the old addons back or the data imported back into the site like the garage. To create a thread or to reply with a post is basically the same as it was in the prior software. The default style of the site is light colored, but i temporarily added a darker colored style, to change you can find a link at the bottom of the site.

Engine alignment as it pertains to drive belt alignment

h0gr1der

New member
All,

I would like some technical expertise from those of you that have actually turned wrenches on the 1330 Ace.

Here is my dilemma. I'm a complete newb, so pardon my ignorance. I've purchased a new 2018 RTL and found the belt tension high using a Krikit. Read enough and watched enough videos to be confident in setting the tension and alignment. Upon inspection before adjustment, I find the belt is running to the far right at the back, looked like it was touching the flange, while the front was running to the far left, also appearing to touch the flange.

The factory service manual has an alignment section in the engine removal and installation section, but it doesn't say anything about how to align one. They mention a length of 120.1mm for the front rod link, but don't say how that pertains to alignment or if it is just a torque link. Has anyone seen this issue before? If the belt is rubbing a flange will it heat up? After setting the tension to the recommended value, I got the belt to show an occasional gap of a few thousandths of an inch at the back, same at the front. I looked for any articles about how to uncover and inspect the front pulley, and maybe belt replacement, but can't seem to locate any.

I think I can't rely on the dealer, they aren't even courteous enough to return my call about the Kenda tires shaking the whole front of the bike. I think I'm on my own here.
 
There are video's online on how to adj the drive belt and you do it by adj the rear wheel.Front tire shake probably due to wheel balance.Find a dealer to correct your issues it's all under warrenty.
 
Great questions. I hope you can find meaningful answers. More likely you'll find the dealer telling you; 'It's normal, they all do that'. But don't give up.
 
These belts our Spyders run are pretty robust things that really shouldn't 'get hot' thru any gentle rubbing on the flange at either end; and as you've found out, sometimes the engine's relationship/alignment with the frame can make it almost impossible to 'align' the belt in quite the way BRP & everyone else tells you it should be running, especially wrt the rear pulley! :gaah:

So don't worry too much if your belt is touching either flange, but DO worry if it looks like the belt is riding up on either flange or it's being forced to skew a bit & run at an angle to the rest of the belt once it hits the pulley &/or flange. You should be able to sight along the edge of the belt to check that last one; and the first one shows up PDQ on the edges of the belt teeth that ride up on the flange, the edges of each tooth will get chewed away, chamfered, or even frayed so that the 'riding up' edge clearly shows as having a worn vertical side with an angle that's less than 90° in relation to the top edge (flat) of the belt. But if it's necessary you should be able to align things so it's aligned OK up front while up the back end the belt might touch a flange fairly firmly without going that extra touch that lets the belt start riding up on the flange, if that makes any helpful sense to you?! :dontknow: I've seen belts that've been so tight on the rear flange that they've polished the inside edge almost mirror bright, but the belt still doesn't ride up on the flange and upon closer inspection, while you can see that the edge of the belt has been 'touching' something firmly, it's still square & not burnt or damaged in any way! :thumbup:

Ps: re the front end collywobbles, just cut your losses now, find a good tire dealer/alignment place & get them to strip the crappy Kendas off; check the ball joints & 'A' arm chassis mounts as well as checking that your rims are actually round & reasonably balanced; then since they're off the rims already, just toss the Kendas (or sell them if you are game to inflict that crap on someone else!) & fit some better quality tires; get a proper alignment done; & then go out & ENJOY riding your Spyder the way it should be enjoyed! :ohyea:
 
Last edited:
Before you go the "replace the tires" route, check your air pressures, these things are very sensitive to differing pressures.
 
Peter Aawen,

Thanks for the knowledgeable answers. I appreciate someone who has actual hands on experience with the subject matter at hand (front and rear alignment). Being the newb, and coming from chain and shaft drives, I don't know what to expect from a belt. One spec said one flange contact is OK, but not two. I dunno...

I did learn something from my belt alignment learning curve. I hear folks running the lifted bike while tightening the belt, some folks set it down to do the same, some folks whack the axle bolt adjustment cap or axle nut. On my bike every time I started tightening the axle nut in the end the belt would run to the left of where it was set. It moved. Every. Single. Time! I tried everything.

The Spyder has a 5/8" (15.8mm) hole through the axle shaft. With the belt tension at ±175 Lbs (778 Newtons) there is very little chance the left adjuster will come off seat. The right side, not so much. So if you have a 1/2" (25mm) steel rod approximately 20" long you can slide it through the axle and hook a small ratchet strap to rod protruding from the muffler side and find a pull point (front floorboard mount) to gently apply a few pounds of continuous tension frontward to keep the adjuster caps seated while tightening the bolt on the off side , holding the nut with an open end wrench, until good and snug. I also found a 1/2" drive Kolbalt 36mm standard socket on a torque wrench is short enough to actually get in by the muffler to do the final tighten.

So, with all that said, anyone ever looked deep enough into the guts of one of these things at view the front pulley or the front rod link?
 
Regarding adjusting the engine strut, be very hesitant to go there. Not saying it can not be done, simply it is a core and critical setting.
 
Last edited:
Peter Aawen,

Thanks for the knowledgeable answers. I appreciate someone who has actual hands on experience with the subject matter at hand (front and rear alignment). Being the newb, and coming from chain and shaft drives, I don't know what to expect from a belt. One spec said one flange contact is OK, but not two. I dunno...

I did learn something from my belt alignment learning curve. I hear folks running the lifted bike while tightening the belt, some folks set it down to do the same, some folks whack the axle bolt adjustment cap or axle nut. On my bike every time I started tightening the axle nut in the end the belt would run to the left of where it was set. It moved. Every. Single. Time! I tried everything.

The Spyder has a 5/8" (15.8mm) hole through the axle shaft. With the belt tension at ±175 Lbs (778 Newtons) there is very little chance the left adjuster will come off seat. The right side, not so much. So if you have a 1/2" (25mm) steel rod approximately 20" long you can slide it through the axle and hook a small ratchet strap to rod protruding from the muffler side and find a pull point (front floorboard mount) to gently apply a few pounds of continuous tension frontward to keep the adjuster caps seated while tightening the bolt on the off side , holding the nut with an open end wrench, until good and snug. I also found a 1/2" drive Kolbalt 36mm standard socket on a torque wrench is short enough to actually get in by the muffler to do the final tighten.

So, with all that said, anyone ever looked deep enough into the guts of one of these things at view the front pulley or the front rod link?

I run my belt at 130-140 lbs measured on the ground. It's fairly common to have the adjustment change as you tighten the axle nut. Take that change into consideration prior to tightening the axle nut--thus compensate for the torque change via the initial adjustment setting--a few torque the shaft nut & claim it eliminates the movement. good luck.
Darrell
 
As it turned out, after I lowered the belt tension to around 150 in the air, 165 on the ground, the belt alignment corrected itself on the front. Originally I had 220+ Krikit lbs in the air. I reckon it had so much tension that it torqued the rubber mounted engine out of line, rubbing the front left flange. Now with the lower tension I have good gaps on both sides of the front pulley, and the small gap at the back pulley. As a bonus, all my high speed vibration is gone so I may not need a belt tensioner. Using the rod and ratchet strap really eases the process, keeps all the slack out of the right side while tightening. I put the box end on the right side nut, insert the rod, and hook up the ratchet strap. Very gentle tension keeps the axle adjusters tight against the swingarm. After setting tension and gap I tighten the axle bolt (left side) enough to hold all settings, then drop the bike and finish torque the nut side after the rod and strap are removed. Works great for me.
 
As it turned out, after I lowered the belt tension to around 150 in the air, 165 on the ground, the belt alignment corrected itself on the front. Originally I had 220+ Krikit lbs in the air. I reckon it had so much tension that it torqued the rubber mounted engine out of line, rubbing the front left flange. Now with the lower tension I have good gaps on both sides of the front pulley, and the small gap at the back pulley. As a bonus, all my high speed vibration is gone so I may not need a belt tensioner. Using the rod and ratchet strap really eases the process, keeps all the slack out of the right side while tightening. I put the box end on the right side nut, insert the rod, and hook up the ratchet strap. Very gentle tension keeps the axle adjusters tight against the swingarm. After setting tension and gap I tighten the axle bolt (left side) enough to hold all settings, then drop the bike and finish torque the nut side after the rod and strap are removed. Works great for me.

Awesome! I think you are exactly right in your assessment. Running the belt too tight has a great number of negatives. You may even have had some engine vibration transfer to the frame with the mounts stressed as they were.

So glad you persevered and got this worked out. It can be a very rewarding feeling when things work out well as they have in this case.
 
Torque Link.jpg

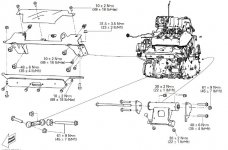
I never did get a definitive answer on what the front link rod actually does. It's on the front of the engine, and appears to be toward the left side (from the illustration). Only reference is a 120.1mm C/C spec, all cautions as to not change this. Inquisitive minds and all that. Controls torque, or does it tweak alignment?
 
View attachment 171795

I never did get a definitive answer on what the front link rod actually does. It's on the front of the engine, and appears to be toward the left side (from the illustration). Only reference is a 120.1mm C/C spec, all cautions as to not change this. Inquisitive minds and all that. Controls torque, or does it tweak alignment?

I would say that it does both. It is interesting that it is adjustable. It appears to have a tension spec rather than a particular length designation. This would certainly lend to the idea of a critical function.
 
Last edited:
When I bought my bike, the belt was up against the flange on the rear pulley.

I could smell belt, and so could the people I rode with. I had the dealer adjust the belt three times. Finally, I did it myself and it is now fine.

Learn from all the great info on here, you can do a better job than the dealer most of the time.
 
Last edited by a moderator:
Questions for the Unknown.

The front link rod/connecting rod part #707001918 in the service manual shows the link should be set at 4.733 inches/120.1 mm in a diagram front center of both bolt holes, but when you jack up the Spyder and crawl under and do the measurement, the center of the link rod/solid body is 4.733 inches. Not what it shows in the service manual. I find it to be another error in the service manual along with the errors that come along with your new manual which includes a diagram showing that the belt should be riding in the middle of the front pulley.

I bought a new 2020 RT. Heard the noise, smelled the rubber. Had conversations with BRP. They suggested I go to a dealer. BRP instructed the dealer to replace the belt and install the new WHITE pulley ending in #44. The belt STILL rides against the outside flange of the front pulley.

Contacted BRP and after a REAL discussion, the BRP person told me they don't know why this is happening. Their reply to me was if you have a failure concerning this issue we will repair it NO Charge. WOW $2,500.00 later.

I have posted this issue here hoping that others will read this and start a real conversation about this issue. For owners who aren't mechanicaly inclined just take a small 4x6 mirror and a flash lite and lay it under the front pulley and see if the belt is riding against the outside flange.
 
Last edited by a moderator:
It sounds like the tech at your dealer needs to spend the time needed and just adjust the rear wheel.
 
Last edited:
Using that torque adapter, you need to accommodate and adjust for added length since the 90* method will likely hit the bodywork and give an erroneous torque.
 
Last edited:
I've found that when torquing the axle nuts it helps to torque them in the direction against the adjusters. It helps to keep the belt from moving too much.
 
Last edited by a moderator:
Back
Top