JerryB
New member
Hi folks,
There is another thread on here: Made 4 skid plates today for RS/GS
So I contacted David Hamilton & he sent me a paper template for what he made.
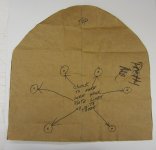
This gave me a starting point to begin the project.
I then removed the undercarriage cover & started measuring.
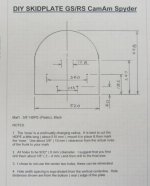
I will try to post a drawing of the dimensions that I made my DIY Skidplate to when I get it completed; hopefully in a few days.
I bought a piece of 3/8" thick HDPE from a local supplier, cut to 24" x 24", for $24.00.
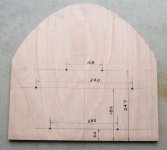
Using some measurements from David's paper template, I cut the HDPE to 520 mm wide by 510 mm tall.
From the existing undercarriage cover I got the distance on the holes and laid out my piece of HDPE.
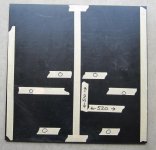
I then drilled the 6 holes with a 1/8" drill bit & then with a 9/64" drill bit & tried a test fitup. All the holes were within a tolerance that I could bolt my piece of HDPE to the Spyder.
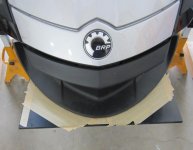
I then added more masking tape, reinstalled it onto the Spyder and drew a line around the nose of the frunk. I made a small 3/8" ( 10 mm ) spacer to add some distance for damage control should I hit anything with the skidplate.
I then decided to make a plywood template as I did not want to ruin my only piece of HDPE. I re-laid everything out onto the plywood & went over to a friend who is a very accomplished wood worker. He cut the plywood on his bandsaw & sanded it smooth with his table disc sander. The nose of the frunk is not a set radius; I really do not know what BRP used for the dimensions.
I got home with my piece of plywood, fitted it up and decided to go for cutting the HDPE.
I had a good router with a few cutters; and had at it. After cutting out the pattern using the plywood template, I took a small router bit & rounded the piece of HDPE on the top & bottom sides so that I would not have sharp edges on it.
Here are some more photos:
Fitting the piece of HDPE with a lot of masking tape to trace the contour of the nose of the frunk)
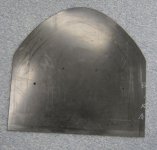
Finished piece of HDPE)
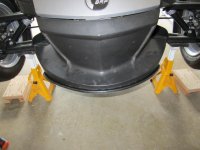
As installed)
Since I can only upload 5 photos, I'll do the other one in a reply to this post.
If anyone has any questions, fire away. If anyone wants any help on a project like this, just get in touch.
I cannot thank David Hamilton enough for his help on this DIY Skidplate project.
Jerry Baumchen
There is another thread on here: Made 4 skid plates today for RS/GS
So I contacted David Hamilton & he sent me a paper template for what he made.

This gave me a starting point to begin the project.
I then removed the undercarriage cover & started measuring.
I will try to post a drawing of the dimensions that I made my DIY Skidplate to when I get it completed; hopefully in a few days.
I bought a piece of 3/8" thick HDPE from a local supplier, cut to 24" x 24", for $24.00.
Using some measurements from David's paper template, I cut the HDPE to 520 mm wide by 510 mm tall.
From the existing undercarriage cover I got the distance on the holes and laid out my piece of HDPE.

I then drilled the 6 holes with a 1/8" drill bit & then with a 9/64" drill bit & tried a test fitup. All the holes were within a tolerance that I could bolt my piece of HDPE to the Spyder.
I then added more masking tape, reinstalled it onto the Spyder and drew a line around the nose of the frunk. I made a small 3/8" ( 10 mm ) spacer to add some distance for damage control should I hit anything with the skidplate.
I then decided to make a plywood template as I did not want to ruin my only piece of HDPE. I re-laid everything out onto the plywood & went over to a friend who is a very accomplished wood worker. He cut the plywood on his bandsaw & sanded it smooth with his table disc sander. The nose of the frunk is not a set radius; I really do not know what BRP used for the dimensions.
I got home with my piece of plywood, fitted it up and decided to go for cutting the HDPE.
I had a good router with a few cutters; and had at it. After cutting out the pattern using the plywood template, I took a small router bit & rounded the piece of HDPE on the top & bottom sides so that I would not have sharp edges on it.
Here are some more photos:
Fitting the piece of HDPE with a lot of masking tape to trace the contour of the nose of the frunk)

Finished piece of HDPE)

As installed)

Since I can only upload 5 photos, I'll do the other one in a reply to this post.
If anyone has any questions, fire away. If anyone wants any help on a project like this, just get in touch.
I cannot thank David Hamilton enough for his help on this DIY Skidplate project.
Jerry Baumchen

