Don't sweat it man. Just continue on, so far your doing good.
Keep us posted on what you find.
Best advice I can give you is don't cheap out when putting it back together when it comes to buying gaskets....[/QUOTE
I am listening.. I will be getting all new gasket and whatever else I am suppose to use new. Thanks:thumbup:
-
There were many reasons for the change of the site software, the biggest was security. The age of the old software also meant no server updates for certain programs. There are many benefits to the new software, one of the biggest is the mobile functionality. Ill fix up some stuff in the coming days, we'll also try to get some of the old addons back or the data imported back into the site like the garage. To create a thread or to reply with a post is basically the same as it was in the prior software. The default style of the site is light colored, but i temporarily added a darker colored style, to change you can find a link at the bottom of the site.
You are using an out of date browser. It may not display this or other websites correctly.
You should upgrade or use an alternative browser.
You should upgrade or use an alternative browser.
Bearing Pieces in oil
- Thread starter Caito
- Start date
Big Arm
New member
I must take my hat off to you Caito! You, Sir, have bearings of Steel!:bowdown:
I'm also a bit envious as well... I haven't rebuilt a engine since the mid 80's when I was rebuilding my old 70 Camero. Those were good times and good memories, at least in retrospect.
I'm learning a lot from you even though my hands are still clean and my knuckles aren't busted open...
Thanks so much for including us in your endeavor!
:agree: :agree: :agree: :cheers:
Found it..
[TABLE="class: gv"]
[TR="class: gvr"]
[TD="class: Description"][/TD]
[TD="class: Price"]Good news and great news..
The good news is I did it and the great news is there is no damages at all in the trans or inside the gearbox area.
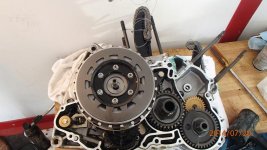
I splitted the crankcase this morning and anxious to find the trouble bearing in the gear box. I was disappointed to find that all the bearings and
needle bearings inside the gearbox and the crankcase were working and looking perfect. I was kind of wondering where the heck did those bearing
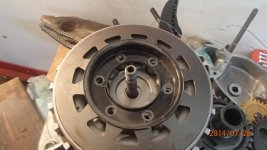
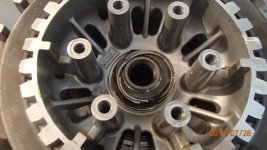
parts came from. After a session of grumble and a cold one. I get back into studying the diagrams and bingo. Its in the clutch. There is a needle bearing
in the SE5 clutch.
[TABLE="class: gv"]
[TR="class: gvr"]
[TD="class: Description"][/TD]
[TD="class: Price"][/TD]
[/TR]
[/TABLE]
[/TD]
[/TR]
[/TABLE]
[TABLE="class: gv"]
[TR="class: gvr"]
[TD="class: PartNumber"]420632700[/TD]
[TD="class: Description"] Needle Bearing[/TD]
[TD="class: Price"] $13.99 CAD[/TD]
[/TR]
[/TABLE]
The bearing cage and part of the circlip is the only thing left . I am sure some of you would have spotted that right away. I am still glad that I did the tear down and now I know my ride is good and solid. A peace of mind when I go for my next long ride. I will be ordering some parts and putting my ride back together. Its way past due for that long ride ...
I will be posting some pics of the engine tear down and the trouble spot tomorrow. Maybe someone down the road will find this post useful.:thumbup:
[TABLE="class: gv"]
[TR="class: gvr"]
[TD="class: Description"][/TD]
[TD="class: Price"]Good news and great news..
The good news is I did it and the great news is there is no damages at all in the trans or inside the gearbox area.
I splitted the crankcase this morning and anxious to find the trouble bearing in the gear box. I was disappointed to find that all the bearings and
needle bearings inside the gearbox and the crankcase were working and looking perfect. I was kind of wondering where the heck did those bearing
parts came from. After a session of grumble and a cold one. I get back into studying the diagrams and bingo. Its in the clutch. There is a needle bearing
in the SE5 clutch.
[TABLE="class: gv"]
[TR="class: gvr"]
[TD="class: Description"][/TD]
[TD="class: Price"][/TD]
[/TR]
[/TABLE]
[/TD]
[/TR]
[/TABLE]
[TABLE="class: gv"]
[TR="class: gvr"]
[TD="class: PartNumber"]420632700[/TD]
[TD="class: Description"] Needle Bearing[/TD]
[TD="class: Price"] $13.99 CAD[/TD]
[/TR]
[/TABLE]
The bearing cage and part of the circlip is the only thing left . I am sure some of you would have spotted that right away. I am still glad that I did the tear down and now I know my ride is good and solid. A peace of mind when I go for my next long ride. I will be ordering some parts and putting my ride back together. Its way past due for that long ride ...
I will be posting some pics of the engine tear down and the trouble spot tomorrow. Maybe someone down the road will find this post useful.:thumbup:
Attachments
Very cool to hear! Sometimes it just takes a little patience and persistence. Nice work for sure!
Did you separate the waterpump from the case and remove the shaft? This is a weak area on these motors.
If you removed the shaft from the case/seal during disassembly, then replace it. If you left it all intact during disassembly then just check it out real good for ANY weeping of oil or antifreeze from the weep hole.
If you see anything then replace it. It's a pretty inexpensive part and a difficult one to get to.....Easy with the motor on the bench....
Again, nice work!!
PMK
Active member
Not to change the subject, next expense if you don't have one already. A good quality torque wrench. Not Harbor Freight but a quality item in the proper range.
Also, ensure all the threads are super clean before Loctite. I normally spray with CRC halogenated brake cleaner in the red can. Typical for when I rebuild shocks, forks and motors.
I know you don't want to break the bank, but before reassembly, research the original bearing you suspected. It may be a good time to go the extra step and replace it also. There is a lot of constant tension on that bearing, along with driveline vibration.
I would also do the penny trick on reassembly, however make sure both case halves are installed to prevent angle loading the gearbox input shaft.
Myself, I would also replace the water pump seal or whatever it takes to prevent a leak. Don't scratch the shaft, and polishing may be acceptable prior to the new seal. A new shaft would be best, but not sure about cost.
All the best with it and good, rewarding job when complete.
FWIW I have had my 1981 KTM495 engine apart for the last 12 years. I am about ready to prep and reassemble it, with luck by Christmas. Sitting in boxes, some items lashed together, a printed oem parts book and manual. The previous owner had a shift fork break, which in turn logged into the primary drives gears on the crank and clutch breaking them. Being kind of rare and old, parts are difficult to find and expensive whether new or used.
I a sure you will have good results and a smile except for the costs.
PK
billybovine
Active member
I could not find any mention of the year of Spyder you have. If it is a 2011 (I think) or older the SE5 clutch can be updated with the newer clutch kit with an extra friction plate and a longer oil nozzle. The oil nozzle can be upgraded at any time but since it is apart you may consider a very expensive "You May as Well" for the clutch.
If your Spyder is one of the ones that blows a lot of oil into the air box. The fix is easy while the engine it is still on the bench. If so let me know and I will explain how to do it.
If your Spyder is one of the ones that blows a lot of oil into the air box. The fix is easy while the engine it is still on the bench. If so let me know and I will explain how to do it.
PMK
Active member
Thanks for the advice. For the extra $60 to replace the shaft and the seals. I am doing it and hopefully it will be the last time I ever see it. :thumbup:
To clarify, I was not stealing Drews thunder about the waterpump seal, just mentioning based on experience with other machines. Likely best to replace as you are doing.
PK
I could not find any mention of the year of Spyder you have. If it is a 2011 (I think) or older the SE5 clutch can be updated with the newer clutch kit with an extra friction plate and a longer oil nozzle. The oil nozzle can be upgraded at any time but since it is apart you may consider a very expensive "You May as Well" for the clutch.
If your Spyder is one of the ones that blows a lot of oil into the air box. The fix is easy while the engine it is still on the bench. If so let me know and I will explain how to do it.
Is a 2009 GS SE5. The filter seems to be clean when I took it off. I purchased the bike used therefore I really have no knowledge of how the last owner took care of the bike. I think right now I will just try to put the bike back on the road first and see what kind of job I did. If it give me problems again then I will go from there. Thank you for your suggestions.
Very cool to hear! Sometimes it just takes a little patience and persistence. Nice work for sure!
Did you separate the waterpump from the case and remove the shaft? This is a weak area on these motors.
If you removed the shaft from the case/seal during disassembly, then replace it. If you left it all intact during disassembly then just check it out real good for ANY weeping of oil or antifreeze from the weep hole.
If you see anything then replace it. It's a pretty inexpensive part and a difficult one to get to.....Easy with the motor on the bench....
Again, nice work!!
I did took it out because it seems a little sluggish when I try to turn it. I will be replacing it. Thanks :thumbup:
Water pump seal installation tools
Base on BRP service manual. It will requires 3 different tools to install the seals and the shaft. # 420877650 installer handle # 529035757 oil seal pusher and #529035765 Rotary seal installer. Do I really need those tools or can I push the seal in with a socket or a wooden rod? Anyone have any suggestions?
Base on BRP service manual. It will requires 3 different tools to install the seals and the shaft. # 420877650 installer handle # 529035757 oil seal pusher and #529035765 Rotary seal installer. Do I really need those tools or can I push the seal in with a socket or a wooden rod? Anyone have any suggestions?

It's all good PMK. We are all here trying to help.
If your new waterpump shaft and seals comes in separate pieces and you have to install the shaft through the seal pay REALLY close attention to the hole in the shaft. It will slice the seal very easily on assembly. Clean up the edge of the hole.
Some of the newer ones we have seen come as an assembly with the shaft already through the seal. You should be fine with that one.
Keep it rolling!


Any Alternative to BRP expensive compound??
Any other compound I can use beside BRP suggesting:
Dow Corning 111 :dontknow:
Drei Bond Sealing Compound :sour:
Petamo grease GHY 133n :hun:
I know Loctite 243 and 648. I am not sure what the number meant. It must be blue and red.. Anyone..
Any other compound I can use beside BRP suggesting:
Dow Corning 111 :dontknow:
Drei Bond Sealing Compound :sour:
Petamo grease GHY 133n :hun:
I know Loctite 243 and 648. I am not sure what the number meant. It must be blue and red.. Anyone..
Personally, I'd feel comfortable using 3 Bond 1211 in place of Drei Bond since Drei bond may be a dealer only find. Yamabond would work good too if you have any laying around. Some also substitute "the right stuff" but I'm not into that one all that much.
The others should be sourced fairly easily through mcmaster.com or even amazon.
648 is overkill IMHO but really good stuff. Yes, basically blue and red with a bit of a twist for each....
The others should be sourced fairly easily through mcmaster.com or even amazon.
648 is overkill IMHO but really good stuff. Yes, basically blue and red with a bit of a twist for each....
Thanks
I will going hunting for some loctite, lube, grease and whatever else I need to do the job tomorrow. I was thinking a high temp bearing grease might do the trick instead of the Petamo grease. I really don't understand the point of it all. Once I filled the engine with regular engine oil, it shouldn't matter with that little bit of grease on the crank. Like I said I am really not that good at this. I am going to check with some local shop here and see what they use to put their engine together. Thanks again.
Petamo grease is basically a marine grade wheel bearing grease with moly. I've heard it stands for: PETroleum And MOly.
I will going hunting for some loctite, lube, grease and whatever else I need to do the job tomorrow. I was thinking a high temp bearing grease might do the trick instead of the Petamo grease. I really don't understand the point of it all. Once I filled the engine with regular engine oil, it shouldn't matter with that little bit of grease on the crank. Like I said I am really not that good at this. I am going to check with some local shop here and see what they use to put their engine together. Thanks again.
Similar threads
- Replies
- 8
- Views
- 732
- Replies
- 7
- Views
- 798