• There were many reasons for the change of the site software, the biggest was security. The age of the old software also meant no server updates for certain programs. There are many benefits to the new software, one of the biggest is the mobile functionality. Ill fix up some stuff in the coming days, we'll also try to get some of the old addons back or the data imported back into the site like the garage. To create a thread or to reply with a post is basically the same as it was in the prior software. The default style of the site is light colored, but i temporarily added a darker colored style, to change you can find a link at the bottom of the site.

Apple CarPlay update - what is the secret to getting it working properly??

I can confirm that a backup camera works on a 2024 Spyder RT Limited. I bought a cheap camera on Amazon and was able to get it to work.
This was the camera I used:

https://www.amazon.com/dp/B0B95J5JC5?ref=ppx_yo2ov_dt_b_fed_asin_title

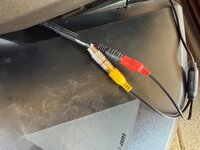
The 3 pin connector that has been discussed previously near the left rear light IS the connector for the camera.
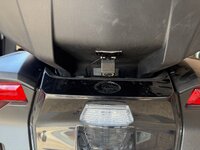
Here are pics of mine.
View attachment 212770 - View attachment 212771

The male end with end cap plugs is attached to the female end with the wires.
Here is a clip from the maintenance manual of the pinout.
View attachment 212772
Also, here you can see the Camera (-) eventually goes to ground.

View attachment 212773

So I connected the cameras - and power - to Camera (-), the cameras power + to Backup Light / 12V Cam , and the cameras signal to Camera (S).

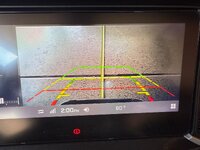
Turned on the Backup Camera in the software and put it in Reverse and the camera image displayed on the screen.
Since this wasn’t the OEM camera, I’m not sure the backup lines mean much.

Also, I’m waiting on some terminal connectors so I can use the existing male end rather than wait 2-4 weeks to get one from Amazon.
Finally still trying to decide it I will use this camera or buy another one and where to mount it… but at least it works.
I like what you have done. I have been curious about such a setup all along. I have a couple of questions. I understand from looking at the Amazon camera wiring description the red wire goes to the PK/BG-20 Can-Am connector and the black wire goes to the BK/BG-20 connector. From your description it looks like you also connected another (-) wire to it. Where did this wire come from? How did you identify the signal wire that connects to the BG/BK-20 connector. I'm guessing that there are several wires sheathed in the cable that is intended to run to the vehicle head unit. Finally, regarding the male end connector, are you saying that it has a removable plug and can then be used to connect to the female end if you have appropriate pins to insert? If that's the case and you have a line on how to obtain them please pass that info on.
Thanks. I'm anxious to try this setup myself.
For my specific camera, the wires are shown in the picture below. In my previous post, I had connected the (4 - Camera Ground) and (2 - Power -) together. I found out in further testing today that I don't need to connect the (4 - Camera Ground) to anything. Testing with an Ohm meter, the (2 - Power -) and (4 - Camera Ground) are actually connected together, probably where the wires split after the camera. Depending on the camera, those 2 wires may need to be connected together.

I've added a jumper cable from the the original camera connector to run under the seat. I'm going to then run a cable from there to where I plan to mount the camera. Right now, that'll probably be under the rear cargo storage. That way, if I need to replace the camera, I don't have to disassemble anything.
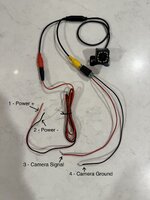
IMG_6662.jpg
 
I’m picking my RT S2S up in the morning. They could not get Apple CarPlay to even show as greyed out on the screen. They will continue working with BRP tech support.
 
My backup camera project is done!!! And it works great.
My cost for the whole project was $19.99
I already had the tools and a few of the items I used.

5set 1-1703494-1/1488991-5 Car Reversing Radar Eye Plug DJ7032YA-1.2-11/21 Female and Male Waterproof Connector Inserts - $10.00
https://www.amazon.com/dp/B0CL6GSZ78?ref=ppx_yo2ov_dt_b_fed_asin_title

Car Rear View Camera Backup Reverse Camera HD 170° Wide Angle 12 LED Night Vision, for RV Trucks Trailer SUV - $9.99
https://www.amazon.com/dp/B0B95J5JC5?ref=ppx_yo2ov_dt_b_fed_asin_title

I decided to run an extension cable from the original camera connector to under the seat. This way I shouldn't need to disassemble the side of the Spyder if I need to make adjustments. Then another extension with a power and RCA end to under the rear cargo storage.
I then connected those to the camera ends. The camera is attached to under the rear cargo storage with Gorilla tape. I think that will hold it, but will report back if not.
With his setup, I should be able to replace the camera pretty easily if needed.
The downside to this camera is it also has backup lines, but for the cost, I can live with it.
In the picture, the Red Line is 10 inches from the back of the Spyder.

IMG_6671.jpg - IMG_6668.jpg - IMG_6663.jpg
 
Back
Top