• There were many reasons for the change of the site software, the biggest was security. The age of the old software also meant no server updates for certain programs. There are many benefits to the new software, one of the biggest is the mobile functionality. Ill fix up some stuff in the coming days, we'll also try to get some of the old addons back or the data imported back into the site like the garage. To create a thread or to reply with a post is basically the same as it was in the prior software. The default style of the site is light colored, but i temporarily added a darker colored style, to change you can find a link at the bottom of the site.

2011 RT Air Filter change

traderbobnc

New member
It stated out innocently enough. I've had this "new to me" 2011 Spyder RT for just under a year. She only had 14K miles on her when the adventure started. I've been riding for years... Honda's and BMWs... They all have their achilles, The GL1200 stater died shortly after aquiring it. I went through the Poor Boy Alternator conversion - where you redesign hanging a Geo Metro alternator off the crank to bypass the lame stator. Then, the Light Truck BMW K1200LT - with final drive problems, radio problems, and the stupid oil filter up inside the engine, and the air filter... don't even get me started on the air filter... so much for German Engineering. Now I'm finding out, my foray into the Canadian Motorcycle space is going to be likely fraught with similar challenges!
So two weeks ago, I started to think, I should probably change the oil and air filter and get to really know the Spyder. Little did I know...
After finding a few Youtube videos about oil changes (BTW there are very few on how to change the air filter in this puppy) I started to get worried.
I was sort of prepared for having to remove a oiece of plastic or two. I'd already checked the oil level... How much more difficult could it be to change the oil?
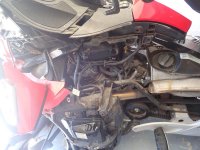
Now I have body parts strewn all over my little garage,,, screws and the stupid little push pins everywhere... I know for a fact, at least one of the push pins fell inside the body behind the FRUNK.
When I put the 4.5 quarts in her, she still barely registered on the dipstick, so I put another 1/2 quart in. Now she's up a little over the full mark, so I'm going to have to purge some of the new fresh oil, to keep from getting it blowin into the airbox.

Speaking of the airbos,,,
I still haven't been able to retrieve the stupid air filter. Seriously? Before I started I read the manual. It said:
Refer to BODY subsection and remove:
- Upper side panels
- Central panel.
Disconnect the idle air control valve (IACV) hose.
Release clamps from air filter housing cover.

Come on! How difficult could that be?

This is why people write books about channeling Zen and the art of motorcycle maintenance.

It'll likely be 6 more months before I figure out how to exorcise the air filter, purge the oil and find all the bits and pieces strewn all over the Garage. By then, I will have gone on the BMW forum and found an old Slash 7 to resurrect.

This is NUTS! But what are you going to do?
At least there is a Covid quarrantini going on.
I'm socially distancing in the garage.
The neighbors keep walking by and shaking their heads. I just know they're thinking "Poor fool." "He'll never get that thing put back together again."
I'm not giving up though... even if riding season will likely be over before I can ride again.
It's cathartic!

Having fun. The secret of life is enjoying the passage of time.
P5030131.jpg
P5030133.jpg
 

Attachments

  • P5030132.jpg
    P5030132.jpg
    70.5 KB · Views: 74
Thanks, I may do that next time. If only I'd have known to do that before I started down this road. Now I guess I wait until the next filter change rotation
 
If you have a SM5, only put in 4qrts. If you have a SE5, put in only 4.5 qrts. Changing the air filter is a pain, but you do have to remove right side mirror, air deflector, upper right side panel, side cover and right side acoustic panel. You now have access to air filter. It is a pain but doable. Good luck.
 
TraderBob, I'd be changing all the placcy stuff for JT's air filter while you've got it all un-buttoned!! :lecturef_smilie:

And while you're at it, give BajaRon a call & get a set of plugs and leads so you can do them too!! :shocked: Only thing about doing that is.... you only thought the air cleaner's a pain to get to?!? You haven't felt how bad that pain can get until you try to do the plugs and leads!! :yikes:

But seriously, don't waste the opportunity to get as much done as you can while it's all naked and opened up! There are some quite time consuming and fiddly things that will need doing, only they're made a LOT WORSE by the amount of time & mucking around it takes JUST to gain access!! Don't put off something you can do now, especially when you are SOOO CLOSE to having it stripped down enough to do it!! Why put it all back together only hafta do the whole strip & refit thing again?!? :dontknow:

I do know some people (by that, I DO mean more than just one owner! :shocked: ) who've ended up buying a new Spyder rather than trying to change the plugs and leads!! Some even gave up once their Spyder was all opened up like yours is in the pics - they got that far, looked at what else was required, and both daunted and horrified, eventually just bundled all the spread out stuff up, took it to the dealer, and said "Here, you can have that, just gimme a new Spyder!" nojoke :banghead:

Think very carefully before buttoning it all up and putting the tupperware back on! Do you really want to hafta do that again in a year or so? Will you still be capable, both physically and mentally, of stripping it all down even further again just to change the plugs & leads?? :dontknow:

Think about it...... :thumbup:
 
Maybe it's just me. Does anyone else have Murphy following them around just waiting on them to screw up?
The continuing escapade...
I tried and tried to figure out how to get the dog gone air filter out.
I did find one video from a guy that suggested taking the Frunk off.
What the hey. In for a penny; in for a pound.
https://www.youtube.com/watch?v=yl6QAFUJl34
It can't be all that bad right? He made it look so easy.
So I grab me some hex bits and a 10mm socket or two and have at it.
I opened the Frunk and got everything pretty much disconnected. Then, because I didn't have enough stress in my life, I did something really stupid... I shut the Frunk.
Back to this wonderful forum to figure out how to open a locked Frunk.
After fiddling with it for a half an hour, I had the bright idea to try the switch - and woudn't you know it, it unlocked.
I'll for sure be following y'alls advice and adapting a failsafe solution to open the locked Frunk.
Anyway - after the Frunk was removed, I finally dragged the old air filter out of the air cleaner... and wouldn't you know... it wasn't that dirty after all. All this time wasted!:mad:
While I was under there I looked at the overflow for the coolant and it was below the minimum... so I guess before I button this puppy up, I'll have to get some more coolant. It's probably going to take me another 6 months of Weekends to find all the pieces and parts and button everything back up anyway.
My fear is that I'll be going down the road and plastic pieces will start flying off like they did on my old GL1200.
I remember a trip across the Alligator River Bridge in the Outer Banks, when my left side battery cover decided to commit Harakiri and liberated itself; flying off into the Alligator River. Definitely don't that to happen with this sucker.
So I guess it is just me afterall. Murphy's law still lives in the lives of poor shade tree CanAm Spyder mechanic owners.
Can I get a little Grace and Mercy?
 
Follow Peter's advice, do the plugs and wires now. They are going to need it soon enough anyway. And you gave already gone thru the aggravation. When I went in to change mine I thought "Oh it can't be that bad" so just bought plugs and wires. After I wrestled the air cleaner out to get to the front plug, I said " No way I am going to wrestle that back in there". and promptly ordered JT's air cleaner kit. I had to wait a week waiting for it to come, but it was still a good decision. Oh BTW get the muffler he sells for it also. Money well spent.

Oil changes, I only out in 4 qts at first then drive it down the street to get it good and warm then check it and add a little as needed. Remember the Spyder even on an oil change wants to be good and hot and have all the oil pumped into the tank from the sump when you check it.
 
I guess I'm just scared, that if I go through all the trouble of doing what you guys are suggesting - plugs and leads, mufflers and sensors and air box - that someday she'll throw a code and I'll have to limp home, or worse, get a tow, only to have the dealer tell me - they can't do anything for me, cause she's not stock.
Has anybody encountered that?
I've already run into a Brake Failure warning and I have an inkling there is something draining the battery and I've only put 1K miles on it.
 
I have performed almost all of the recommended modifications on my 2013 STS.
The dealer has never refused to do service or repairs during my warranty days.
Besides we have the Magnuson Moss Act act to protect us from manufacturers and warranty issues.
Burden of proof is on the manufacturer to prove your modification caused a warranty part to fail. Not likely.

Now, my bike is out of the extended warranty so my modifications are not an issue.
Yes I have been towed to the dealer because I screwed up a custom wiring issue. My fault and my bill to pay.
 
Paul, when you say : "Oh BTW get the muffler he sells for it also. Money well spent". Are you talking about the Cat bypass? I didn't see any muffler on his site.

Thanks, Bob
 
If you still have it opened up, by all means get the spark plug wires as well as plugs and the vacuum hoses. This is a thread I started on mine which is a 2010. https://www.spyderlovers.com/forums/showthread.php?127764-Winter-Maintenance-on-the-RT You would have to take off the air box in order to access the right side wire and plug, but if yours have never been changed out, then sooner or later you will be going back in to do the work. The more you take these things apart, the easier it gets and the more confidence you will develop.
 
The saga continues... I got all the plastic back on with the exception of the plastic bezel on the instrument cluster. I only had 4 screws left over and the only other thing I only broke was the wire that connects to the Frunk release. I installed the USB charger switch on the base of the dash. I had the 4 screws in a plastic bag. But in the attempt to reattach the plastic bezel, 3 of the 4 screws fell behind the handle bars into the cavity where that base panel is in the dash. Does anybody know if I have to remove ALL the plastic again, to retrieve the 3 screws? I'm half tempted to leave them there and get new ones if I can... but I don't want them moving around in there and messing something else up... If it was a bullet, I might leave it there. Why is nothing simple. I was soo proud of myself... adding the accessory usb charger. Pride goes before a fall...
 
Those screws are gone!! :shocked: We don't call those holes 'Black Holes' or 'the Abyss' for nothing!! :yikes:

You would very likely have to strip down ALL the tupperware again just to look properly for the screws; but even if you do that, your chances of finding & retrieving them all aren't good! There's all sorts of little shelves & nooks & crannies & hidey holes that something as small as those screws can drop into/onto & probably either safely remain lodged in there forever or drop out onto the road immediately in front of your rear tire the very next time you ryde... with fairly predictable results there!! :gaah: But seriously, unless you can pick your Spyder up, hold it over your head & turn it upside down, then shake it vigorously until the screws fall out, your chances of retrieving them are fairly slim! :lecturef_smilie: Not impossible mind you, some have recovered screws from the various 'Black Holes' found on Spyders; they're just so slim as to be very nearly at the level of 'Pure Fluke'!! :banghead:

Cut your losses, leave those screws, get some new screws to secure the dash, and move on! :ohyea: :thumbup:

Ps: you've really learnt & achieved quite a lot thru this little exercise, and if your only real loss is those screws, you should feel pretty proud of yourself! Unlike many, it doesn't sound like you've launched many tools into the next State &/or Low Earth Orbit, and you haven't told us of any emergency dashes to surgery to re-attach any important personal bits or seal up any holes letting too much in the way of 'essential bodily fluids' out, so unless you're carefully hiding those from public scrutiny, you've done good and can be justifiably proud! :2thumbs:
 
Last edited:
People think I'm nuts, but I have a big piece of cardboard with a sketch of the top view of the spyder and various subcomponents and when I take a bolt, pin or screw out it gets pushed into the cardboard in the corresponding location. That way I always know what goes where.
 
People think I'm nuts, but I have a big piece of cardboard with a sketch of the top view of the spyder and various subcomponents and when I take a bolt, pin or screw out it gets pushed into the cardboard in the corresponding location. That way I always know what goes where.

That's really not a bad idea.:thumbup:
 
I had a seat bushing fall into the black hole at the rear and I found it with a borescope and fished it out with a piece of coat hanger.
 
It's done! I took the left and right side plastic off AGAIN!. I'm actually getting OK doing it. Lifted up the console switch, shown a flashlight in there and wouldn't you know it: 3 little instrument pod cluster screws, gently napping, right there. After I had already driven (the cage) to the Stealership to order more screws (BTW they are M5 not M6 like all th others). But they won't be here till next weekend and I just can't wait any longer. How to get them out? The needle nose won't reach. There not steel so they won't attract to the magnet. So I get a piece of tape and affix it to the stupid magnet thingy and the screws stuck to the tape and voila! No more napping screws. All buttoned back up now and ready to ride. Thanks guys! There is still the question of how to re-take apart the dash AGAIN, and replace the Frunk lock cable - but the cheater fix of attaching the extra string to remotely open the Frunk should work for a bit... until the cable gets here and I get the courage to take it all apart again.
 
Back
Top