speedster200
New member
New from BRP as of 05/07/09.
I'm writing this per the dealer internal news letter. YOU can do this mod yourself. hyea:
hyea:
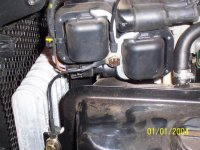
It you encounter an SE5 that gets stuck in any gear, then, after the key is shut off for 2 or more minutes will shift again, we have a simple and permanent solution. Add a ground wire from the ignition coil mounting bolt to the grounding lug on the left side of the frame, and from the ignition coil mounting bolt to the oil cooler mounting bolt just below the coil. You will need 27" of wire to follow the frame and harness and reach the grounding lug, and approximatley 4" to reach the oil cooler mounting bolt. Make sure to securely tie wrap the long wire. 16ga, 18gs, or 20ga wire will work fine. We suggest using black wire for asthetics and to respect the wiring color codes.
This is probably an RFI problem and wouldn't be a bad idea to do on an SM5. The less RFI interferance the better. Thats my 2 cents worth.:thumbup:
I'm writing this per the dealer internal news letter. YOU can do this mod yourself.
hyea:It you encounter an SE5 that gets stuck in any gear, then, after the key is shut off for 2 or more minutes will shift again, we have a simple and permanent solution. Add a ground wire from the ignition coil mounting bolt to the grounding lug on the left side of the frame, and from the ignition coil mounting bolt to the oil cooler mounting bolt just below the coil. You will need 27" of wire to follow the frame and harness and reach the grounding lug, and approximatley 4" to reach the oil cooler mounting bolt. Make sure to securely tie wrap the long wire. 16ga, 18gs, or 20ga wire will work fine. We suggest using black wire for asthetics and to respect the wiring color codes.
This is probably an RFI problem and wouldn't be a bad idea to do on an SM5. The less RFI interferance the better. Thats my 2 cents worth.:thumbup: