• There were many reasons for the change of the site software, the biggest was security. The age of the old software also meant no server updates for certain programs. There are many benefits to the new software, one of the biggest is the mobile functionality. Ill fix up some stuff in the coming days, we'll also try to get some of the old addons back or the data imported back into the site like the garage. To create a thread or to reply with a post is basically the same as it was in the prior software. The default style of the site is light colored, but i temporarily added a darker colored style, to change you can find a link at the bottom of the site.

Drilling Holes in Trunk Lid

wd5gnr

New member
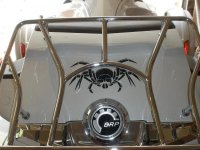
I just picked up the Big Bikes trunk rack. It looks good (other than a missing scuff foot used during installation which is no big deal).

However, before I start drilling (more) holes in the bike, I wanted some advice (please). The instructions say to use a center punch to mark the holes. Really? I fear that would (possibly) crack the hard plastic. My plan was to drill small pilot holes and then finish out with a step drill.

Any advice before I start? I've drilled two holes on the bike so far and they were both not related to other holes and in cheap-to-replace parts. A little nervous ;-)
 
I don't think I would center punch either, drill the small pilot hole like you said. If it came with a paper template you can use an ice pick to mark the holes rather than center punch.
 
Have to agree..!!

use a sharp point to mark the spot and drill a small pilot hole with a sharp/new bit so it won't walk. Then continue with the step drill. Kinda what you intended to do. Pic's when your done and we all clap..!! :thumbup:
 
Before you drill any holes be aware that that truck rack is great and i love it but the lower two holes will be real close to the plastic extensions for the originalscrews and you have to measure three times and drill once. Believe me.

Cruzr Joe
 
Just checking.Are you aware the top section of trunk lid comes off. I used masking tape and a pin
to mark the holes, then as above, small sharp but and then one to fit.
I would suggest going back to dealer for template, it is hard to measure the spacing.
I think I measure a lot of time before before drilling that first hole.
Good luck
Oldmanzues
 
I installed a Big Bike Parts rack on my friends Limited . First thing is to use some masking tape to locate where you are going to drill holes, draw circle around leg, mark with marking pen
then mark center with dot ,drill pilot hole then use a step drill to size. It helps to have some one hold rack while you mark holes. The outer lid easily separates from inner liner.
 
Just checking.Are you aware the top section of trunk lid comes off. I used masking tape and a pin
to mark the holes, then as above, small sharp but and then one to fit.
I would suggest going back to dealer for template, it is hard to measure the spacing.
I think I measure a lot of time before before drilling that first hole.
Good luck
Oldmanzues
:agree: Masking tape is your friend. The center punch is OK, just don't hit hard (or just use hand pressure), but a pin or an awl will do just as well or better.
 
holes

I installed a Big Bike Parts rack on my friends Limited . First thing is to use some masking tape to locate where you are going to drill holes, draw circle around leg, mark with marking pen
then mark center with dot ,drill pilot hole then use a step drill to size. It helps to have some one hold rack while you mark holes. The outer lid easily separates from inner liner.

I did it this way and it turned out great......measure, measure, measure...PB030038.jpg
 
I took a break from stringing lights today to do a trial fit of the rack. Looks easy enough but for those of you who have one: it looks like whatever you have on there better not poke too far over the right edge or you bump the antenna. Most of the bags I have seen have expandable sides. So do you just have to keep it all on the deck? Or do you let it hang asymmetrically? Or am I missing something?
 
Before you drill any holes be aware that that truck rack is great and i love it but the lower two holes will be real close to the plastic extensions for the originalscrews and you have to measure three times and drill once. Believe me.

Cruzr Joe
sounds like it's coming from a bad experience!!!:yikes:
 
I took a break from stringing lights today to do a trial fit of the rack. Looks easy enough but for those of you who have one: it looks like whatever you have on there better not poke too far over the right edge or you bump the antenna. Most of the bags I have seen have expandable sides. So do you just have to keep it all on the deck? Or do you let it hang asymmetrically? Or am I missing something?

Just use a small bag on the rack for items like extra glasses, caps gloves and such, too big of a bag is risky.

Cruzr Joe
 
I just picked up the Big Bikes trunk rack. It looks good (other than a missing scuff foot used during installation which is no big deal).However, before I start drilling (more) holes in the bike, I wanted some advice (please). The instructions say to use a center punch to mark the holes. Really? I fear that would (possibly) crack the hard plastic. My plan was to drill small pilot holes and then finish out with a step drill.Any advice before I start? I've drilled two holes on the bike so far and they were both not related to other holes and in cheap-to-replace parts. A little nervous ;-)[/QUOTEDon't do it!Jack
 
Did you get the chrome 1 that contours to trunk? If so I installed 1 a couple of months ago and it was very easy. Centered it on lid mostly by eyeballing but did use wife's hemming tape to check things. I marked where posts were to be located with a magic marker. Checked alignment. Drilled a pilot holes. You do have a very little bit of leaway. I was off a little and made up for it on last hole. Everything looks good and no leaks. The gaskets were a problem because I got them mixed up.
 
A little drilling tip

After you mark the hole location, the masking tape is a good idea, but the secret to not missing the mark requires a reversible drill. Run the drill bit backwards for just a short burst. It will create the small dimple needed and will not "walk" because the cutting edge is not pulling on the surface. It works every time. It is works even better when drilling into metal!

Enjoy.
 
Tapping a center punch lightly will not harm the plastic.

Layout the holes first by using blue painters tape........

rough measure the hole pattern on the rack
place blue painters tape on the lid in the approximate hole locations
place the rack on the lid where you want it
take reference measurements to make sure the rack is centered
trace the post diameters with a Sharpie
mark the center of the circles
measure the center of the holes on the rack
confirm the center locations marked on the lid
lightly center punch the lid
drill a small pilot then use the clearance drill(caution...the drill bit will want to suck down thru the plastic fast)
lightly deburr the holes with countersink
 
Last edited:
Back
Top