• There were many reasons for the change of the site software, the biggest was security. The age of the old software also meant no server updates for certain programs. There are many benefits to the new software, one of the biggest is the mobile functionality. Ill fix up some stuff in the coming days, we'll also try to get some of the old addons back or the data imported back into the site like the garage. To create a thread or to reply with a post is basically the same as it was in the prior software. The default style of the site is light colored, but i temporarily added a darker colored style, to change you can find a link at the bottom of the site.

Spyder surgery - one less thing to remove for servicing!

.

Hi Pete,
The only ( semi) radical one is the intake mod. Most owners don't know how the air gets to the intake/ air filter. That long tube on the left side near the frunk ends at the front of the :spyder2: with a restricted opening on the very front/left of the :spyder2:'s nose. I cut out the baffle that blocks the air flow and then heated the thermoplastic to enlarge the opening to close to double its size. Not RAM air but MUCH freer flowing , especially at speed.
I've modded intakes on my ZX11, and V-Max for some improvement----- every little bit helps.

Lew L

hmmmm, I like this idea. Will need to poke around a little and maybe do it. I enlarged the leading edge of the intake tube on the two R1200Cs I have. In both instances I saw an increase in fuel mileage of 3 to 4mpg
 
Last edited by a moderator:
Well if I understand you ..... ( & I hope you looked at the pic ) . My set-up operates the same way the OEM system, except there is no plastic air intake tube. When I take the Frunk off part of my tube stays attached to the frunk and the other part stays attached to the air box plastic .... they just slide together ..... there's no need for this to air tight because all the air is pre-filter. .... I hope this makes sense..... Mike :thumbup:

OK, I think I found the pix. ( on a white :spyder2:) Where does that black tube stick out into the air stream????
 
I love to read and see pics of mods. Would someone please post a pic of the air intake y'all are talking about? Thanks.
 
I love to read and see pics of mods. Would someone please post a pic of the air intake y'all are talking about? Thanks.

We were talking about two versions ..... Enlarging the OEM air intake ...OR .... totally removing it ( which is what I did )..... Mike :thumbup:
 
You know where the Air Box ( with the filter is ) .... well I removed the OEM rubber elbow, and attached half of the Metal tube to the box at the original elbow hole ..... the other half is attached ( w/ "L" brackets and rivets ) frunk wall in the same location .... sorry I don't have pics of the inside :banghead: ....... All this was done to provide ambient air to go directly into the OEM air-box ..... Mike :thumbup:
 
.

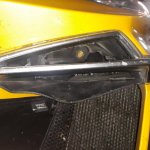
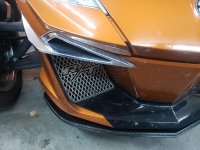
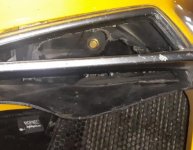
So here ya go Bob. This is the right side as your looking at the front of an RT.

20220619_143327.jpg

There is a thin horizontal piece ( NOT the chrome one but behind it) that I may try to remove yet. The pix doesn't do justice to the amount the intake area was opened up. It is much more free flowing that stock and it's all but un-noticeable. Also draws higher pressure air ( at speed ) in the front of the bike than at the wheel well.

Lew L
 
.

So here ya go Bob. This is the right side as your looking at the front of an RT.

View attachment 196927

There is a thin horizontal piece ( NOT the chrome one but behind it) that I may try to remove yet. The pix doesn't do justice to the amount the intake area was opened up. It is much more free flowing that stock and it's all but un-noticeable. Also draws higher pressure air ( at speed ) in the front of the bike than at the wheel well.

Lew L

Lew I removed the entire thing and it was a *itch & a 1/2 .... after done I thought I should have just cut it out ..... However if you remove it you can still do something with it..... One of the benfits of doing what I did was EASE of removing and replacing the entire FRUNK .... and of course I get lots more air ......good luick .... Mike :thumbup:
 
Lew I removed the entire thing and it was a *itch & a 1/2 .... after done I thought I should have just cut it out ..... However if you remove it you can still do something with it..... One of the benfits of doing what I did was EASE of removing and replacing the entire FRUNK .... and of course I get lots more air ......good luick .... Mike :thumbup:

I knew there was a good reason I was reluctant to remove the frunk (I still avoid it).
 
Last edited:
.

So here ya go Bob. This is the right side as your looking at the front of an RT.

View attachment 196927

There is a thin horizontal piece ( NOT the chrome one but behind it) that I may try to remove yet. The pix doesn't do justice to the amount the intake area was opened up. It is much more free flowing that stock and it's all but un-noticeable. Also draws higher pressure air ( at speed ) in the front of the bike than at the wheel well.

Lew L

Are you aware that the intake duct you modified has a huge inlet opening just aft of what you cut up? The entire duct, even in the reduced cross section portions remains larger than the bore of the throttle body.

Just this evening I reinstalled the intake duct into the frunk portion of our 2014 after installing heat management material. I tested and found the inlet air temps approximately 30*f above ambient at times, which is more than I care for.

The 2020 and newer Spyder RT series located the radiators outboard of the bodywork, essentially appendage’s on each side. This likely was to reduce intake heat. The 2020 also does not utilize the long duct from the primary airbox to the left front bodywork. Similar to what Mike did, without cutting a hole, the 2020 and newer Spyders pull air in from under the bodywork. With outboard radiators they can do this as this is a cooler location than 2019 and prior that require the duct, unless you cut the bodywork.

I looked for this " huge inlet opening' and couldn't find it aft of the modded opening. Is it in the " engine bay" , under the tuppeware? I may break out the remote camera for a better look but little better description of where this opening is would really help.

Thanks for your input,

Lew L
 
.

So here ya go Bob. This is the right side as your looking at the front of an RT.

View attachment 196927

There is a thin horizontal piece ( NOT the chrome one but behind it) that I may try to remove yet. The pix doesn't do justice to the amount the intake area was opened up. It is much more free flowing that stock and it's all but un-noticeable. Also draws higher pressure air ( at speed ) in the front of the bike than at the wheel well.

Lew L

Do you have any more pics that would help illustrate what you did and where? I'm having a difficult time visualizing it. Thanks.
 
Do you have any more pics that would help illustrate what you did and where? I'm having a difficult time visualizing it. Thanks.

Hi Pete,
Pix are difficult as everything is BLACK. Try this: Sit in front of the spyder, put your left hand into the opening shown. You will feel the baffle. There is an opening just behind it causing the incoming air to turn( slow down). I removed the baffle by drilling and cutting with hacksaw blade in a little handle. Now that you can get your fingers in there, you can feel the "floor" on the intake duct. This was heated ( slowly and carefully) and pushed down to make an "intake scoop".
I'll try to PM you more pix,

Lew L
Lew
 
Hi Pete, Pix are difficult as everything is BLACK.

Try this: Sit in front of the spyder, put your left hand into the opening shown. You will feel the baffle. There is an opening just behind it causing the incoming air to turn( slow down). I removed the baffle by drilling and cutting with hacksaw blade in a little handle. Now that you can get your fingers in there, you can feel the "floor" on the intake duct. This was heated ( slowly and carefully) and pushed down to make an "intake scoop".

Lew

I think I understand now. The Hopnel label showing in your picture threw me off a bit. I still don't get why I can see that if it's inside your frunk.

20220620_142300.jpg

Lews Intake duct modification.jpg
 
Last edited:
I think I understand now. Thanks.

Did you happen to see/feel the opening that PMK mentioned.\??? I couldn't find anything other opening further down the intake pipe. BUT maybe right after the part I heated there was a hole that I may close to use the openings I made to have a straight entrance without any turbulence. Just a little something I've learned about ram air intakes.

Lew L

Lew have you ever had the frunk off ???? .... you can see the entire plastic intake ..... Mike
 
Back
Top