• There were many reasons for the change of the site software, the biggest was security. The age of the old software also meant no server updates for certain programs. There are many benefits to the new software, one of the biggest is the mobile functionality. Ill fix up some stuff in the coming days, we'll also try to get some of the old addons back or the data imported back into the site like the garage. To create a thread or to reply with a post is basically the same as it was in the prior software. The default style of the site is light colored, but i temporarily added a darker colored style, to change you can find a link at the bottom of the site.

Dream Catcher's New Installs

Spyder_Cowgirl

GOS member (Girls On Spyders)
Originally posted on FB …. but, I know that there are many here that never go there. Sooo …. mighty proud of the following::D:D

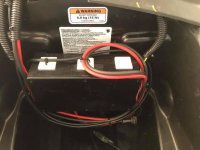
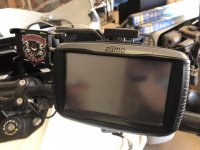
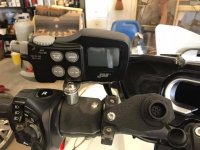
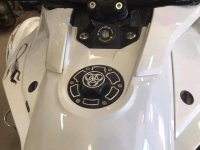
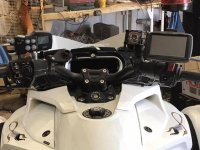
It is done and put back together (no more Spyder porn)! It only took me five days, with help from LR Smith (aka hogcowboy).... someone with more experience could do it in one. Some pics of the result - installed a power block, CB, GPS, phone holder, and Lamonster gas cap. The pig tail for the battery tender is now run in the power block, as is the GPS, and I still have four slots left for accessories. The cable for BRP connect is extended to the phone holder, so I can use BRP connect apps if I chose.

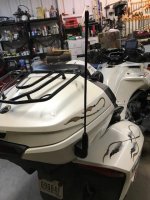
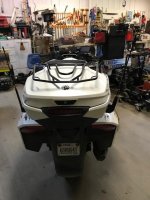
Also, the antenna is mounted on the right side of the rear trunk using a J&M kit for a Harley that was custom built with a one foot mast (usually is two feet for that kit).

All the best …. Ann
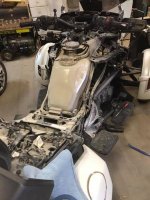
NakedSpyder.jpgWiringBoxFrunk.jpgGPS Phone_RightSide.jpgCB_LeftSide.jpgGasCap.jpgFullViewCockpit.jpg
 
I love the job you did mounting the J&M CB and mic plug. I have one I'm going install and I'm curious as to what hardware is that holding the mic plug? Custom made? Supplied by J&M?
 
Looks great!

Note - when filling gas make sure the pump nozzle is all the way in and do not attempt to top it off once the auto shut off stops the fuel flow. Is is very easy to get back splash as the opening on Lamont's cap is so small.
After learning this the hard way we now get very few over spills.
 
CB and Mic Plug Mounts

I love the job you did mounting the J&M CB and mic plug. I have one I'm going install and I'm curious as to what hardware is that holding the mic plug? Custom made? Supplied by J&M?

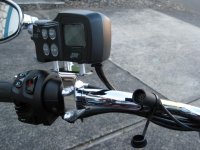
The CB itself is mounted with the following:
  • Lamont's Top Cap, using the "mirror mount" hole.
  • The bracket is from J&M and for a Yamaha (was the only flat bracket that allowed the correct orientation); part JCB03-HBK03
  • I used a 3/4" barrel spacer to raise the CB up just high enough to use the Reverse and PTT buttons on the left control pod
  • The bolt has a TORX 40 head on it for security (was a challenge finding those).


The mic plug in is mounted with the following:
  • Lamont's SpyderCuff that sits just inside the TopCap; gives several different mount points.
  • I purchased a single "power plate" from Lamonster garage that has a cigarette style plug for power / USB.
  • Hubby (aka hogcowboy) then cut the bottom out of the cigarette plug; as it is just a little large, I used a properly sized snap ring to keep the mic plug from being pushed through the top. We also drilled a strategically placed hole near the bottom and zip tied the mic plug into the unit (just about keeps it from being pulled out when unplugging).


It all works well, and I think it looks pretty darn good too!

All the best .... Ann
 
Looks great!

Note - when filling gas make sure the pump nozzle is all the way in and do not attempt to top it off once the auto shut off stops the fuel flow. Is is very easy to get back splash as the opening on Lamont's cap is so small.
After learning this the hard way we now get very few over spills.

Thank you for the heads up on that .... I rarely use auto shutoff because our tanks at home (with a ranch we have "real gas" delivered) don't have an auto shutoff capability. So, I just use my ears and make sure I have the nozzle inserted correctly to avoid that little splash out when removing from the cap. Do this at gas stations too, it's just become habit.

Thanks again .... Ann
 
congratulations..🍻

We do love the DIY 'ers of which you surely qualify...:clap: nicely done :thumbup:
 
Thank you Cowgirl for that well detailed description. I will print it out for reference when I'm installing mine. There will be some differences as I have a F3L, but you gave me a way to start. Attached is a photo of mine on my Victory. I had one of the first Cross bikes and J&M had no hardware for them yet, so I had to wing it and it worked well for the 9 years I had that bike. Note that the mic plug is simply zip tied in place - simple, but it worked.
CB INSTALLATION 024.jpg
 
Thank you Cowgirl for that well detailed description. I will print it out for reference when I'm installing mine. There will be some differences as I have a F3L, but you gave me a way to start. Attached is a photo of mine on my Victory. I had one of the first Cross bikes and J&M had no hardware for them yet, so I had to wing it and it worked well for the 9 years I had that bike. Note that the mic plug is simply zip tied in place - simple, but it worked.
View attachment 176359

Nicely done on the Victory ... note that this was done on a 2018 F3L. I have two Spyders, a 2016 RT Ltd (Jubiliee) and a 2018 F3 Ltd (Dream Catcher). Hoping that hogcowboy will, someday, pick up the F3 as it is getting more difficult for him to ride the Indian (MC accident in 2012 trashed his right ankle).

Thanks for the update on yours .... Ann
 
Nicely done on the Victory ... note that this was done on a 2018 F3L. I have two Spyders, a 2016 RT Ltd (Jubiliee) and a 2018 F3 Ltd (Dream Catcher). Hoping that hogcowboy will, someday, pick up the F3 as it is getting more difficult for him to ride the Indian (MC accident in 2012 trashed his right ankle).
Thanks for the update on yours .... Ann
Ann...I shoulda looked more closely at your photos. Now I'm all the more encouraged and hoping the bracket that's on the Victory will work on my F3L. If not, I always enjoy a challenge, just like ranch folks do.
I empathize with your hubby's injury and I like many others here had a physical problem cause them to "graduate" to three wheels.
 
Ann....Please show us how the antenna is mounted.

I don't know why I didn't take pics of this before ... this is a J&M trunk mount CB kit for a Harley Davidson. J&M was kind enough to build the kit with a one foot mast instead of the usual two foot of the standard kit. I did add some rubber fender washers to the bottom bolt to put the antenna in a more vertical plane -- it is now very close in angle to the radio antenna on the opposite side of the trunk.

All the best .... Ann

AntennaFromSide.jpgAntennaFromRear.jpg
 
Thanks Ann, nice job on the antenna, looks like factory. Thanks for pioneering this project.
How was the antenna coax cable routed through and out of the trunk to the under seat area?
Do you have the J&M part number for that antenna mount? Tried to find it on their site.
 
Thanks Ann, nice job on the antenna, looks like factory. Thanks for pioneering this project.
How was the antenna coax cable routed through and out of the trunk to the under seat area?
Do you have the J&M part number for that antenna mount? Tried to find it on their site.

I am not the pioneer on this one …. James Thorne did it long before I did (I even asked several questions of him before proceeding with my own install). The antenna coax and ground are routed out the front / bottom of the trunk (using a similar path as the radio does on the other side of the trunk). There is a pretty good gap at the front / bottom of the colored panel -- you will need to make a longer ground in order to reach the far left corner under the trunk. The part for the antenna kit is TMCBA-200 … normally comes with a two foot mast.

All the best … Ann
 
Back
Top