• There were many reasons for the change of the site software, the biggest was security. The age of the old software also meant no server updates for certain programs. There are many benefits to the new software, one of the biggest is the mobile functionality. Ill fix up some stuff in the coming days, we'll also try to get some of the old addons back or the data imported back into the site like the garage. To create a thread or to reply with a post is basically the same as it was in the prior software. The default style of the site is light colored, but i temporarily added a darker colored style, to change you can find a link at the bottom of the site.

2016 F3 how to lift out the frunk basket

RunSharon

New member
I'm a very excited owner of a 2016 F3 T and I'm struggling with how to pull out the basket in the storage compartment to get to my battery. The manual is not much help and I don't want to yank the molded basket out and destroy the pins / grommets holding it in place. Can anyone tell me if I can just lift and pull or what more has to be done to get to the battery without causing damage? Thank you, thank you, thank you in advance for any help! ~Sharon
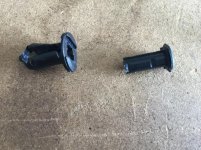
 
Hi Sharon,
Lift the cover with the thermometer stamped on one side and the PC on the other. There is an attached pin each side, so just lift each one vertically.

Remove the 4 pins in each corner of the frunk. Lift out frunk.

Pete
 
Last edited:
p.s. It looks like you haven't removed the plastic pins before. If you look closely, you will see they have a small hole under the top. Put a small screwdriver in there and lift the top out. You can then put the screwdriver under the bottom half of the pin and lift it out
 
Windshield question

Windshield
Hi Sharon,
Lift the cover with the thermometer stamped on one side and the PC on the other. There is an attached pin east side, so just lift each one vertically.

Remove the 4 pins in each corner. Lift out frunk.

Pete
 
p.p.s. Here is a pic of the underneath of the upper cover showing the fixed pins, and also what the removed pins from the frunk look like.
 

Attachments

  • IMG_0459.jpg
    IMG_0459.jpg
    99.1 KB · Views: 64
  • IMG_0460.jpg
    IMG_0460.jpg
    58.7 KB · Views: 102
p.p.s. Here is a pic of the underneath of the upper cover showing the fixed pins, and also what the removed pins from the frunk look like.

Thanks for the help. I'm not very handy even for a girl. LOL. I had my uncle looking at the frunk and under the cover but the manual leaves a bit to be desired. It's dark out there now but I will take a look tomorrow. So you are talking about the four pins holding the basket in, right? Do I lift each pin out with a small screw driver under the head of the pin? I live over an hour away from the dealer, and he was not very helpful. When I asked how do I get to the battery, he just tapped the service cover, which I did remove and successfully put it back.

Sorry to have to ask for details but as stated, I am not very familiar with tools, screws and pins.

Yep, you've got it Sharon. When you pop a small screwdriver under the head of the pin (the right half of the photo) , you can lift it out. You can then slide the small screwdriver between the plastic bodywork and the bottom half of the pin (the left half of the photo) and ease that out. You can then lift the frunk out. Once you get familiar with it, you will find you can lift the head about a quarter inch, and take both bits out together.

When putting the pins back in, it's easier to insert the head partway into the bottom (the head will only go in one way), push the bottom half into the frunk hole and then press the top in.....or you can simply put the bottom into the frunk hole, twist the top till it lines up with the bottom, and push the top in.

I always find the hardest part is getting the bloody service cover lined up and back in, but it looks like you have already mastered that:thumbup:

Don't be sorry asking for details, we have all been there.....that's what is good about this group. Most of the members remember that they were Spyder novices once and love to help out !
 
Thank you so much! I appreciate your patience. I had an ST Limited and all I had to do was unzip the liner cover. Easy peasy! I'm kind of missing my GPS because my sense of direction matches my lack of dexterity skills. Hoping a phone mount and Google Maps will tide me over until I can do something about the GPS. Thank you again. I have found this forum to be very kind and helpful.
 
Each of the 4 "pins" consist of 2 parts.

You pry out the smaller centre piece

Then you pry out the larger outer part

You can't pry them out as a unit as the lower part of the "pin"is wider than the holes in the basket. Once the smaller centre piece is out, the larger outer piece will pull out of the basket holes.

The claim that you can't pry them out as one unit is not strictly true oldgoat;). If you lift the top pin a quarter inch, that allows the bottom pin wings to collapse and you can slide your lifter under the bottom half and lift both halves out as one unit.
Pete
 
Basket removal

The very beginning of this video shows you how to remove the basket and get to the battery.
 
The claim that you can't pry them out as one unit is not strictly true oldgoat;). If you lift the top pin a quarter inch, that allows the bottom pin wings to collapse and you can slide your lifter under the bottom half and lift both halves out as one unit.
Pete


That's how I do mine (like you). They stay together as a unit....most of the time anyway!
 
Another handy video

At 1:20 into the video he shows the same type of pins with the center pulled up. I hope more folks that know there way around spyders make videos like these.
 
Back
Top