I don't know. Probably a big job, which is why I didn't do it that way.how big of a job to run the cable to the glove box, maybe even using the original stock cable, Thanks, Mike
-
There were many reasons for the change of the site software, the biggest was security. The age of the old software also meant no server updates for certain programs. There are many benefits to the new software, one of the biggest is the mobile functionality. Ill fix up some stuff in the coming days, we'll also try to get some of the old addons back or the data imported back into the site like the garage. To create a thread or to reply with a post is basically the same as it was in the prior software. The default style of the site is light colored, but i temporarily added a darker colored style, to change you can find a link at the bottom of the site.
You are using an out of date browser. It may not display this or other websites correctly.
You should upgrade or use an alternative browser.
You should upgrade or use an alternative browser.
What is the best way to by-pass the frunk lock?
- Thread starter wmh9680
- Start date
How about some pictures showing the way you did it? Thanks.Did mine in similar fashion yesterday. What made it real easy was the pre-drilled hole above the stock lever attachment. Ran a coated wire down to the left inspection panel, attached a key ring, and DONE !! Probably 15 minutes. I had the seat release done another 15 minutes later. Fishing line attached then led the free end into the glove box on a key ring (thanks to another member's idea :thumbup, can't even see the line when the seat is down. I also coated both locks with a silicone spray as a preventive measure. BIG, BIG thanks to all who posted ideas and pics previously, they all helped my work be so much easier.
HayRog
New member
OK Pete ..


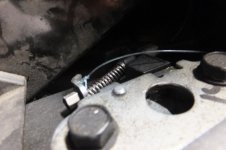
Frunk release.
Pic 1 -- direction the wire takes from lever down to the inspection panel.
pic 2 -- behind inspection panel, the key ring barely visible, attached by a mini clip.
pic 3 -- how the wire attaches to the lever
To release frunk, open inspection panel and pull wire.
ignore the two pics below !
Attachments
Last edited:
HayRog
New member
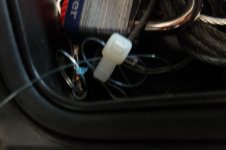
Seat release


pic 1 -- end of fishing line, tied to a key ring, cinched by a white cable tie and dropped into bottom right corner of glove box. Hidden when lid and seat are down.
pic 2 -- direction of fishing line from glove box and down through a hole I drilled to the left of the dip stick.
pic 3 -- fishing line attached, knotted and knot fixed with superglue, to the seat release lever.
To release seat, remove line from glove box and bring in line with bottom front of seat -- pull to the right -- viola!!
:banghead: don't know how two of those pics made it to the above post also -- pilot error")
pic 1 -- end of fishing line, tied to a key ring, cinched by a white cable tie and dropped into bottom right corner of glove box. Hidden when lid and seat are down.
pic 2 -- direction of fishing line from glove box and down through a hole I drilled to the left of the dip stick.
pic 3 -- fishing line attached, knotted and knot fixed with superglue, to the seat release lever.
To release seat, remove line from glove box and bring in line with bottom front of seat -- pull to the right -- viola!!
:banghead: don't know how two of those pics made it to the above post also -- pilot error
Last edited:
Seat release
View attachment 161813View attachment 161814View attachment 161815
pic 1 -- end of fishing line, tied to a key ring, cinched by a white cable tie and dropped into bottom right corner of glove box. Hidden when lid is down.
pic 2 -- direction of fishing line from glove box and down through a hole I drilled to the left of the dip stick.
pic 3 -- fishing line attached, knotted and knot fixed with superglue, to the seat release lever.
:banghead: don't know how two of those pics made it to the above post also -- pilot error
Nice job!
I dunno...fishing line...I'm not seeing a clinch knot or surgeon's knot there...View attachment 161809View attachment 161810View attachment 161808
Frunk release.
Pic 1 -- direction the wire takes from lever down to the inspection panel.
pic 2 -- behind inspection panel, the key ring barely visible, attached by a mini clip.
pic 3 -- how the wire attaches to the lever
ignore the two pics below !
Thanks for the pics. What did you use for the outer casing?
BLUEKNIGHT911
Sadly Passed Oct 2024 - RIP
HIDDEN SEAT RE-LEASE
:clap::clap::clap: ....Nice job ... I have a Gas Door & I did what you did, but put the wire near the gas cap ( behind the locked door )............. Mike :thumbup:Seat release
View attachment 161813View attachment 161814View attachment 161815
pic 1 -- end of fishing line, tied to a key ring, cinched by a white cable tie and dropped into bottom right corner of glove box. Hidden when lid is down.
pic 2 -- direction of fishing line from glove box and down through a hole I drilled to the left of the dip stick.
pic 3 -- fishing line attached, knotted and knot fixed with superglue, to the seat release lever.
To release seat, remove line from glove box and bring in line with bottom front of seat -- pull to the right -- viola!!
:banghead: don't know how two of those pics made it to the above post also -- pilot error
Okay, now I'm confused. Isn't the gas cap on the opposite side of the bike from the seat latch release?:clap::clap::clap: ....Nice job ... I have a Gas Door & I did what you did, but put the wire near the gas cap ( behind the locked door )............. Mike :thumbup:
wmh9680
New member
The long side panels have to be loosened at the front so that the screw holding that center panel can be removed (it's hidden). Then there are two screws underneath the center panel and then the obvious ones at the mirror. Hope that helps.
Can you post pics? I have the snap swivel attached but can't get it closed with the center panel on. Thanks, Mike
Attachments
HayRog
New member
I dunno...fishing line...I'm not seeing a clinch knot or surgeon's knot there...
Thanks for the pics. What did you use for the outer casing?
The outer casing is telephone internal wiring, with the 4 wires inside removed.

Watch this video. I think it will help answer your questions.Can you post pics? I have the snap swivel attached but can't get it closed with the center panel on. Thanks, Mike
BLUEKNIGHT911
Sadly Passed Oct 2024 - RIP
SEAT LATCH RE-LEASE & GAS DOOR
You are correct.... I drilled a tiny hole next to the gas Cap and fished a thin wire under the glove box to the area just forward of the seat latch ... I then attached the wire to the latch arm ..... since the gas cap is closer to the front of the bike than the latch .... the angle allowed the wire to pull open the latch .....all these methods work the same way, they are a little different in the way the wire travels to the latch ..... Mike :thumbup:.........PS - Kudos to the member who discovered the Telephone wire , that is very strong stuff, very thin, flexible yet stiff enough to feed thru blind area,s .............I was going to suggest using it, but not all have access to it ..... MikeOkay, now I'm confused. Isn't the gas cap on the opposite side of the bike from the seat latch release?
Last edited:
Got it. Thanks Mike.You are correct.... I drilled a tiny hole next to the gas Cap and fished a thin wire under the glove box to the area just forward of the seat latch ... I then attached the wire to the latch arm ..... since the gas cap is closer to the front of the bike than the latch .... the angle allowed the wire to pull open the latch .....all these methods work the same way, they are a little different in the way the wire goes ..... Mike :thumbup:
wmh9680
New member
Watch this video. I think it will help answer your questions.
Thanks, I'm slowly but surely learning how to take her apart, once when I was played up from knee surgery I removed the carbs on my Virago and stripped em down and cleaned em,
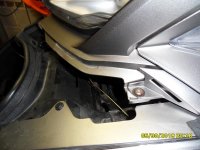
It's best not to tackle it the first time when you're under time pressure. I just took these pics today of the headlight surround removal. The trick is to get at that bolt that's out of sight underneath the front of the side panel.Thanks, I'm slowly but surely learning how to take her apart, once when I was played up from knee surgery I removed the carbs on my Virago and stripped em down and cleaned em,
 In this one, I've removed the hidden bolt and pulled the surround slightly forward so you can see how the various panels are secured at that location.
Attachments

Last edited:
wmh9680
New member
Thanks, I got her all apart and was able to attach the wire and she works. I also drill a hole thru the bottom/side of the glove box and ran a wire from the seat lock into the glove box and put a key-ring on it.It's best not to tackle it the first time when you're under time pressure. I just took these pics today of the headlight surround removal. The trick is to get at that bolt that's out of sight underneath the front of the side panel.
View attachment 161854 In this one, I've removed the hidden bolt and pulled the surround slightly forward so you can see how the various panels are secured at that location.
View attachment 161853
FrankPa
New member
Another idea...
You could just get a generic key cut (no transponder) and slide it under the passenger footrest rubber pad. That way, nobody can steal your Spyder (won't start with that key), but you can still unlock the trunk if you leave your keys in your heavy pants and you change into lighter clothes because the sun finally came out.
(Don't ask me how I know this works.:dontknow
I had mine in that spot on my old Spyder for 7 years and it never moved...
BLUEKNIGHT911
Sadly Passed Oct 2024 - RIP
your answer
I think you missed the point of this Thread ...... WE ( me and a lot of others ) don't want to use the Ignition switch for opening Anything .....if / when yours breaks and you get charged $400 or so to fix it ....the spare Key thing won't seem to be as good an idea as once thought ....... Mike :thumbup:You could just get a generic key cut (no transponder) and slide it under the passenger footrest rubber pad. That way, nobody can steal your Spyder (won't start with that key), but you can still unlock the trunk if you leave your keys in your heavy pants and you change into lighter clothes because the sun finally came out.
(Don't ask me how I know this works.:dontknow
I had mine in that spot on my old Spyder for 7 years and it never moved...
wmh9680
New member
You could just get a generic key cut (no transponder) and slide it under the passenger footrest rubber pad. That way, nobody can steal your Spyder (won't start with that key), but you can still unlock the trunk if you leave your keys in your heavy pants and you change into lighter clothes because the sun finally came out.
(Don't ask me how I know this works.:dontknow
I had mine in that spot on my old Spyder for 7 years and it never moved...
Thanks, I have 3 generic keys. It was the generic key that I had in the ignition trying to open the trunk and seat with it in the ignition and it got stuck there.
IdahoMtnSpyder
Well-known member
You can also use a 1/4" dowel to reach in and push the lock open. You can lift the frunk lid enough to reach in with a dowel. It takes a bit of trial and error to get it just right, but still pretty easy. Play with it first with the lid open and when it's in place hold it and lower the lid. Then mark on the dowel how far it has to go in to make contact.After getting locked out this weekend I want to stop using the key for frunk access and seat access. I have attached 2 pics of the frunk lock. The cable pulls from the right to trip the lock open. What is the best/easyest way to run a cable and where to? Seen and heard diff ways. Just wanna make it as simple as possible. Thanks, Mike


This is shown on the 2013 RT I had but it would be same for other models.
Similar threads
- Replies
- 11
- Views
- 3K
- Replies
- 2
- Views
- 712
- Replies
- 6
- Views
- 719
- Replies
- 5
- Views
- 1K
- Replies
- 7
- Views
- 500