• There were many reasons for the change of the site software, the biggest was security. The age of the old software also meant no server updates for certain programs. There are many benefits to the new software, one of the biggest is the mobile functionality. Ill fix up some stuff in the coming days, we'll also try to get some of the old addons back or the data imported back into the site like the garage. To create a thread or to reply with a post is basically the same as it was in the prior software. The default style of the site is light colored, but i temporarily added a darker colored style, to change you can find a link at the bottom of the site.

Want to put a compass on my RT

So you have not seen many compasses I guess...
Boat compasses for instance do not need to be stationary. The are gimbaled.

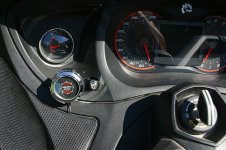
This is what I tried to use in my Spyder. It's a boat compass you mount in the dash.

It's a Ritchie X21BU. This will fit in the Spyder gauge hole perfectly!

It would have worked fine while moving but like I said, the magnets and electronics threw it WAY OFF.

View attachment 136875

Bob

What would happen if you just removed the speakers completely? I NEVER listen to the radio.
 
It may or may not work. Between electronics of the display, headlights, and even the frame of the machine, it may still have a tough time.

Honestly, when you really get the desire for just a heading from a compass, it is easier and more accurate to use a GPS with screen set to a compass display. Not sure if automotive or moto units allow this, but inexpensive hiking units will and are water resistant. If you go with rechargable batteries and a simple mount, it becomes a simple setup.

A member pm'd me about Marlin compasses, and I'm thinking about buying this one: http://www.marlinsclocks.net/Marlin...Windshield-Mount--Satellite-Driven_p_311.html
 
I was wondering that, too, since I also never use my radio. Can't hear it unless I'm all but sitting still.
Now that's a good question. My radio has been useless since day one. Only time it comes in, is when I'm passing thru a city. If I took a speaker out, could I use that lead for a 12v plug to plug in a GPS, with out screwing up the electronics?
 
Now that's a good question. My radio has been useless since day one. Only time it comes in, is when I'm passing thru a city. If I took a speaker out, could I use that lead for a 12v plug to plug in a GPS, with out screwing up the electronics?
There's room to put a 12v plug there and leave the speaker in - at least on an RT. Many have done that.
 
A member pm'd me about Marlin compasses, and I'm thinking about buying this one: http://www.marlinsclocks.net/Marlin...Windshield-Mount--Satellite-Driven_p_311.html

So let me get this clear???

You WON'T use a GPS because it's electronic rubbish that you don't want to be exposed to despite it having the capability to display a compass heading, cos it 'might cause problems or interfere with various Spyder functions'.....

And yet you ARE considering buying & using a compass display that works by utilising GPS technology behind the scenes to display a compass heading?!? :hun: :shocked:


Oh yeah, that makes perfect sense?!?

:banghead::banghead::banghead:
 
Last edited:
It may or may not work. Between electronics of the display, headlights, and even the frame of the machine, it may still have a tough time.

Honestly, when you really get the desire for just a heading from a compass, it is easier and more accurate to use a GPS with screen set to a compass display. Not sure if automotive or moto units allow this, but inexpensive hiking units will and are water resistant. If you go with rechargable batteries and a simple mount, it becomes a simple setup.

A member pm'd me about Marlin compasses, and I'm thinking about buying this one: http://www.marlinsclocks.net/Marlin...Windshield-Mount--Satellite-Driven_p_311.html
Ruralgirl,

Have to say, I like Paul's idea better, but given your remonstrance to technology, I believe your choice is a good compromise. And it looks good too. :)

You are indeed a lady of principle. :thumbup:
 
So let me get this clear???

You WON'T use a GPS because it's electronic rubbish that you don't want to be exposed to despite it having the capability to display a compass heading, cos it 'might cause problems or interfere with various Spyder functions'.....

And yet you ARE considering buying & using a compass display that works by utilising GPS technology behind the scenes to display a compass heading?!? :hun: :shocked:


Oh yeah, that makes perfect sense?!?

:banghead::banghead::banghead:


It's a matter of simplicity. A rectangular screen taking up a good piece of real estate in my face with functions that I'll never use, or a small circle that I can place unobtrusively where I wish and which is devoted to the only function that I need. Please note that, Plan A failing (a regular compass), I AM unhesitatingly turning to higher technology. I never said I didn't appreciate modern gizmos, nor recognize their place.
 
Removing Instrument Panel

I will be trying to do the install of the satellite compass for my wife Wendy (ruralgirl).

The plan is to screw on the compass using one of the existing 4 screws of the instrument panel with an appropriate spacer (24mm).

My question to you guys is the removal of the instrument panel console. It looks like one just removes 4 screws and it lifts out. It looks simple enough, but apparently others have had unspecified trouble?
Also, I am expecting to find a switched accessory wire to use for power and a place for the ground wire. What is the "color code" for the switch power wire?

Thanks for any comments and suggestions.
 
UPDATE

I ordered the 190747 Marlin's Quest Compass in Perch Clamp a few days ago and received it a couple days later (http://marlinsclocks.com). Today, my husband and I installed it, which took about 90 minutes plus an hour to run out and get smaller tap splice connectors after the first ones failed to displace sufficient wire insulation. I then took a 40 mile spin around the block on twistie roads to test it out. FABULOUS! I'm very pleased with this GPS compass.

For starters, it was easy to install (Bill intends to post the details and give credit for info received in here). We used the bottom left console screw hole, as you can see in my pic, for a perfect location that's out of the way, yet easy to see. A 40mm 5M screw and four 6mm spacers were provided by Marlin for an additional fee. Marlin's wiring is so small that it easily slid behind the flexible speaker grill with no need to cut a notch. The length of wire provided is very long, but we chose not to cut it, coiling it instead, securing with a tiny zip tie, and leaving it in the spacious compartment between the speaker and its grill.

The next thing I like about this compass is its continual, red letter read-out which doesn't rotate like a regular compass. By that I mean, N is always at the top (if that's the way you've positioned the compass), S is always at the bottom, etc. This is important to me because I can't actually read the smaller fonts of SE, SW, NE, and NW while ryding. But it doesn't matter since all I need to see is the position of the letters.

The compass is easily removeable from its base (what Marlin calls its "cup"), so that it can be repositioned throughout the 360 degrees to face N wherever you like. The stem of the perch clamp can be loosened, pivoted to change the compass face angle relative to the stem, and retightened.

This is a quality instrument with heft and beauty. I highly recommend a visit to Marlin's website as he's developed many other potential farkles for us!
 

Attachments

  • IMG_7239a.jpg
    IMG_7239a.jpg
    81.9 KB · Views: 51
Last edited:
Installing the Compass

Wendy and I decided that the lower left console screw would be a good place to mount the GPS compass without cutting any plastic. The existing screw is M5 x 14. I asked Marlin to provide a 24mm spacer and an M5 x 40 screw which they did. The spacer was in the form of four 6mm spacers. After evaluating a trial fit, we ended up using 3 spacers (18mm), and had to use the 4[SUP]th[/SUP] under the head of the screw. Otherwise the screw was too long.
I did a great deal of forum searching to obtain as many ideas in advance as possible. The best I found was at http://www.knarfoh.com/GPS_INSTALL/gps_install.html which was very helpful. My needs were just a subset of what he described.
We started by removing the left speaker grill which has 5 tabs. Started at the upper left with two flat blade screwdrivers, worked both down and also to the right to release the next two. The remaining two pretty much just popped out. Easy.
Then we removed the 4 console screws after applying the helpful towel around the steering column to cover the “black hole”. Turned the steering all the way to the left, and with a little flexing of the bottom of the console, we could pop out the console. There is only about 2 inches of slack cable to the fuel and temperature gauges. On Wendy’s 2015 RT-S, the fuel gauge connector is way different than that shown on the knarfoh website. By releasing this connector, we could rotate the whole console up 90 degrees and out of the way.
After inserting the power cable of the compass into the hole at the very upper left corner of the speaker cavity, it just popped into the console cavity after the first push. Easy.
As already stated, there is only about 2 inches of free cable to the fuel gauge. So put on your smallest fingers for the next step. The 3 wires going to the gauge are wrapped in a woven cloth sheath. I slit this sheath back about an inch with a small utility knife to expose more of the wires. I confirmed with a multimeter that the orange and black wires provide switched 12V and ground respectively. These two wires were tapped to the compass using Ace Hardware 22-18 AWG Red Tap Splice Connectors. I first tried the blue (for 18-14 AWG) which I had on hand, but they weren’t successful (no power). Then the console was reinstalled, but I had to install the left side first; otherwise the new splice connectors wouldn’t go into the available hole. With 3 of the console screws snugged in, we then installed 3 spacers, the compass bracket, a spacer and the 40mm screw and snugged them down. Pulled most of the wire into the speaker cavity and coiled it up and secured it with a zip tie. Then popped the speaker grill into place without cutting any slot for the power wire. This is not a waterproof grill in the first place, and it didn’t look like we were making it any less. So that was it. Wendy went on her maiden voyage and came back happy.
 
Last edited:
Back
Top