• There were many reasons for the change of the site software, the biggest was security. The age of the old software also meant no server updates for certain programs. There are many benefits to the new software, one of the biggest is the mobile functionality. Ill fix up some stuff in the coming days, we'll also try to get some of the old addons back or the data imported back into the site like the garage. To create a thread or to reply with a post is basically the same as it was in the prior software. The default style of the site is light colored, but i temporarily added a darker colored style, to change you can find a link at the bottom of the site.

TricLED Question

TexasSpyder

New member
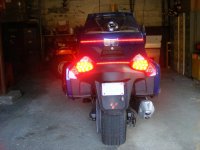
I am trying to install the 3rd & 4th brake lights and have a question. The harness has 5 wires out and only 3 are used for this install. Are the other 2 for turn signals, or what is their function? Just courious.
J. D.
 
Just curious did you video the install? how hard is the install, i.e. how much tupperware did you have to remove and how hard was it to fish the wires.

I wanted Reggy to instal these at Magog but he was out of stock at the time.

tia

harry
 
Just curious did you video the install? how hard is the install, i.e. how much tupperware did you have to remove and how hard was it to fish the wires.

I wanted Reggy to instal these at Magog but he was out of stock at the time.

tia

harry

I plan on the install tommorrow morning. the instructions with the lights is very straight forward, and doesn't look hard at all. I'll post results tommorrow. Really don't have the capabilities for video of the install. It shows the top rear fairing is the only piece to be removed.

J. D.
 
You have running lights, brake lights, turn signal, reverse, and the ground wire.
The install is pretty easy. remove the rear tupperware. and mount it.
I do have one BIG piece of advice. unplugging the harness from the light fixture is easy. plugging it back in is NOT if you have hands any larger than those of a child or petite woman. Don't waste time trying to make it go in if you have large hands. lower the rear mudflap a bit (three screws on the back middle, plus maybe one on each of the sides). It does not NEED to come all the way off just enough to access the screws to remove the tail light enclosures and reconnect the harness. This couple extra minutes of time will save you a lot of cussing, time, and scratched up hands.
 
:agree: Reggy's instructions are spot on! :thumbup:
But I did need to enlist the Missus when it came time to play with the wiring harness extension... We also took a real strong hunk of wire, bent it into a large U-Shape, and hooked it around the back of the factory harness to help hold it while she fought with plugging in the extension. MAKE SURE that everything snaps together fully! :shocked: This is a job that you'll only want to do once!
 

Attachments

  • A Decent Ride 002.jpg
    A Decent Ride 002.jpg
    55.4 KB · Views: 51
Installation Complete (kind of)

Everything went really well up to a point. I had to lower the "mud flap" to allow my wifes petit hands to make the plug connection. I had a problem when I was putting the 4th light on. I missed the placement a little and when I tried pulling it up to correct the positioning the wirescame out of the lower, 4th ,light. so I have a third light but no fourth light. Just be very careful on the placement of the lower light (using the primer).

J. D.
 
I would bet that you can get another 4th light from Reggy... How costly could it be?
(There I go; spending other peoples' money again! :roflblack:)

My hands were shaking worse than a parakeet at a "Catvention" when I laid mine on... :yikes:
 
Back
Top