Bob Denman
New member
Here's some printed instructions that I find to be very useful... :thumbup:
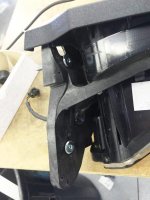
Most damage to the keyhole clips comes from improper or overly physical removal of the mirrors. I have never broken a clip on two RT's, although the mirrors have been removed frequently. To remove without damage I recommend the following:
1. Place one hand at the back of the mirror near the outer edge of the glass. This hand should apply light pressure toward the front to keep you from moving the mirror to far and breaking the clip.
2. With the other hand, rap against the front puter edge to pop the front spring clip loose. I describe the force of the hit as "firm, but gentle". A sharp, short rap is all you need. Do not tug or push, and be sure to resist with the other hand.
3. Move the backup hand to the top outer portion of the housing.
4. From underneath, rap upward with the other hand to pop the lower spring clip loose.
5. Gently lift straight up on the mirror assembly, about 1/2", then pull outward to slip the latch pin from the keyhole clip.
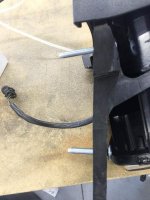
6. Pull the wires from inside the console until the wiring connector is clear of the body. An untrimmed wire tie on the cable will prevent the connector from falling back inside, when it too is pulled clear of the body.
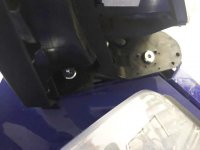
7. Installation is the reverse of removal. Be sure to straighten the spring clips before you reinstall, so they are straight and parallel. Lightly lubing the latch pins helps, too.
INSTALLATION:
First, make sure the mirror spring wires are straight and parallel. If they are bent inward they may not catch the post,
and if they diverge or bend outward, the mirror will be loose. It can help to put a very tiny bit of lube on the outer,
conical part of the post only. I'm talking about a film here, not a glob. Make sure there is none on the back side (post notch).
Engage the keyhole slot first. Then rap downward firmly (but politely) on the outer edge of the mirror to seat the bottom latch.
Now rap forward on the outer edge of the mirror to seat the front latch. You can rap a little harder than you can taking the
mirrors off, because they won't fly across the room, but don't get carried away. Problems seating the latches are usually
caused by bent spring wires.
Most damage to the keyhole clips comes from improper or overly physical removal of the mirrors. I have never broken a clip on two RT's, although the mirrors have been removed frequently. To remove without damage I recommend the following:
1. Place one hand at the back of the mirror near the outer edge of the glass. This hand should apply light pressure toward the front to keep you from moving the mirror to far and breaking the clip.
2. With the other hand, rap against the front puter edge to pop the front spring clip loose. I describe the force of the hit as "firm, but gentle". A sharp, short rap is all you need. Do not tug or push, and be sure to resist with the other hand.
3. Move the backup hand to the top outer portion of the housing.
4. From underneath, rap upward with the other hand to pop the lower spring clip loose.
5. Gently lift straight up on the mirror assembly, about 1/2", then pull outward to slip the latch pin from the keyhole clip.
6. Pull the wires from inside the console until the wiring connector is clear of the body. An untrimmed wire tie on the cable will prevent the connector from falling back inside, when it too is pulled clear of the body.
7. Installation is the reverse of removal. Be sure to straighten the spring clips before you reinstall, so they are straight and parallel. Lightly lubing the latch pins helps, too.
INSTALLATION:
First, make sure the mirror spring wires are straight and parallel. If they are bent inward they may not catch the post,
and if they diverge or bend outward, the mirror will be loose. It can help to put a very tiny bit of lube on the outer,
conical part of the post only. I'm talking about a film here, not a glob. Make sure there is none on the back side (post notch).
Engage the keyhole slot first. Then rap downward firmly (but politely) on the outer edge of the mirror to seat the bottom latch.
Now rap forward on the outer edge of the mirror to seat the front latch. You can rap a little harder than you can taking the
mirrors off, because they won't fly across the room, but don't get carried away. Problems seating the latches are usually
caused by bent spring wires.
 pps:
pps: