Bob Denman
New member
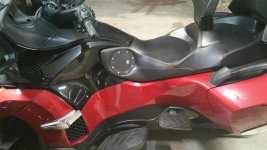
I just noticed that some of the fuel doors have 8 bolts and others have 6...Which is the better fit???

Mine appears to have 8 screws holding it in place... The two at the nine O'clock position just hold the hinges for the door.
I just noticed that some of the fuel doors have 8 bolts and others have 6...Which is the better fit???
The foam is going under your BUTT :roflblack: .... not where you put the Gas Door :thumbup: ..... The ones I did all had the lock and there wasn't any interference with the OEM gas cap ...... I said 15 and I'm sticking to that number :roflblack::roflblack: ....PS , when you trim the SEAT material inside the DOOR MOUNTING RING .... do NOT trim it close, leave some extra , this little LIP ( so-to-speak ) will prevent the DOOR to go to FAR in...... Also make absolutely sure your SEAT BOLTS are tight and the latch post goes into the hole cleanly. If the seat slides forward, it will contact the glove box :lecturef_smilie: :gaah:..... some Dealers aren't tightening them correctly........ Mike :thumbup:Hi Mike ,I ordered the black one and before I drill holes I am having a denser foam install in the front seat area and then recovered with a new skin that I have yet to pick out. being that the door has a lock I was hoping to us the stock cap, glad to know. How many of these have you done, do you do any thing else.
Well that's because this DOOR is supposed to put on something else - you are entering the DIY world - WELCOME :thumbup::thumbup::thumbup:..............Have fun ..... if you have a problem PM me before not after :yikes:...... Mike .....PS, I hope you read posts # 11, 16 & 22 above .....PPS - please post some Pics when you finish :clap:I received the door today , ill head over to home depot to get the bolts thanks. by the way the screws that come with the door look to be to short, thanks again.
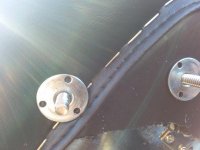
I should have mentioned this :banghead::banghead::banghead: ..... Home Depot ( & Lowe's ? ) sells " T " nuts in various thread sizes .... Use these ( with Lock-tite ) to attach door RING instead of Lok-Nuts. Get the size to fit your bolts..........have fun :thumbup:......Mike
Mike,
Do you have any pics? Would like to see the finished product you have done with the t-nuts. Thanks in advance!

looks good! :clap::clap:Just installed gas cap. Works great, I used T nuts without the prongs, no problem.
What are you guys using to cut the big hole in the seat and the seat covering??? I think someone may have been using coffee can and heating it up and melting a hole in the seat covering???
I want to do this over the winter and I'd like to only do it once...
THANKS in advance...larryd
I have done 15 doors using different methods. I have used the coffee can method above and it did work, but I have found a better way. You must mount the door RING first, and you only need to melt the SEAT Material before you use a drill for the MOUNTING holes. Do two bolts to hold the RING on; then you can do the others, you don't need to do ALL of them at once. The RING is very, very, sturdy and it won't bend. FOUR bolts will work to hold it permanently (mine did!) I would skip the very long bolts. After the ring is on, use a new RAZOR knife blade and cut the seat material inside the hole; leave a little extra, this prevents the door from going in. Now you can cut the rest of the foam. Use the "T" nuts. Mike :thumbup:
 DIY VIDEO :bowdown:
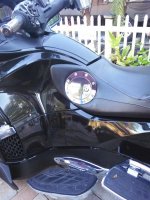
")