• There were many reasons for the change of the site software, the biggest was security. The age of the old software also meant no server updates for certain programs. There are many benefits to the new software, one of the biggest is the mobile functionality. Ill fix up some stuff in the coming days, we'll also try to get some of the old addons back or the data imported back into the site like the garage. To create a thread or to reply with a post is basically the same as it was in the prior software. The default style of the site is light colored, but i temporarily added a darker colored style, to change you can find a link at the bottom of the site.

SteveMac Mods

The Destruction of Daytona Bob

Well folks, if any of you saw the "For Sale" thread I posted (click here if you want to see it) where I was trying to sell a Half Helmet you are aware that Deans BMW felt the helmet was unsafe. Of course, I didn't appreciate the hi-jack of my "For Sale" post. Dean and I went back and forth a bit, and he decided that he would put his money where his mouth was, and he paid me in full for the helmet on the condition that I would throw it away.

Now some of you here know me personally, and you are probably aware that I am not going to just let it go at that. After all, someone could get it out of the trash and use it. So,,, rather than get ticked off at the situation,,, I decided to have a little fun at Dean's expense. Literally. So the video below is evidence to Deans BMW that the helmet has in fact been rendered unusable.

The outcome of the destruction was a bit surprising to me, and therefore I decided to post a poll. The poll looks like it will have to be in a new post to vote.

Enjoy!

http://www.spyderlovers.com/forums/showthread.php?t=32492
 
Last edited:
Well folks, if any of you saw the "For Sale" thread I posted (click here if you want to see it) where I was trying to sell a Half Helmet you are aware that Deans BMW felt the helmet was unsafe. Of course, I didn't appreciate the hi-jack of my "For Sale" post. Dean and I went back and forth a bit, and he decided that he would put his money where his mouth was, and he paid me in full for the helmet on the condition that I would throw it away.

Now some of you here know me personally, and you are probably aware that I am not going to just let it go at that. After all, someone could get it out of the trash and use it. So,,, rather than get ticked off at the situation,,, I decided to have a little fun at Dean's expense. Literally. So the video below is evidence to Deans BMW that the helmet has in fact been rendered unusable.

The outcome of the destruction was a bit surprising to me, and therefore I decided to post a poll. The poll looks like it will have to be in a new post (CLICK HERE) to vote.

Enjoy!

That give me confidence in the one I wear on hot days! Good video.
 
Very well done.. You have done some pretty cool stuff with the spYder.. Look'in good.. Like the helmet video you put together... Thanks for sharing..

X-Joe
 
Steve I can't tell by your pic. What color fender tips did you install? Amber or White LEDS?

I went with the amber. Primarily because I used the dual converter to make them signal lights also, and I felt that the flashing amber would be better than the clear. Had I not used the dual converter, I probably would have went with clear. :thumbup:
 
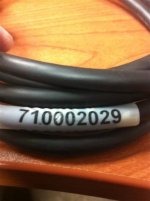
BRP 9-pin Pigtail (710002029) to a Non-BRP Trailer 5 wire (4 light system)

A lot of folks out there want to hook a non-BRP trailer to their spyder, but the project often hits a snag when they have to modify the BRP cable, which is a 9-pin 7-wire cable to a standard trailer lighting system.

The mod below will help you connect the factory BRP 710002029 cable to a 4-light 5-wire hook up, or a 2-light 5-wire hook up (If the brake and blinker use separate wires)

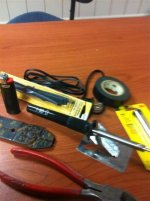
Common tools you may need:
  • Side Cutters
  • Soldering gun and solder
  • Heat shrink tubing
  • Electrical tape
  • Heat source
The BRP 710002029 cable utilizes the following wire coding:
BLUE--------------Left Flash
ORANGE-----------Left Brake
BROWN------------Running/Marker
BLACK-------------Ground
YELLOW-----------Back Up
RED --------------Right Brake
GREEN------------Right Flash

The five wire plug in this application will use the following wire coding:
BLUE-------------Brakes (both)
YELLOW----------Left Flash
BROWN-----------Running/Marker
GREEN------------Right Flash
WHITE------------Ground

I utilized 4 LED lights which had the following wire coding:
Black-------------Running Marker
Red---------------Flash or Brake depending on whether inner or outer light
White-------------Ground

I have attached the PDF file below which has the complete wiring schematic to hook the 710002029 BRP Cable to a 4-light, 5-wire system in which the two "inner lights" will be the Running and Brake lights, and the two "outer lights" will be the Running and Flasher lights.

View attachment BRP 9-pin Pigtail _710002029_ to a Non-BRP Trailer 5 Plug …_1.pdf

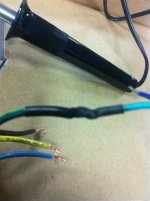
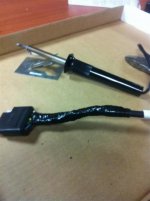
There are some pics below of the tools, work in progress and final product.

I hope this helps some of you who have questions about how to connect your Spyder to a non-BRP trailer!

TrailerCable 0000.jpgTrailerCable 000.jpgTrailerCable 001.jpgTrailerCable 003.jpg
 
Last edited:
I was wondering what I could use those old Xmas door mats for:roflblack:....Thanks Steve for your help.. And what a great job on all of your Mods they look fantastic..
 
This was the first Mod that I haven't done myself, but Cowtown did a wonderful job. Gotta love those guys. Thanks to Dan and the gang in the shop!

Video:
Steve,

I am REALLY interested in getting one of these and am ready to pull the trigger but I see on TBR site and here there are issues wuth the trailer hitch hitting the canister. I have also seen where Len says no issues should be seen. My question to you is did Cowtown do anything special on the install to prevent these issues and if so what? Are you having issues with the canister hitting the hitch bolt? Hitch install looks standard, some hav suggested reversing the direction og the hitch bolt but yours is not that way.

Just want to make sure before I shell out $500-600 on an exhaust!
 
Not sure if they do any thing "special" other than making sure the mounting bracket is attached in such a way as to prevent rubbing. I would assume that is the case. I have checked mine often and it is close, but no contact.
 
Last edited:
OK here is my newest "mod" and I use that term loosely!

I bought one of the non-BRP trailers similar to what one of our new SpyderLovers sponsors is selling.

Mine came with two standard tail/brake lights. Since I have my harness already setup for a five-wire (separate brake and signals) I had to do some modifications. Hence the "mod"!!!!

Anyway, I used the two outer lights for running and signal lights. Then I added 3 - 2.5" round LEDs for the brake lights. And just for kicks I added a light bar with 3 LEDs on the rear frame an tied those in with the brake lights for good measure. I used my wiring schematic from one of my above posts for this project.

I think it turned out nicely. I am now ready for Spyderfest, Durango, and Lamont's BBQ!!!

46f9d0f8-3343-d7fb.jpg

46f9d0f8-3366-3ff2.jpg

46f9d0f8-339e-c87d.jpg

46f9d0f8-33b0-33d8.jpg

46f9d0f8-33bd-0e19.jpg

46f9d0f8-8119-1221.jpg
 
Last edited:
Looks good!!

Looks good behind the new paint job on the Spyder. Getting healed up enough to ride. Will give you a call or text
 
Steve, I think that you should run at the back end of the pack for Durango.............with all the lights, it will help visability for all of us! :yes:
 
OK I have a few more mods to complete before Spyderfest 2012, and here we go!!! :)

Today, my project is threefold. I installed the BumpSkid from Harvey Spyderpops, then began installing my Green Monster LEDs from Reggy at TricLed and finally my green GloRyders!!! :yes::yes::yes:

The BumpSkid is one very heavy built product. Once installed it looks like it should have always been there and gave me a finishing touch and will help protect my new paint job. The instructions were easy to follow and the install was less than an hour. There really aren't any tips or tricks. It is pretty straight forward and anyone with decent tools and moderate wrenching skills can easily complete the job. Thanks Harvey for another fantastic product!

In speaking with Reggy from TricLed, he suggested that I use a router and cut a 1/2" wide by 1/8" deep channel in the bottom of the BumpSkid for the LEDs to nestle up into and be very protected. I did this and it worked out nicely. One tip here. I tried cutting the entire length of the channel in one pass and that was my mistake. If you choose to do this, I recommend setting the router on moderate-high speed and cut a channel about four inches long at a time. Then use a large flat head screwdriver to remove the plastic which will tend to melt and gum up your bit. This happened to me and I scuffed up my BumpSkid a little, but fortunately it is up under the RT and can't be seen (except for the photos below!:)). All in all I am still very happy with the result. In one of the pics below, you can see that the LEDs fit nicely up into the channel, and are flush with the bottom of the BumpSkid. This offers great protection for the lights.

I dd get the LEDs installed, but didn't get around to finalizing the wiring nor did I get the GloRyders installed today. But that should be a short job tomorrow and I'll post pics of those projects and the lighting effect. And tomorrow will also bring a nice wax job getting ready for SpyderFest 2012!!!

But for now, I have posted some pics of the install of the BumpSkid. And I am VERY happy with it. It really finishes off the front end. Now I can push possums with Lamont!! ;););)

Getting ready!
46f9d0f8-ba7c-e763.jpg


Before!
46f9d0f8-ba8c-bf80.jpg
.

Before!
46f9d0f8-baa4-9501.jpg
.

Preparing you use a router to cut the groove for the LEDs
46f9d0f8-babf-cbee.jpg


LEDs fit flush. LOVE it!
46f9d0f8-bb30-74b8.jpg


See my boo boo?
46f9d0f8-bb6b-86a2.jpg


Be sure the threaded nut portion of the clips provided go up! And a quick test fit.
46f9d0f8-bba2-5f3a.jpg


The Finished product!!!
46f9d0f8-bbdd-85fb.jpg


LOVE the BumpSkid! Looks great In my opinion.
46f9d0f8-bbf6-e559.jpg


And finally the GloRyders are done too!
46f9d62a-9659-f02a.jpg
46f9d62a-9670-7c8d.jpg
 
Last edited:
Back
Top