-
There were many reasons for the change of the site software, the biggest was security. The age of the old software also meant no server updates for certain programs. There are many benefits to the new software, one of the biggest is the mobile functionality. Ill fix up some stuff in the coming days, we'll also try to get some of the old addons back or the data imported back into the site like the garage. To create a thread or to reply with a post is basically the same as it was in the prior software. The default style of the site is light colored, but i temporarily added a darker colored style, to change you can find a link at the bottom of the site.
You are using an out of date browser. It may not display this or other websites correctly.
You should upgrade or use an alternative browser.
You should upgrade or use an alternative browser.
SteveMac Mods
- Thread starter SteveMac
- Start date
SteveMac
MOgang Member & Monster Member,
Lookin REALLY great Steve!!!
Phil, Tyler TX- from my iPad3.5 using Tapatalk HD
Thanks Phil. See you in a couple of weeks I hope!!
kevorama
MOgang Member & Pyro-Man
Steve, I didn't think of using a router to channel out my under lighting. That gives me a great excuse for going to HD or Lowe's to get a new DeWALT plunge router. I installed Pop's skid as well, but had an issue with getting the two inboard holes to line up. I have several of Reggy's lighting mods, but went with something that had the RGB color wheel that would give me a little more control of the color and effect. I'm hoping to get it on before SF. Helpful hint on the GloRyders: Use an Emery cloth to clean out the powder coat on your new wheels. You are going to scratch some of the black or green powder coat taking off the dust caps, but the GR's will cover any small damage that was done. I can walk you through what I did to Spyder Linda's wheels when I installed her GR's.
The bike looks awesome! Can't wait to see it at night.
PS - Don't touch the - post for jumping to attach to your LED power supply. See previous posts on that nightmare.
The bike looks awesome! Can't wait to see it at night.
PS - Don't touch the - post for jumping to attach to your LED power supply. See previous posts on that nightmare.
SteveMac
MOgang Member & Monster Member,
Steve, I didn't think of using a router to channel out my under lighting. That gives me a great excuse for going to HD or Lowe's to get a new DeWALT plunge router. I installed Pop's skid as well, but had an issue with getting the two inboard holes to line up. I have several of Reggy's lighting mods, but went with something that had the RGB color wheel that would give me a little more control of the color and effect. I'm hoping to get it on before SF. Helpful hint on the GloRyders: Use an Emery cloth to clean out the powder coat on your new wheels. You are going to scratch some of the black or green powder coat taking off the dust caps, but the GR's will cover any small damage that was done. I can walk you through what I did to Spyder Linda's wheels when I installed her GR's.
The bike looks awesome! Can't wait to see it at night.
PS - Don't touch the - post for jumping to attach to your LED power supply. See previous posts on that nightmare.
Don't worry Kevin. I am NOT touching that battery post! :roflblack::roflblack:
Ill post some more pics tomorrow!
SteveMac
MOgang Member & Monster Member,
This past weekend I built my flag holder so I'll be ready for the Spyderfest parade!
I started with this mount on the hitch (as seen in some of my earlier posts) http://shop.mobileweb.ebay.com/searchresults?kw=Goldwing+cooler+carrier&x=0&y=0&cmd=SKW
Then I took a couple of pieces of 1 1/4 inch angle iron and a flat piece of 1/8x4 flat iron. I welded these together and drilled a couple of holes for the retaining pins. Then I took a heavy duty aluminum flag mount, like what is used on a house, and bolted it on with stainless bolts and nylock nuts. Then shot a good coat of satin black on it and "Voila" I have a flag mount that connects and disconnects in 30 seconds!! I'm pretty happy with the result.
SteveMac
MOgang Member & Monster Member,
My final Project this past weekend was to rework my highway pegs for the third and final time,, I hope!
I already had the ISCI mounts and risers, but regular pegs put my feet too far apart and at a bad angle. It put a lot of pressure on my bad hip and the steel pins in that hip screamed in discomfort.
So I put on a set of highway boards (see post above). And while the boards were at a good angle and not too far apart, they were much too flat and they were flimsy metal too. So I began searching for something that would be much more sturdy, at the correct width and foot angle and would look close to factory. But what would that be??
I found the answer when a member here had their old aluminum boards and pegs off an RT for sale. I bought these and began making my plans.
First, I tried the boards, but they were just too big and didn't look like what I wanted. So, I chose to use the factory pegs.
I removed the two 10mm head bolts holding the rubber to the peg. I discarded the damping weight and the long bolts. I then took the ISCI risers and ground them down until they fit up into the cavity of the peg. Then I put the risers in a drill press and drilled a hole length ways through the entire length of the riser and also drilled a hole in the peg base. I used a 3/8 x 8 stove bolt through both securing the peg and riser to the ISCI mounts. I did have to extend the mounting bracket a couple of inches in order to get the pegs into the position that I wanted.
I bolted it all together using nylock nuts and then cut off any excess threads off the bolts. Wiped all down ith paint thinner and shot some satin black on it.
The result is a set of highway pegs that are super sturdy, are the correct width and angle for me, and even look like a factory item.
I LOVE em and now I am ready for trips to Spyderfest, Durango and Lamont's BBQ!!
SteveMac
MOgang Member & Monster Member,
MR Mac----
I am jealous of your metal working abilities. VERY nice work. Oh, and... Like anyone BELIEVES that is your last mod")
Phil, Tyler TX- from my iPad3.5 using Tapatalk HD
LOL. :roflblack:
No my friend it won't be the last mod I am sure, but I hope it is the last time I rework these pegs! Having them setup right is all about the feel and they are finally right "for me"! You will have to check them out at Spyderfest whilst I will be checking out the awesome LEDs on Darth!
GloryRyders
MOgang Member
Steve, hope to see all the new mods this comming Saturday at the Spyderfest meeting................but, the way the weather forecast looks we might not be ryding the Spyders!:lecturef_smilie: Bummer!:gaah:
SteveMac
MOgang Member & Monster Member,
Steve, hope to see all the new mods this comming Saturday at the Spyderfest meeting................but, the way the weather forecast looks we might not be ryding the Spyders!:lecturef_smilie: Bummer!:gaah:
I know. Fingers crossed. Here in Southeast MO they pushed the sun into Saturday. Cuba just needs to do the same and we will be riding! Heck we will ride anyway if it's just a little rain. Just no big storms!
R.T. Smith
New member
R.T.Smith
Where did you find the luggage carrier on e bay? I was going to purchase a trailer out of California but your idea looks good.
Where did you find the luggage carrier on e bay? I was going to purchase a trailer out of California but your idea looks good.
SteveMac
MOgang Member & Monster Member,
Where did you find the luggage carrier on e bay? I was going to purchase a trailer out of California but your idea looks good.
I have a link to it in the post 45 above.
") .
. Good luck!
Last edited:
bullant12
New member
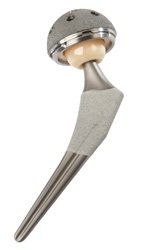
Here is a pic of the latest SteveMac Mod.
Scheduled for installation later this month, and I will be a VERY happy camper...:clap:
Bionic man?:roflblack:
Good luck! I'll follow your progress!
 ray:
ray:SteveMac
MOgang Member & Monster Member,
Bionic man?:roflblack:
Good luck! I'll follow your progress!
:roflblack::roflblack:
You were quick on the trigger! No fair, you know me too well LOL.
I am looking forward to the best summer in at least ten years my friend!
happy happy happy :thumbup:
Last edited:
Spiderwoman
Member
Better Mileage!!
Waiting to hear what your mileage report will be after install!!
Here is a pic of the latest SteveMac Mod.
Scheduled for installation later this month, and I will be a VERY happy camper...:clap:
Waiting to hear what your mileage report will be after install!!
Similar threads
- Replies
- 2
- Views
- 303
- Replies
- 2
- Views
- 645
- Replies
- 4
- Views
- 605
- Replies
- 8
- Views
- 849
- Replies
- 9
- Views
- 1K