• There were many reasons for the change of the site software, the biggest was security. The age of the old software also meant no server updates for certain programs. There are many benefits to the new software, one of the biggest is the mobile functionality. Ill fix up some stuff in the coming days, we'll also try to get some of the old addons back or the data imported back into the site like the garage. To create a thread or to reply with a post is basically the same as it was in the prior software. The default style of the site is light colored, but i temporarily added a darker colored style, to change you can find a link at the bottom of the site.

Steering Bolt Stripping Prevention

giantjas

New member
I am getting ready to tackle taking the two top steering bolts off of my new 2020 RTL to install my GPS mount. I am looking for advice on how to prevent stripping these bolts as I have seen quite a posts from frustrated owners asking "how to" remove stripped steering bolts, but upon researching here not many tips on how to prevent this in the first place. These bolts are obviously super tough to remove and have loctite applied. I purchased a quality metric hex wrench set and the 7mm fits really good. Other than putting a towel down to prevent bolts from falling down into the console/engine compartment and hitting the wrench top with a hammer to make sure the hex seats in the bolt tightly, any other advice?
 
Are you using an Allen wrench or Allen Socket?
I have found that a good quality Allen socket with a square end works best.
 
HIGH Quality tools....example Snap-on or Mac tools ....that's what I would use.

My two cents,
P.W.
 
Heat the bolt to soften the loc-tite. Then use a quality hex socket with a small impact wrench and the bolts back right out.
 
I can help you with this but before I do I need to make a declaration. I'm in trouble with the moderators for being forthright in my replies. For me, the power of the help forums is in the quality and accuracy of the responses, I never reply to a thread if I haven't got direct experience of the topic. If it is just my view rather than factual I will make that clear.

IMHO, information given, which may be given in good faith but inaccurate or unrealistic is about as useful as a chocolate teapot.

Therefore, what follows is not meant to demean anyone, diss anyone or insult anyone.

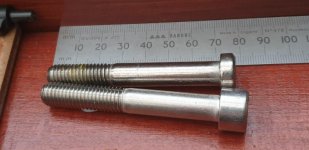
Right, that said, removing these bolts is tricky. The head thickness and therefore the depth of the hex hole is shallow - there is a picture below showing the BRP bolt next to a standard hex bolt, note the head depth.

Because the head depth is shallow and because the bolts are very effectively glued in place there will be some bruising of the hex due to the force necessary to turn the bolt, consequently your technique needs to be very good.

You rightly say the BRP hex is 7mm - no other size will do.

The hex tool needs to be good quality.

You MUST keep the hex tool end absolutely inline with the centreline of the bolt.

I have removed these bolts using a hex key and also removed them using a hex socket and breaker bar. The breaker bar on an extension is the better option because it gives good clearance of the bars but a hex key with an extension is perfectly possible.

Do not apply heat, it is futile because the aluminium bars will conduct the heat away from the bolt head and also you risk damaging the plastic powder coat on the handle bars.

There is no special requirement other than to ensure PERFECT centre alignment of the tool and the bolt at all times, any squintness of the hex tool will cause the hex to wind out sideways and wreck the hex hole.

My recommendation to you for replacing the standard bolt is not to use a locking compound on the thread but to use a dab of grease, I'm not going to go into the reasoning for this but it's based on experience.

Since I don't know you, be sure you have the skill before you start.

There you have it; dry, to the point and factual. I'm not here to be loved but I am here to help. Take care and good luck with it.


Edit: I see the post above has come along and posted while I'm typing this. It recommends heat and impact. There is no intention for me to diss those comments, it's simply a different view posted while I'm typing.
 

Attachments

  • 20200518_203841.jpg
    20200518_203841.jpg
    45.2 KB · Views: 32
Last edited:
Having done this on a 2019 and lots of other stubborn stuff over my lifetime I am going to split the difference between the 2 post above. Make sure the allen wrench fits, TIGHTLY.......ALL THE WAY TO THE BOTTOM. Prefer to use an allen socket and impact driver. Did not see the need to use heat.
 
If the allen tool has rounded corners on the end, grind the bottom just so the end is flat and corners are sharp.

QUESTION: Seeing the difference between the BRP and a regular allen head bolt, would it be a good thing to use the regular ones instead?
 
I found that on my 2020 RT the bolts were no way as tight as the earlier models. I have done both. Still, use a good allen head.
 
If the allen tool has rounded corners on the end, grind the bottom just so the end is flat and corners are sharp.

QUESTION: Seeing the difference between the BRP and a regular allen head bolt, would it be a good thing to use the regular ones instead?
Yes, I do that. They are not quite a neat in appearance because they stand a little proud of the bar recess and often have their characteristics stamped on the top edge. I have a machine shop so I skim the top and add a wee chamfer so appearance for me is fine. The standard hex bolt also has an 8mm hex which is a good deal stronger in drive terms.

On an impact driver, I can't comment.
 
Heat the bolt to soften the loc-tite. Then use a quality hex socket with a small impact wrench and the bolts back right out.

I agree with JC.
Use a decent 7mm hex drive bit on an Impact driver after heating the bolt with a soldering iron.
 
I did a couple last week. Allen socket, breaker bar. Tap the socket to seat, turn with breaker bar. I like the idea to replace them with standard Allen head bolts. Never needed heat, but they do love lock tite! I’m doing one tomorrow or Wednesday. I’ll post up my results. Joe
 
The key points are ensure the hex tip is ground flat and not domed. You want full engagement into the capscrew head.

Again, to ensure full engagement, fully seat the hex tip with a few light taps.

I am undecided regarding applied heat. If there was a no damage method to get sufficient heat to the threads where the threadlocker resides, then heat is viable. As mentioned though, the aluminum handlebars act as a heat sink and cooling fin. Just not decided if heat helps.

Regarding impact guns or hand held impact drivers, these work well on fasteners with no thread locking compound. Typically, a steady adequate force with constant non stopped rotation until the thread locker is defeated works best. Sometimes once the fastener breaks free, the situation may require with smooth steady force, alternating directions of rotation until completely defeating the thread locking compound.

Sadly, it seems, most horror stories posted here involve destroying the capscrews internal hex. Suspect the major causes are a low quality hex driver. Not seating the hex driver fully. Not applying steady force that is absolutely true on the fastener.

If you want to increase the hex bit grip into the fastener, apply a thin film of valve grinding compound to the hex bit flats. None is applied at the very tip. The grit helps reduce clearance while providing a textured interface that helps prevent slippage as the tool is turned.

All the best with it.
 
Thanks to all who posted and for any future posts|. There are apparently a lot of ways to "skin this cat". After reading the posts, I ordered a breaker bar and I think I have everything else I need to accomplish this task and will do it next week. I will post how it goes!
 
No way I would attempt to remove with an allen wrench. Specifically, the 90 degree, black wrench from a multipack.
I've used VIM bits for years, never failed.
3/8 drive breaker bar, VIM bit, mine broke loose and came out without drama.
https://www.vimtools.com/Catalog/2017_Catalog/2017%20Catalog.pdf
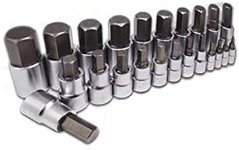
I think you'll find the MMS23 will serve you well for a lifetime and fit virtually anything on the Spyder.
https://www.amazon.com/Vim-Tools-Metric-Master-VIM-MMS23/dp/B073T6DPSNVIMMMS23.jpg

PMK mentioned valve grinding compound. An (ancient, like me) old time mechanics trick is Crest toothpaste, the standard blue kind, not gel.
Arm and Hammer with baking soda works too.
 
Back
Top