• There were many reasons for the change of the site software, the biggest was security. The age of the old software also meant no server updates for certain programs. There are many benefits to the new software, one of the biggest is the mobile functionality. Ill fix up some stuff in the coming days, we'll also try to get some of the old addons back or the data imported back into the site like the garage. To create a thread or to reply with a post is basically the same as it was in the prior software. The default style of the site is light colored, but i temporarily added a darker colored style, to change you can find a link at the bottom of the site.

Review: Spyderpops RT base LED flashing brake light strip

MONK

New member
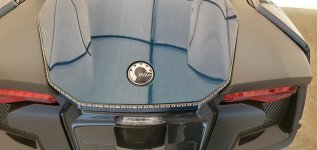
Extra lights, especially extra brake lights are good, right? FLASHING extra brake lights are even better. How about BRIGHT flashing extra brake lights?? The 2020+ RT Limited comes with a top case that integrates an extra LED brake light. The base models (such as my own) don't. Since I would prefer someone NOT rear end me (that's not how I roll), I wanted extra lights/brake lights. (There are other rear brake lights available and they'll go on my bike sooner or later but this thread isn't about those.)

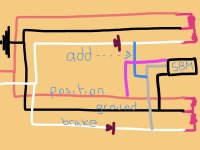
This is a 15 minute installation and is truly plug and play. (I didn't screw it up so anyone can install this.) Remove the rear cover, clean the trailing edge (with the included alcohol pads and adhesive promoter stick), center the LED strip and stick it on and plug it in to the same plug on the bike that the top case uses. (ALL 2020+ RTs, base or Limited, have the same plug on the bike.)

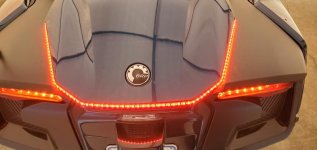
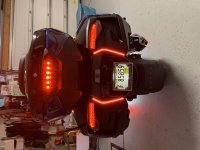
When you hit the brake pedal, you get (3) fast blinks followed by (3) slow blinks then it's steady on.

Added a couple pics, on and off plus a really short YouTube video here. (https://youtu.be/hv6KMrERI6I)

https://spyderpops.com/2020-up-rt-t...trobe-rear-top-cover-without-top-case-spy410/
 

Attachments

  • Spyderpops LED off.jpg
    Spyderpops LED off.jpg
    33.9 KB · Views: 112
  • Spyderpops LED on.jpg
    Spyderpops LED on.jpg
    34.5 KB · Views: 120
Might want to consider exploring Signal Dynamics offerings. They produce both headlight and brakelight modulators that will markedly increase your visibility both front and back. For ~$150.00 for a full set personal opinion is this is money well spent.

Al in Kazoo
 
We are on the same page with the headlight modulator, also considering the rear Slingmod install, high viz and I like it.
 
Don't forget, one of our sponsors carries the "TricLED Rear Run, Brake & Turn Signal LED Lighting Strips". Rick from Value Accessories has 'em and you'll save a couple of $$ to boot. :yes:
Glad to see my addiction to LED lighting is contagious. Safety first, cool factor is a caveat.:doorag:
Happy New Year all! :cheers:
 
OK. Thanks. I was thinking to use a top case periodically. So, I assume the spyderpops connection won't work at the same time. Unless there is an additional harness that can split that connection...?
 
OK. Thanks. I was thinking to use a top case periodically. So, I assume the spyderpops connection won't work at the same time. Unless there is an additional harness that can split that connection...?

The Spyderpops LED strip mounts to the outside of the cover you'd use if you don't have the top case installed. You can't use the cover and the top case at the same time. With the top case in place, you would already have a 3rd brake light. There are other products you can add to a top case to add add'l lights (brake/run/turn) to a top case.
 
I successfully installed Smart-Turn's Smart BRAKE Module in my 2013 RTL. Message me if interested in the detailed installation. Colored coded wires are actual 2013 RTL colors.
 

Attachments

  • 56F89924-E60E-4C9F-BB61-186BDE99BEEF.jpg
    56F89924-E60E-4C9F-BB61-186BDE99BEEF.jpg
    41.1 KB · Views: 14
Thanks but I'm not a big headlight modulator fan. I've considered a brake modulator (that does something similar to what Spyderpops LED light strip does) but not sure if I need to go down that route. I'm already serious considering this (https://www.slingmods.com/canam-spy...-signal-led-lighting-strips-tricled?vehicle=1).

You might want to hold off on the TricLED run-brake-turn signal LED.

I just got mine installed and it was a bit of a PITA to install but the worst part is that the LED strip doesn't fit in the body channel very well (led strip is too wide) so it basically only adheres at the top and the bottom. Also, the led strip has to make the radius turn and it won't do it because of the thickness of the light.

I am going to watch mine but I don't give it but a few months before it falls off. I sent TricLED some feedback on this. If they just made the led strip narrower it would fit in the body channel and it would adhere all along the strip's length. Downside of a narrower led strip is probably a less noticeable light but at least it would be a more permanent installation.

There is at least one video on how to remove the rear body panels and the video talks about the threaded plastic rivets which have to be drilled out - this was the case for me too so I have to go the dealer to buy new ones now.

I might do a review/how-to at some point but right now I am a little bit frustrated with the install and not very objective.:gaah:
 
You might want to hold off on the TricLED run-brake-turn signal LED.

I just got mine installed and it was a bit of a PITA to install but the worst part is that the LED strip doesn't fit in the body channel very well (led strip is too wide) so it basically only adheres at the top and the bottom. Also, the led strip has to make the radius turn and it won't do it because of the thickness of the light.

I am going to watch mine but I don't give it but a few months before it falls off. I sent TricLED some feedback on this. If they just made the led strip narrower it would fit in the body channel and it would adhere all along the strip's length. Downside of a narrower led strip is probably a less noticeable light but at least it would be a more permanent installation.

There is at least one video on how to remove the rear body panels and the video talks about the threaded plastic rivets which have to be drilled out - this was the case for me too so I have to go the dealer to buy new ones now.

I might do a review/how at some point but right now I am a little bit frustrated with the install and not very objective.:gaah:

Good to know. Do you have a pic of the strip, installed?
 
You might want to hold off on the TricLED run-brake-turn signal LED.

I just got mine installed and it was a bit of a PITA to install but the worst part is that the LED strip doesn't fit in the body channel very well (led strip is too wide) so it basically only adheres at the top and the bottom. Also, the led strip has to make the radius turn and it won't do it because of the thickness of the light.

I am going to watch mine but I don't give it but a few months before it falls off. I sent TricLED some feedback on this. If they just made the led strip narrower it would fit in the body channel and it would adhere all along the strip's length. Downside of a narrower led strip is probably a less noticeable light but at least it would be a more permanent installation.

There is at least one video on how to remove the rear body panels and the video talks about the threaded plastic rivets which have to be drilled out - this was the case for me too so I have to go the dealer to buy new ones now.

I might do a review/how-to at some point but right now I am a little bit frustrated with the install and not very objective.:gaah:

Agreed, it's a PITA to install, but Wow does it look great and they do everything I hoped for. Super bright. Mine fit perfectly in the grooves on either side. I have a 21 RTL. I did have to remove the trunk for installation. No biggie. I found a couple of short cuts for those who want to install them in the future. I'll do a DYI write up in the near future. The toughest part was getting those Damn black plastic push pin/screws out of their holes. After that, it was a fairly easy install.
IMG_4981.jpg IMG_4984.jpg
 

Attachments

  • IMG_4976.jpg
    IMG_4976.jpg
    56.8 KB · Views: 25
Last edited:
Agreed, it's a PITA to install, but Wow does it look great and they do everything I hoped for. Super bright. Mine fit perfectly in the grooves on either side. I have a 21 RTL. I did have to remove the trunk for installation. No biggie. I found a couple of short cuts for those who want to install them in the future. I'll do a DYI write up in the near future. The toughest part was getting those Damn black plastic push pin/screws out of their holes. After that, it was a fairly easy install.

Maybe there is more than one mold that BRP uses for that rear plastic piece but the led strips didn't fit flat into the upper channel at all. It would fit if I laid it in there sideways but if I did that, I would have had to put a severe twist in it to get it 'round the bend. I wound up getting it to fit flat at the very top for about 3 inches and then again at the bottom for maybe 5". In between it is more or less just a friction fit with some of the adhesive sticking here or there.

Those push pins are puzzling: They are just like normal push pins except they have threaded screws which I was not able to remove except by drilling most of them out. Don't understand why BRP used them. What they need is something just like it but with a raised head where you can get some needle nose pliers or a pick in there to pull the screw out - doesn't take a lot of effort to pull them out but since they are recessed, it is impossible to get a grip on them. The philips head is basically useless.

How did you remove that hidden cap screw at the top rear of each panel? I wound up breaking the tab off and now I have to figure out a way to fix it. There was no way that I could see to get a wrench in there to remove it. Not sure how they installed it at the factory unless the seat pan and those side panels all went on at the same time.

Yes, I agree they do look great, especially at night. Improves the rear visibility greatly. Just not sure how long mine will stay attached before it comes loose.:(
 
The LED tubes were so soft & flexible that they just formed into that vertical grove. I only pressed about 2 inches at a time and they went in easy and stuck there pretty good. I used the alcohol prep pads followed by the primer pads, waited 5 minutes for everything to dry and just pressed them in.
I only removed the two rear black plastic pushpin/screws. They are not screws, that is not a screw thread on them even though it has a phillips head (strange but true). They are push pins and near impossible to get the pin out of the holder. I used a long small flat head screw driver and kept picking away at the pin until it finally pulled up, then it easy came out of the hole. The key is to work on the center pin insert(with the phillips head), not the entire pushpin unit. I did not remove the bottom bolt and nut, the two front black plastic push pins nor the rear panel. Once I removed the two rear black push pins, the two screws under the hydraulic shock for the saddle bag cover, the plastic piece on top (two screws) and the single screw under that cover, I was able to pull the side panel about 4 - 5 inches away from the main section just wide enough to get my hands in there. You have to give it a good tug to get it loose, but it will open up for you. I put a wedge in between the panel and body to hold it open while I worked on the OEM tail light harness. The harness is right there, when you pry the side away and attached to a plastic tab. The harness just slides to the side to remove it to install the plug n play harness in the LED kit. I used a flat screwdriver to move it off. Again, I will try to add the entire installation to DIY section of SL when I have a chance. Feel free to PM me with any other questions.
IMG_4981.jpg
 
I like these a lot, I just have to decide on them or the spyderpops version. (also thinking about their vision kit) I also like the floor board lights, going to do those also.
 
@Valkrocket
Are those lighted lights on the rear of the front fender or is that the reflectors shining from the floorboard lights? I hate those cheap looking factory reflectors.
 
VALKROCKET: We have strayed well off topic for MONK'S review here but I would be interested to see your DIY when you post it as your '21 bike might be slightly different than mine.

You obviously didn't completely follow the directions they provided with the kit. ;) The instructions say to remove 6 screws (actually there are 7) from the saddlebag area. My big hands and arms would never fit in that area without removing those saddlebag top panels and once all 7 screws are removed, you might as well take it off completely to get better access.

I am not sure how you got to those 2 torx screws that hold the tail light lens at the top without breaking off those 2 hidden cap screw tabs on the top saddlebag panels (like I did). You are clearly a better mechanic than I (I am not being sarcastic).
 
Back
Top