PinkRosePetal
New member
Firstly, thanks to you folks on the forum, without you I wouldn‘t have been aware of the front sprocket rusting issue.
This Spyder RT is off on a five week trip soon and it‘s at 16-17k miles on the odometer, right where some of you indicated you had a sprocket spline failure - best check it out and lucky I did.
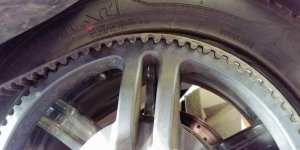
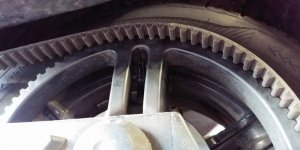
Below you‘ll find sequential pictures of what was found and the refurbishment sequence, starting with how to remove the belt in less than 10 seconds without dismantling anything; folk don‘t seem to believe this, it‘s too easy. Just keep pulling the top of the belt sideways and rotate the wheel. Refitting, from the bottom, slip the belt onto to the teeth as far as you can then rotate the wheel upwards, 5 seconds only! Oops, I see the pictures have uploaded in reverse order...
Anyway, on with the spline story.
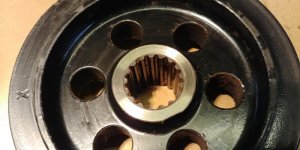
No red dust to be seen so all looked good, put the big C-spanner into the holes of the sprocket to hold it still and the big breaker bar onto the bolt head and prepared to pull hard.... Yikes, the bolt was loose! It screwed out with only the drag of the thread lock compound. The end of the sprocket and the splines were red rusty and the sprocket was unwilling to come off even after working around its edge tapping with a hammer, small puffs of red dust were emitted from the splines on every tap of the hammer. Levering and tapping came to nought. Ooo, not looking good. Best give it a squirt of release oil, let it sit and get the big puller out.
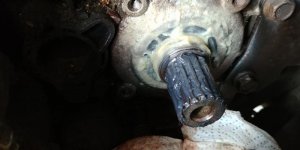
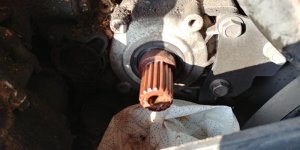
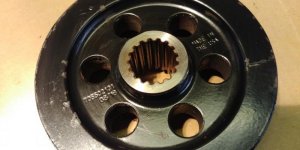
Well, no need, as soon as the oil penetrated (very quickly) the sprocket slipped off with just finger pressure - too weird. As can be seen from the picture, red rust everywhere; so began the clean up. Washed it clean with solvent and used wet or dry paper to clean up the splines and the shaft.
The rear of the sprocket is worn away in the contact area of the shoulder of the shaft and it looks as though this wear releases the clamping pressure of the bolt so the sprocket is free to move on its splines, once that happens moisture gets in and rusting starts in a big way and serious wear begins its destruction. This wear ridge can be seen in the pictures and also there are pictures of the sprocket after refacing the end surfaces ready for refitting. The shoulder on the shaft is very small and provides little contact for the loads it has to support - a bit of a design failure there imho.
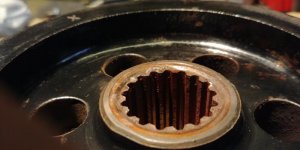
The sprocket is made from cast iron and cast iron rusts very readily. It contains free carbon which is released when it is machined and this leaves minute pits in the surface into which moisture settles. The iron, water and carbon make a nice little electric cell so galvanic corrosion sets in rapidly.
I‘m aware that some folks think the red dust is caused by a fretting phenomena, and in some cases perhaps it is but study of the spline pictures shown below indicate little rusting of the pressure surfaces and much rusting of the non-contact surfaces, spline roots, chamfers, shaft end and even inside the shaft bolt clearance hole. I‘ve no doubt that, given time, the whole lot would become nothing more than a rusty mess ready to finally fail, so, with a bit of luck this one is caught in time.
Some things to note:
The shaft is seriously hard, a centre punch nor a file would mark it.
But, the shoulder of the shaft where the sprocket abuts is worn and slightly burred. Hmm...
The depth of the threaded hole was checked to ensure the bolt didn‘t bottom out and give a false torque reading on tightening - it appeared to be OK.
The back of the bolt head was lightly machined to reface it and to check it was true to the shank of the bolt. It was accurate though the hex head was offset somewhat from the centre line of the bolt shank. Poor manufacture but adequate I guess.
The length of the sprocket boss was checked against the shaft spline length to ensure the bolt did not bottom out on the shaft end when tightening. It was very close and a 2mm spacer was made to make up for the material removed when refacing the sprocket boss.
If refitting a sprocket is undertaken, this clearance should be checked carefully since any wear between the sprocket boss and/or the shaft shoulder, as in this case, will allow the sprocket to settle further onto the shaft.
Presuming the bolt had been tightened to the correct torque at manufacture, then that tightening is inadequate since it allows movement of the sprocket on the shaft leading to inevitable failure. There was no point in simply repeating this so the tightening torque was increased to 110lb/ft in the hope that this will be sufficient. Fingers crossed. There is a grade of high tensile bolt with strength in excess of the standard one which would allow a higher tightening torque, it could be a good idea provided the internal thread in the shaft can take the strain. Who‘s going to be the first to try it out? :yikes:
In the event of a re-failure there are plans for a complete remanufacture of the sprocket clamping mechanism.
Since, in this case, the bolt was slack but for the locking compound, a good service check would be to simply test the tightness of the bolt. Easily done at oil change time, especially on the V-twin bikes since the side panel is removed anyway. Bear in mind that no red dust was externally present.
This Spyder RT is off on a five week trip soon and it‘s at 16-17k miles on the odometer, right where some of you indicated you had a sprocket spline failure - best check it out and lucky I did.
Below you‘ll find sequential pictures of what was found and the refurbishment sequence, starting with how to remove the belt in less than 10 seconds without dismantling anything; folk don‘t seem to believe this, it‘s too easy. Just keep pulling the top of the belt sideways and rotate the wheel. Refitting, from the bottom, slip the belt onto to the teeth as far as you can then rotate the wheel upwards, 5 seconds only! Oops, I see the pictures have uploaded in reverse order...
Anyway, on with the spline story.
No red dust to be seen so all looked good, put the big C-spanner into the holes of the sprocket to hold it still and the big breaker bar onto the bolt head and prepared to pull hard.... Yikes, the bolt was loose! It screwed out with only the drag of the thread lock compound. The end of the sprocket and the splines were red rusty and the sprocket was unwilling to come off even after working around its edge tapping with a hammer, small puffs of red dust were emitted from the splines on every tap of the hammer. Levering and tapping came to nought. Ooo, not looking good. Best give it a squirt of release oil, let it sit and get the big puller out.
Well, no need, as soon as the oil penetrated (very quickly) the sprocket slipped off with just finger pressure - too weird. As can be seen from the picture, red rust everywhere; so began the clean up. Washed it clean with solvent and used wet or dry paper to clean up the splines and the shaft.
The rear of the sprocket is worn away in the contact area of the shoulder of the shaft and it looks as though this wear releases the clamping pressure of the bolt so the sprocket is free to move on its splines, once that happens moisture gets in and rusting starts in a big way and serious wear begins its destruction. This wear ridge can be seen in the pictures and also there are pictures of the sprocket after refacing the end surfaces ready for refitting. The shoulder on the shaft is very small and provides little contact for the loads it has to support - a bit of a design failure there imho.
The sprocket is made from cast iron and cast iron rusts very readily. It contains free carbon which is released when it is machined and this leaves minute pits in the surface into which moisture settles. The iron, water and carbon make a nice little electric cell so galvanic corrosion sets in rapidly.
I‘m aware that some folks think the red dust is caused by a fretting phenomena, and in some cases perhaps it is but study of the spline pictures shown below indicate little rusting of the pressure surfaces and much rusting of the non-contact surfaces, spline roots, chamfers, shaft end and even inside the shaft bolt clearance hole. I‘ve no doubt that, given time, the whole lot would become nothing more than a rusty mess ready to finally fail, so, with a bit of luck this one is caught in time.
Some things to note:
The shaft is seriously hard, a centre punch nor a file would mark it.
But, the shoulder of the shaft where the sprocket abuts is worn and slightly burred. Hmm...
The depth of the threaded hole was checked to ensure the bolt didn‘t bottom out and give a false torque reading on tightening - it appeared to be OK.
The back of the bolt head was lightly machined to reface it and to check it was true to the shank of the bolt. It was accurate though the hex head was offset somewhat from the centre line of the bolt shank. Poor manufacture but adequate I guess.
The length of the sprocket boss was checked against the shaft spline length to ensure the bolt did not bottom out on the shaft end when tightening. It was very close and a 2mm spacer was made to make up for the material removed when refacing the sprocket boss.
If refitting a sprocket is undertaken, this clearance should be checked carefully since any wear between the sprocket boss and/or the shaft shoulder, as in this case, will allow the sprocket to settle further onto the shaft.
Presuming the bolt had been tightened to the correct torque at manufacture, then that tightening is inadequate since it allows movement of the sprocket on the shaft leading to inevitable failure. There was no point in simply repeating this so the tightening torque was increased to 110lb/ft in the hope that this will be sufficient. Fingers crossed. There is a grade of high tensile bolt with strength in excess of the standard one which would allow a higher tightening torque, it could be a good idea provided the internal thread in the shaft can take the strain. Who‘s going to be the first to try it out? :yikes:
In the event of a re-failure there are plans for a complete remanufacture of the sprocket clamping mechanism.
Since, in this case, the bolt was slack but for the locking compound, a good service check would be to simply test the tightness of the bolt. Easily done at oil change time, especially on the V-twin bikes since the side panel is removed anyway. Bear in mind that no red dust was externally present.
Attachments
-
 20190819_195604~2.jpg45.2 KB · Views: 165
 -
 20190819_194148.jpg34.5 KB · Views: 184
 -
 20190819_193930.jpg39.3 KB · Views: 185
 -
 20190819_185113.jpg33.3 KB · Views: 178
 -
 20190819_184014_HDR.jpg41.8 KB · Views: 184
 -
 20190819_171824.jpg43.4 KB · Views: 172
 -
 20190819_171808.jpg48.6 KB · Views: 180
 -
 20190819_163119.jpg38.2 KB · Views: 187
 -
 20190819_195707~2.jpg40.9 KB · Views: 185
 -
 20190819_195626~2.jpg46.4 KB · Views: 162
")


 hyea:
hyea:
")
