cruisinTX
Member
Greetings from the farside again.
Since this isn't really Spyder related I'm putting it here, but this could still be done for those adding an after-market top case to their Spyder.
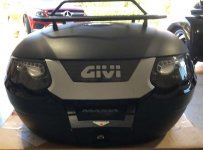
As some of you may recall, I kind of think outside the box when modifying things. Well, this new challenge is no different. I recently acquired a GIVI 55L top case in order to have more lockable storage on my bikes for some longer rides I am planning. GIVI makes kits for adding lights but only for adding running lights and brake lights. So, my new challenge is to add running lights, brake lights, turn signals and an interior dome light in the event I get stuck needing to peer inside after dark. I am doing this all with Oznium LEDs and it IS going to present a challenge. The first hurdle to overcome was in finding a small 6-pin connector that would allow for all the lights plus a ground that would also be easy release enough to make it so one part is mounted in the bottom of the box and the other part in the rack. Then because I may use this set-up on one of two bikes, I am wiring the part from the bikes to the rack with a different 6-pin waterproof connector that will allow me to switch the rack and therefore the top case from bike to bike with only maybe 15 minutes of work.
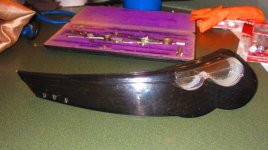
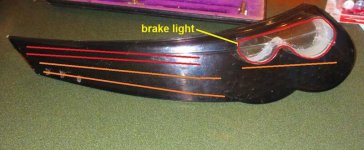
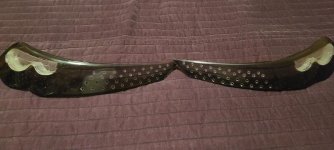
You see the lens on either side only has room for lights underneath (between the lens and lid structure) in the area around the clear part seen in the pictures. The rest of it around to the sides only has about 3mm clearance; not enough to install the traditional LED strips. So, I visited with the folks at Oznium a bit and found out they are now making thinner strips but those would still be just slightly too thick. They informed me some folks have run into a similar dilemma and drilled holes at the right spacing to allow each LED on the strip to seat in the plastic leaving only about 1mm of the strip to contend with in a limited space like I have.
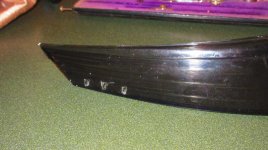
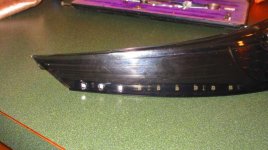
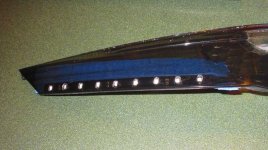
The LEDs on their super thin strips are 17mm apart so I’m carefully marking off the location of each one and drilling an oval with my trusty Dremel tool then squaring up the corners with an Exacto knife. It’s gonna take some time but this is the kind of stuff I love to do.
In these first pictures of just the lens, you can see where the holes are being drilled and one with the first three in place. By the time this is all done, I will have running lights where you see the red lines and turn signals where there are amber lines. The one exception is the red side emitting LEDs behind the clear part of the lens will be wired into the brake circuit and the amber strip under that will be shining through the lens instead of drilling holes as there is plenty of room there for the other style strips. The holes will be made waterproof using E6000 clear crafting cement.
Lastly, the “dome light” will be wired as always hot but I will install a micro switch that only allows it to be on when the lid is open.
WISH ME LUCK!
Since this isn't really Spyder related I'm putting it here, but this could still be done for those adding an after-market top case to their Spyder.
As some of you may recall, I kind of think outside the box when modifying things. Well, this new challenge is no different. I recently acquired a GIVI 55L top case in order to have more lockable storage on my bikes for some longer rides I am planning. GIVI makes kits for adding lights but only for adding running lights and brake lights. So, my new challenge is to add running lights, brake lights, turn signals and an interior dome light in the event I get stuck needing to peer inside after dark. I am doing this all with Oznium LEDs and it IS going to present a challenge. The first hurdle to overcome was in finding a small 6-pin connector that would allow for all the lights plus a ground that would also be easy release enough to make it so one part is mounted in the bottom of the box and the other part in the rack. Then because I may use this set-up on one of two bikes, I am wiring the part from the bikes to the rack with a different 6-pin waterproof connector that will allow me to switch the rack and therefore the top case from bike to bike with only maybe 15 minutes of work.
You see the lens on either side only has room for lights underneath (between the lens and lid structure) in the area around the clear part seen in the pictures. The rest of it around to the sides only has about 3mm clearance; not enough to install the traditional LED strips. So, I visited with the folks at Oznium a bit and found out they are now making thinner strips but those would still be just slightly too thick. They informed me some folks have run into a similar dilemma and drilled holes at the right spacing to allow each LED on the strip to seat in the plastic leaving only about 1mm of the strip to contend with in a limited space like I have.
The LEDs on their super thin strips are 17mm apart so I’m carefully marking off the location of each one and drilling an oval with my trusty Dremel tool then squaring up the corners with an Exacto knife. It’s gonna take some time but this is the kind of stuff I love to do.
In these first pictures of just the lens, you can see where the holes are being drilled and one with the first three in place. By the time this is all done, I will have running lights where you see the red lines and turn signals where there are amber lines. The one exception is the red side emitting LEDs behind the clear part of the lens will be wired into the brake circuit and the amber strip under that will be shining through the lens instead of drilling holes as there is plenty of room there for the other style strips. The holes will be made waterproof using E6000 clear crafting cement.
Lastly, the “dome light” will be wired as always hot but I will install a micro switch that only allows it to be on when the lid is open.
WISH ME LUCK!